


What Should You Do When iTunes Playlist Not Syncing: Easy and Fast
“Error -5000/-69/13010/13014” “Playlists and songs cannot be synced” The above are the most common warning phrases that you will see on your screen when you encounter this issue - iTunes playlist not syncing.
Have you ever been to this situation? You really wanted to transfer and copy all those songs in your iTunes playlists (to another device) but you cannot proceed because the above notifications keep on showing.
This only means that the syncing or copying of songs under the playlists you had chosen won’t work as normal as you expect.
With the above scenario, you must look into alternatives that you can apply in order to fix and resolve the issue. This is why this article was created.
We will be imparting all those solutions possible that would surely benefit you and finally allow you to solve the problem you have with iTunes playlist not syncing on your device.
Contents Guide Part 1: How Do I Sync Playlist in iTunes?Part 2: How Do I Sync Playlists Using Professional Software ApplicationsPart 3: To Sum It All
Part 1: How Do I Sync Playlist in iTunes?
This article will tackle the solutions to the issue under two major clauses - the general or most used solutions and the utilization of professional software applications. The first type of solution to the iTunes playlist not syncing which we are about to discuss is the most common or general option.
Here, we will share numerous alternatives for you. The decision would be yours in case you wanted to try all options below or choose one or two to test. Let us start the discussion with the first one.
Solution #1. Updating The iTunes Application On Your Devices
The first method that you can try is to update the iTunes application on the devices you are using. The issue of iTunes playlist not syncing may be due to the version of the iTunes application you are using. Here is how you can do the updating of the application on your Mac or Windows computer.
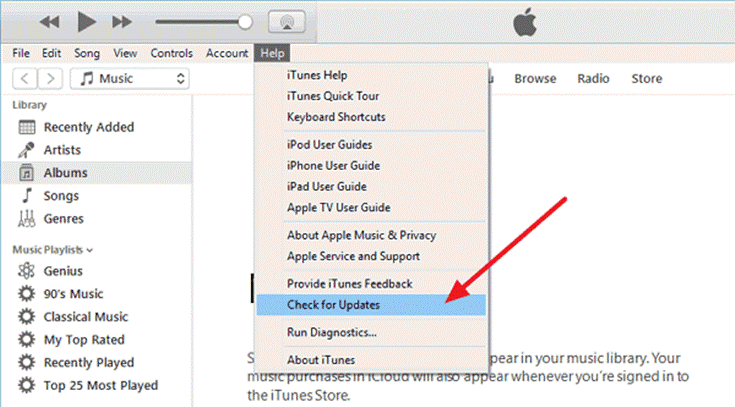
- You need to launch or open the iTunes application on your personal computer.
- In the main interface, if you are using a Mac computer, you need to click the “iTunes” button at the top portion. In case you are doing this on your Windows computer, you need to hit “Help” from the options in the top area of the screen.
- You will be seeing new options on the screen. Choose “Check for Updates”.
- A notification will be seen on the screen in case a newer version of the iTunes application is available for download and installation. You just need to follow the updating process to continue.
Solution #2. Updating Your iPhone Or iPad’s iOS
Are you using iTunes on your iPhone or iPad? If you do and you happen to encounter the same issue when iTunes playlist not syncing, you might need to consider checking in case updates are readily available for your device’s software. In order for you to review this, the below guide must be followed.
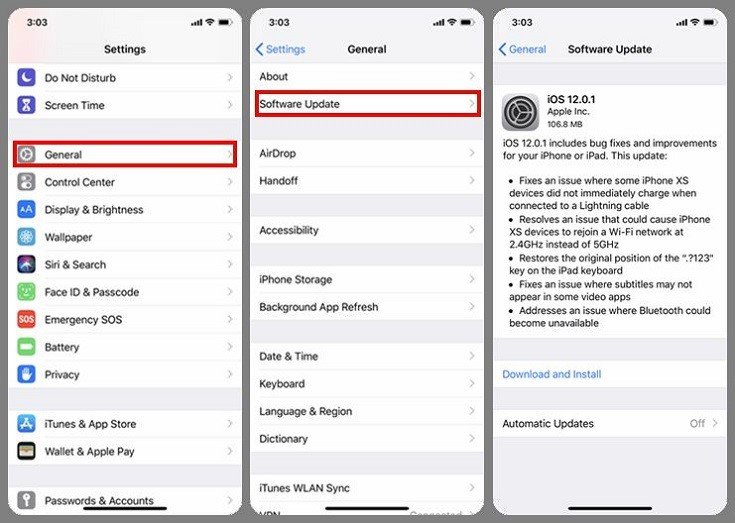
- Go to your iPhone or iPad’s “Settings” option.
- From there, look for the “General” menu then hit “Software Update”.
- If you happen to see an available update for your software, you just need to click the “Download and Install” option.
- As you do the process, you need to ensure that the device is connected to a stable internet connection. The update will last for some time depending on how strong your data connection is.
- After the update has been completed, you will be asked to enter your device’s password to continue. Just do as required.
- After you have completed the steps mentioned, you may now need to check if this way works. Perform the syncing of the desired iTunes playlist and see if the issue would be encountered again.
Solution #3. Perform The Consolidation of iTunes Library Files
The third option which you can try is the consolidation of iTunes library files. There are instances that the files which are saved in several different iTunes libraries often cause iTunes playlist not syncing. If you are wondering about the procedure of consolidating, you can refer below.
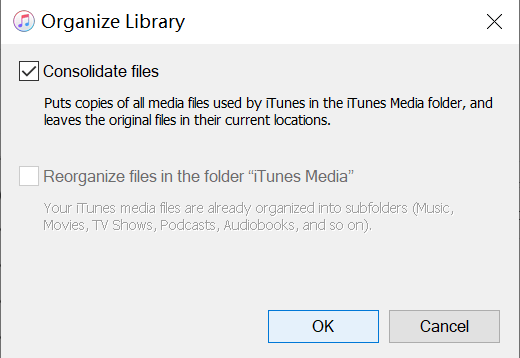
- Head to the “File” button and look for the “Library” option from the list available. Make sure to tick it.
- Now, you need to hit the “Organize Library” button and ensure that the “Consolidate Files” option has been enabled. After doing so, you need to hit the “OK” button.
Solution #4. Review Your Mac Or Windows Computer’s Security Software
Your personal computer’s security software could also be one reason why the syncing of iTunes playlists could not be successful. Sometimes, your device’s security software is blocking or hindering the syncing process.
You can do the below preparation.
- Make sure that date and time has been set correctly
- You may need to sign in to your iTunes account using the needed credentials.
- Check your security software if it is under the latest version.
- If there is a software update, then do the steps needed to update.
If it happens that the same issue reoccurs, you may need to uninstall the security software your device is currently using. After completing the syncing process, you can just re-install the security software.
Solution #5. Check The Connectivity Between The Devices
Sometimes, the failure in syncing your iTunes playlists could be due to the connection between the devices you are using. Keep in mind that below two must always be considered.
- You need to ensure that the host files are not preventing the iTunes application from communicating with any Apple servers.
- The connectivity to the internet connection of both devices you are using must also be checked. You need to take note that both should be under the same network for successful syncing of playlists.
Solution #6. Check Your iTunes Match
If you are using the latest version of iOS, then you might have encountered “iTunes match”. In case you have enabled this feature on your device, this will prevent you from achieving a successful syncing process between your handy device and personal computer. You must disable this feature before doing the syncing procedure. In order for you to do so, you just need to head to your device “Settings” icon and scroll or look down until you see the “Music” button. By then, you can do the disabling process.
Solution #7. Manual Copying Of Songs
This solution could be workable and effective. The manual copying of songs from your iTunes playlists or one by one method will help you copy the songs from one device to another. However, this method could be tiring and time-consuming. This could be the last resort in the above six items that won’t really work.
Solution #8. Turning Your iCloud Music Library On
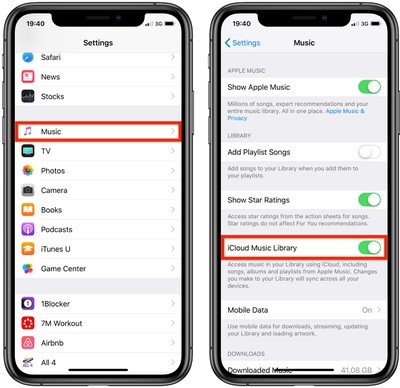
Another option you can do is to turn your iCloud Music library on. If this has been off on your device, then syncing won’t really be possible. In order to do so, you can just go to your device’ “Settings” button and look for the “Music” option from the list. You will see the “iCloud Music Library” there. You would need to ensure that the button must be toggled in order to enable it or turn on.
Now that we learn all the basic or the general (most common) solutions to the issue, we will now head to the presentation of the software applications which you can use.
Part 2: How Do I Sync Playlists Using Professional Software Applications
In case the syncing process is still a mess and you have been so frustrated that you wanted everything to be completed, then the answer is the use of professional software applications. In this part, we will show you two third-party tools that can help to solve iTunes Playlist Not Syncing beginning with DumpMedia Apple Music Converter.
DumpMedia Apple Music Converter
The first tool which you can use is this DumpMedia Apple Music Converter. You can have this downloaded from its official website.
What does it do?
- DumpMedia Apple Music Converter is capable of downloading the songs under the iTunes playlists you love. If you are aware that the songs are under the Digital Rights Management protection, you might find it difficult to look for a tool with the ability to remove this. Well, DumpMedia Apple Music Converter, can do it for you. After removal, you can smoothly proceed with the downloading without worrying anything.
- Conversion is possible as well. The tool has the capability to transform the songs from one format to another. This supports numerous formats. In case you are curious to see the list, you can check it out here.
- The conversion and downloading process are too fast. You can expect that the output would be ready after only some minutes. This has faster speed compared to other tools you will see on the web.
- Compatibility is not an issue with DumpMedia Apple Music Converter. This works well with both Mac and Windows computers.
- The interface is too easy to handle and you can perform all processes smoothly even without following a guide. But just in case you need one, you can always visit the official site for your reference.
With the use of this DumpMedia Apple Music Converter, you could be able to get all the songs in the iTunes playlists you love. You also can remove the playlist of iTunes Playlist to Spotify easily. No need for syncing because you can save all songs to the device using a USB cable or a professional transfer software application.
iSkysoft Transfer
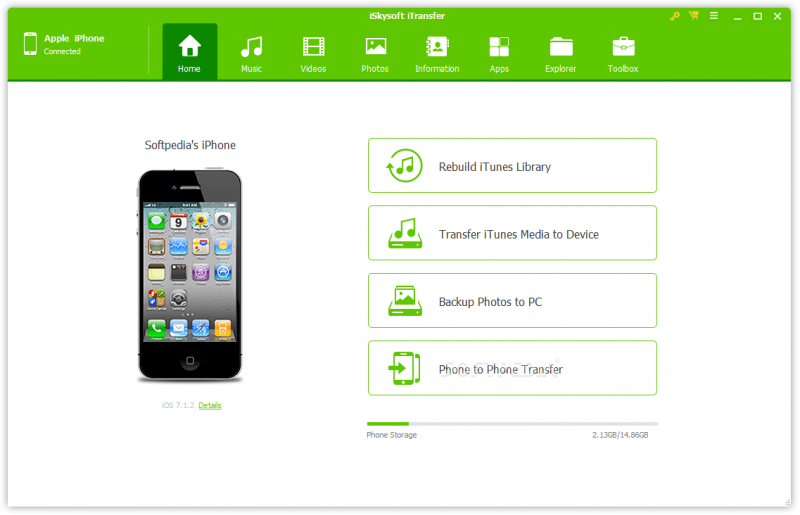
Apart from DumpMedia Apple Music Converter, you can also try iSkysoft Transfer. In case you are still facing the syncing issue, you can rely on this tool. Apart from being able to transfer songs, you can also process voice memos in this application. And, in order to do so, you just need to follow only the simple steps stated below.
- Have the iSkysoft Transfer downloaded, saved, and installed on the personal computer you are using. Make sure that your iPhone has been connected to your computer using a USB cable.
- Now, launch the application to arrive at the main interface. You must see your iPhone on the screen (to check if the connection has been successfully done).
- On the top area of the screen, there are some menu options. You must hit the “Music” button. Upon doing so, you will be able to see all those playlists on the right side of the page.
- By looking at the left panel, you will be noticing that there are a number of options available. You can either do the modification, editing, copying of existing playlists, or even creation of a new one. You can add new playlists from your device to your computer or vice versa.
- Now, you have the option to copy all those iTunes playlists you love from your iPhone to your personal computer or only choose some songs to copy and save on a new playlist created.
Part 3: To Sum It All
Syncing your favorite iTunes playlists to another device is no longer an issue nowadays. Yes! You read that right. You can actually use a bunch of options - either those falling under the general or most common ones or those professional software applications which you can see in the web.
Keep in mind that in choosing which alternative to use, you must be very keen, and you must look into every detail in order to arrive at the best tool to utilize.
In case you still got other things in mind, you can always share all those in the section below. Sharing is caring!

30% Off >>>