


How to Create Apple Music Collaborative Playlist 2026
Alongside iTunes and Spotify, Apple Music has been known as one of the most used, most popular most reliable, and amazing music streaming applications or services in town. Having subscribed to Apple Music lets one listen to millions of trendy and favorite songs anytime and anywhere they want to.
Apple Music has been too flexible as it allows users to create playlists of their choice. Classifying songs based on their features would always be great, right? In this post, we are to share the procedure you must create and share an Apple Music collaborative playlist.
If you are in the look for a way you can accomplish such, you are lucky enough to have seen this article.
If you haven’t encountered Apple Music yet, and you are not yet subscribed or registered, it is great that you will learn some information about this in the first part of this post.
Contents Guide Part 1: What Is Apple Music Collaborative Playlist?Part 2: How to Create Apple Music Collaborative PlaylistsPart 3: How to Share Apple Music Collaborative PlaylistsPart 4: How to Stop Apple Music Playlist CollaborationPart 5: How to Transform Apple Music for Offline PlaybackPart 6: In Summary
Part 1: What Is Apple Music Collaborative Playlist?
Apple Music is one of the best music streaming services ever introduced to the public. It allows users to create collaborative playlists. An Apple Music collaborative playlist is a shared playlist on Apple Music that multiple people can contribute to.
Users can invite friends to collaborate on a playlist, and once accepted, they can add songs to the playlist or remove them. Collaborative playlists are a great way to share music with others and create a collective listening experience.
Collaborating on Apple Music playlists can increase engagement and enjoyment of music, as well as discover new songs and artists. Additionally, collaborative playlists can foster connections and discussions among users. They can be a fun and creative way to share and discover music with friends or colleagues.
Part 2: How to Create Apple Music Collaborative Playlists
As mentioned in the introduction of this post, Apple Music lets one create a playlist based on their preferences. To start a collaborative playlist, there are two steps. First, you need to create a playlist and then collaborate on this playlist. Below, we will explain to you in two steps how to create an Apple Music collaborative playlist. Here is a detailed guide for you.
Step 1. Creating The Collaborative Playlist
The creation of a collaborative playlist is effortless, you just need to follow three easy steps.
- To begin the process, the first thing that you must do is to ensure that you open and launch your Apple Music on your device.
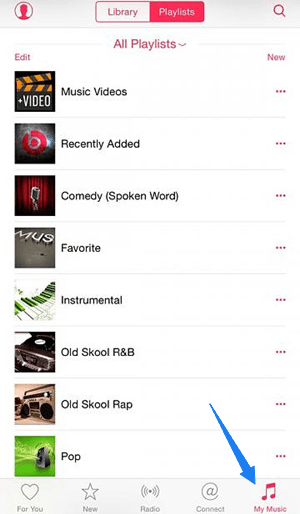
- The next thing would be heading to the “My Music” option. Once ticked, you will see “Recently Added Playlists”, the “Apple Music Playlists” you are following, “My Playlists” which are playlists you have created, and the “Show Music Available Offline” option which lets you see the songs you have saved and downloaded on your gadget.
- Lastly, the last step you need to accomplish is to head to the “New” button which is located at the top right corner of your screen to create a playlist. You can customize its name depending on your preference as well as the description and image you will set.
Step 2. Adding Songs To The Created Playlist
Now that you are done creating your newest playlist, the next thing you would do is to have the songs added to it. You can have this done by following either the first or second option.
- Just head to the playlist you just created and make sure to hit the green button to be able to easily add your favorite songs to your playlist.
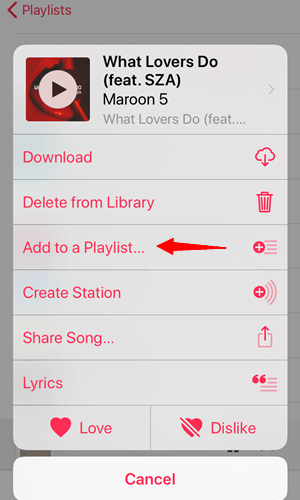
- The next option which you can make use of as well is to look or browse for the songs you want to be added to your playlist and click the three-dot icon you will see alongside it.
Once done, you will see new options wherein you would need to tap the “Add to a Playlist...”. Now, a new song is added to your playlist!
Now that you already know how to create your Apple Music collaborative playlist, you can also try the procedure on how you can share it with your friends or family members. Check out the next part to find out how.
Part 3: How to Share Apple Music Collaborative Playlists
After following the above guide, you have created an Apple Music collaborative playlist successfully! The Apple Music collaborative playlist that you created can be shared with anyone you want to! Ever wondered about reasons for not being able to share playlists and how to deal with that?
You can share the invite link to your playlist via AirDrop, Messages, SharePlay, and other options. You can also choose to invite people to this collaborative playlist on Apple Music via a QR code.
Here are also some readings for you.To share Apple Music collaborative playlists, you would just need to accomplish two easy steps.
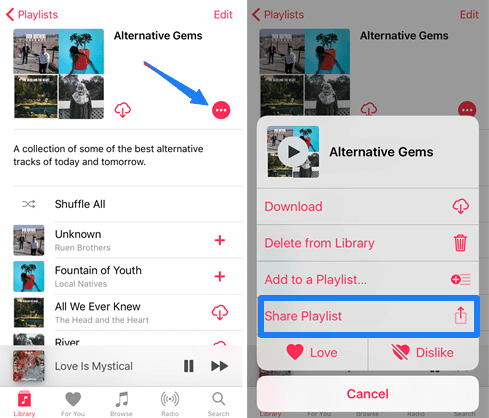
- You need to head to the playlist you wanted to share with someone and hit the three-dot icon you will be seeing at the right part of this.
- Once done, you will see options pop up on the screen and you will need to choose “Share Playlist” among the choices given.
- A new window will show up and you will be given the possible options wherein you can share the playlists – which could be via messaging applications or social media accounts.
It is great that you know how to create your own Apple Music collaborative playlist and even share it with your friends and loved ones. Now, we just wanted to share additional information that could probably help you in the future.
Have you ever experienced the need to play Apple Music songs on your other gadgets and devices but can’t do such due to the DRM protection the songs have?
Well, the answer to that is to use a tool capable of removing the DRM protection and letting you convert the songs to any format you desire and eventually have those played in any player you have.
Tip: You can also create and share on your YouTube. For more detailed information you should read this article from Google Support.
Part 4: How to Stop Apple Music Playlist Collaboration
If someday you want to end the Apple Music playlist collaboration, you could also choose to turn off this function. To stop collaborations on an Apple Music playlist, you can follow these steps:
- Open the Apple Music app on your device.
- Tap on the playlist you want to collaborate on.
- Tap on the collaboration icon in the top-right corner of the screen.
- Choose "End collaboration" when you're prompted. For you, limit collaborations use the settings menu.
Keep in mind that after you end the collaboration, any changes someone else made to the playlist while collaborating will remain on your device. If you want to keep your playlist as it was, you may need to remove their changes manually.
Part 5: How to Transform Apple Music for Offline Playback
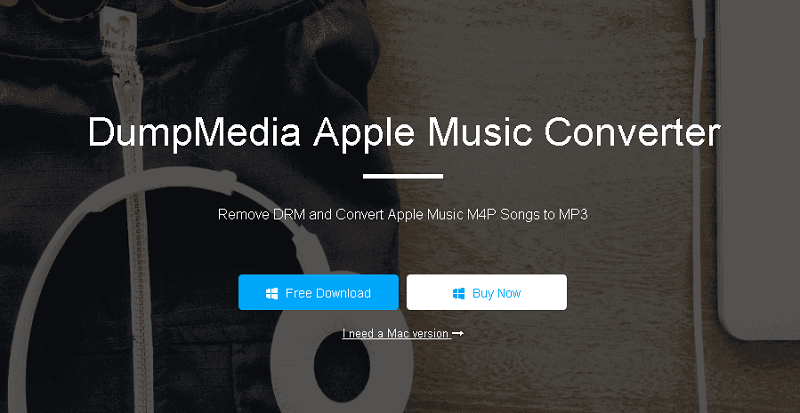
As previously mentioned, if you are looking for an amazing tool to transform your Apple music songs making it highly playable on other devices, DumpMedia Apple Music Converter is the solution.
DumpMedia, being a great tool offering video and audio converters, has been a great help for many users nowadays. Aside from having amazing video/audio converting features, a Spotify Music Converter, and a video downloader.
It also has an Apple Music Converter which lets you convert your favorite music to MP3 format or any other formats you desire to be highly playable in any media player!
This tool is capable of removing DRM protection and allows you to convert songs to thousands of available formats. It even lets you listen to Apple Music songs offline, and even keep your songs running although your subscription has ended! Great, right?
Let us now take a look at how we can use this DumpMedia Apple Music Converter as a tool for easy download of any Apple Music songs and how it can aid in the removal of DRM protection of Apple music files the fastest way possible.
Note: Before performing the steps that are highlighted below, you would need to make sure that the Apple Music songs you ought to convert have been added to your iTunes library application.
- Download and install DumpMedia Apple Music Converter.
- Perform adjustments on the settings of the resulting output.
- Tick the convert button to begin the process.
Let us look into these steps in detail.
Step 1: Download And Install DumpMedia Apple Music Converter
Of course, we need to ensure that the DumpMedia Apple Music Converter has been downloaded and installed on your personal computer. Once installed, open and launch the program. Once the program has been launched, iTunes will also be activated. No need to worry about this and just proceed with the process.
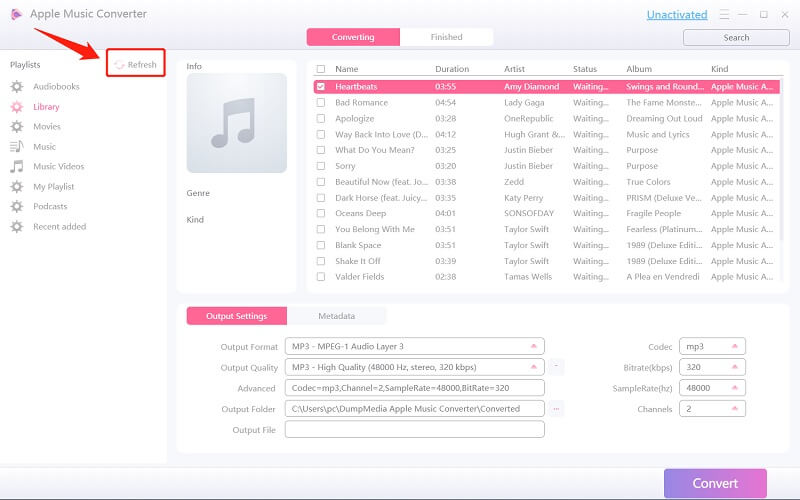
Under the “Library” menu, tick “Music” and you will now see all the songs stored in your iTunes library.

To be able to choose the songs to be downloaded and converted, you can either tick the checkboxes right next to each song or make use of the search bar to easily find the songs you want to be downloaded.
Step 2: Perform Adjustments On The Settings Of The Resulting Output
The next step that should be done is to perform the adjustments on the settings of the resulting output. You can choose any format from those that would be listed.
The application supports many DRM-free formats including MP3. This as well supports those in AC3, M4A, M4R, AIFF, FLAC, AU, and even MKA format.
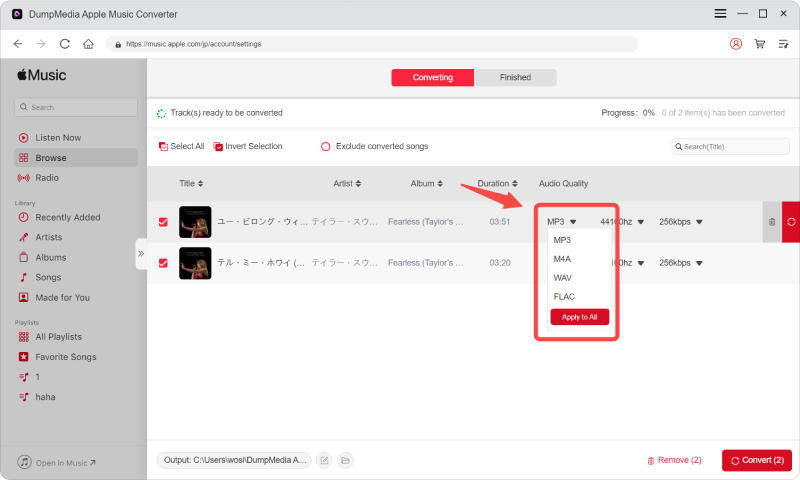
Selecting MP3 among these will do as this format is one supported by almost all devices and media players.
The tool will also allow you to change other options such as the bit rate and sample rate. You can also perform the renaming of the resulting file.
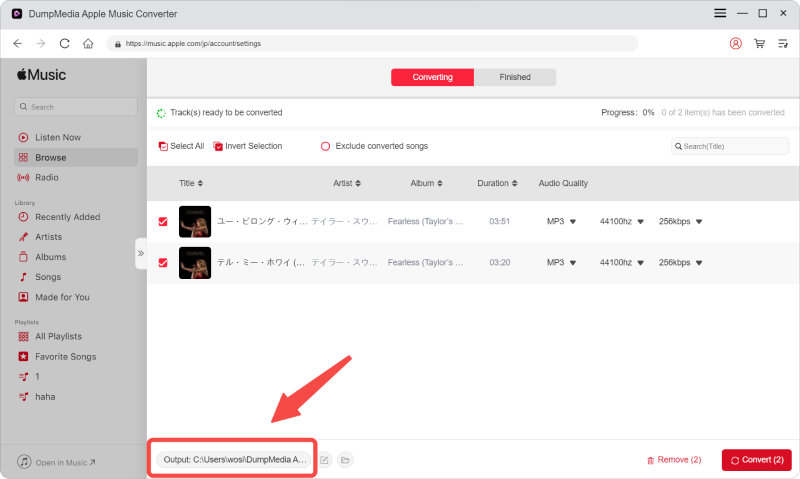
In this step, you would also need to specify the output path or the target location wherein the song or music will be saved.
Step 3: Tick The Convert Button To Begin The Process
Upon completing all the adjustments wanted for personalization or customization, the final step would now be the conversion process. You can just hit the “Convert” button which is located at the bottom right corner of the screen.

After a few minutes, your songs will now be converted and finally downloaded. You can now enjoy the songs on your Apple Music collaborative playlist anytime you want to!
In addition to this, alongside conversion, DRM protection will also be removed at the same time the file is transformed.
Tip: If you need to import the Apple Music playlist to Spotify, go there right away.
Part 6: In Summary
This post discussed two important points – the procedure you can follow to create Apple Music collaborative playlists and how you can share those with your friends and even family members.
In addition to that, an amazing tool capable of transforming Apple Music songs and aiding in the removal of DRM protection has been highlighted in this post – the DumpMedia Apple Music Converter.
What are your thoughts about this? Can you share other information and experiences related to this? How about concerns and queries? Leave it all in the comment section below!

30% Off >>>