


How to Sync Music to iPhone Losslessly [2025 Ultimate Guide]
Nowadays, there are a lot of issues being encountered by Apple users when you play and sync music especially on handy devices like the iPhone.
Unlike Android devices, it is much difficult and harder to add music to iPhones because Apple has its own ways. And, we are to discuss those ways which will help you sync music to iPhone !
In this article, we are to deal with three awesome and effective methods which would definitely help you out. Let us begin with the first one.
Contents GuidePart 1: How to Sync Music to iPhone from Computer Using Finder or iTunesPart 2: How to Sync Music to iPhone from Computer Without Using USB CablePart 3: How to Sync Music to iPhone from Computer Using a Professional ApplicationPart 4: Tip - What if You Are Subscribed to Apple Music?Part 5: Conclusion
Part 1: How to Sync Music to iPhone from Computer Using Finder or iTunes
Both Finder and iTunes have been distinguished as some of the best applications which are totally helping Apple devices’ users a lot. Not only capable of syncing music, but both also can play a great role even in syncing and transferring other media files such as videos, movies, photos, and even your contacts.
If you are a macOS Catalina user, it is advisable to use Finder to transfer your files to your iPhone gadget. But, if you are a macOS Mojave or earlier or a Windows computer user, it would be best to use iTunes.
What is the Difference Between macOS Catalina and macOS Mojave?
Actually, there is not much difference between the two. macOS Catalina or macOS 10.15 is considered to be the new and advanced OS for Mac computers. Offering both small and major improvements, macOS Catalina can also be referred to as a better version of macOS Mojave.
Here is a highlight of the comparison between the two.
- Compatibility – In terms of being able to run the older versions, macOS Mojave is much capable.
- 32 Bits App Support – macOS Catalina will not support any software with 32-bit architecture since this one is designed to support those 64 bits. The update opens the door to a lot more access to storage and improved performance.
- Use of iTunes – In macOS Catalina, this will still function but will be separated into three new applications. If you decided to move to use macOS Catalina, your music will be store to Apple Music, your movies to Apple TV, and another application for podcasts.
- Security – In terms of security, of course, macOS Catalina is an improved version that introduced the “Activation Lock” which gives the owner the only right to erase and reactivate his Mac computer.
And, to be able to sync music to iPhone, you must follow the below simple and easy steps.
#1: Syncing With Finder
Step 1: Just make sure to open Finder on your device once the iPhone has been connected using a USB cable.
Step 2: Once connected, you will be seeing your device on the left side of the Finder window. Make sure to click your gadget. A new window will ask if you will trust the device, just tick “Trust ”.
Step 3: From the window that will open, click “Music ” and you are to be asked the type of music to sync. Ensure to check the “Sync music onto… ” menu. You got the option to choose whether to sync the whole or entire music library or selected items only.
Step 4: Once done with above, just click the “Apply ” button which is located at the lower portion of the screen. Syncing will automatically begin. If not, just head to the Sync button and tick it.
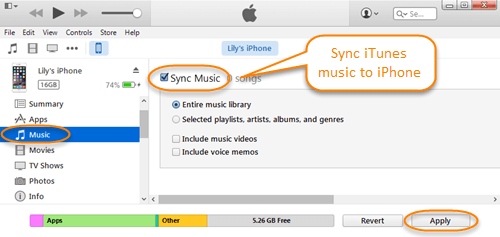
#2: Syncing With iTunes
Step 1 : To begin with, make sure that your iPhone is connected to your computer using your USB cable. Once everything is fixed, open your iTunes application.
Step 2 : In the upper left corner of the screen, you will be seeing an icon for your iPhone. Tick this icon.
Step 3 : Once done, on the left side, tick the “Music” button. Same with Finder, you also can select whether to sync the entire music library or selected songs only.
Step 4 : Just tick on the “Apply” button found at the lower part of the screen as well to proceed. Same with Finder, syncing will automatically begin. If not, just head to the Sync button and tick it.
Part 2: How to Sync Music to iPhone from Computer Without Using USB Cable
Yes, aside from having iTunes and Finder, you can also make use of an application that is capable of syncing music or songs without the need to connect your iPhone on your computer using a USB cable.
The best way to do it is by using an application named AirMore. In using this program, you can be able to sync music efficiently.
Here is how you can do to sync music to iPhone using AirMore.
Step 1: In your iPhone device, download and install this AirMore application.
Step 2: In your computer, head to AirMore’s website. On the screen, you will be seeing a QR code. Using your application on your iPhone, scan the code to connect.
Step 3: Head back to the website and tick the “Music ” icon on the left portion of the screen
Step 4: In the upper are, tick the “Import” button and you will be asked to choose whether to upload a number of songs or a folder. Just choose the files to be moved.
Step 5: Once songs have been transferred, you will automatically see the music on your application.
Aside from the capability to sync music, this application also allows transferring even videos, documents, and pictures. Just make sure that both your iPhone and computer use the same WiFi connection for a successful transfer.
Part 3: How to Sync Music to iPhone from Computer Using a Professional Application
Aside from the previously mentioned methods to deal with music syncing to iPhone, another way to do it is by using a professional software application. One of the best is this ApowerManager. If you are having a hard time using either Finder or iTunes, this could be an option for you.
Here is how you can do to sync music to iPhone using ApowerManager.
Step 1: Of course, there is a need to ensure that ApowerManager has been installed and downloaded on your personal computer.
Step 2: Once installed, launch and run the program to finally begin. Make sure that your iPhone is connected to your personal computer.
Step 3: Once you arrived at the screen of the application, tick the “Manage ” button at the upper portion of the screen. In the “Music” tab, hit the “Import” option to be able to select which songs to transfer. Once selected, just click “Open” to transfer.
In just three easy steps, you can have all your most loved songs synced on your iPhone device.
Part 4: Tip - What if You Are Subscribed to Apple Music?
One concern arising for some is what if they wanted to transfer songs from Apple Music? The challenge would be the inability to play on non-authorized iPhone devices due to DRM.
Well, the answer to this question would convert your Apple Music to MP3 which is a DRM-free format. But, how are you going to do it?
To solve this issue, DumpMedia had offered an extra amazing way.
DumpMedia, being a great tool offering video and audio converters, has been a great help for many users nowadays. Aside from having amazing video/audio converting features, it also has an Apple Music Converter which lets you convert your favorite and most loved music to MP3 format to be highly playable in any media player!
This tool is capable of removing DRM protection and allows you to convert songs to thousands of available formats. It even lets you listen to Apple Music songs offline, and even keep your songs running although your subscription has ended! Great, right?
Well, here is how you can proceed with Apple Music to MP3 conversion using this DumpMedia Apple Music Converter.
- Download and install DumpMedia Apple Music Converter.
- Select the desired output format.
- Tick the convert button to begin the process.
Let us look into the steps in detail.
Download and Install DumpMedia Apple Music Converter
Of course, we need to ensure that DumpMedia Apple Music Converter has been downloaded and installed on your personal computer. Once installed, open and launch the program. Under the “Library ” menu, tick “Music ” and select the desired file to be converted to MP3.
Select the Desired Output Format
Once a music file has been selected, head to the “Output Format ” section which you will see at the bottom portion of the screen. Make sure to choose MP3 among the selections that would be listed. Other than this, you can also choose the bit rate or even rename the file if you prefer to.
Tick the Convert Button to Begin the Process
Upon finishing above, just proceed and click the “Convert ” button to finally begin the conversion process.

Part 5: Conclusion
Three awesome ways on how to sync music to iPhone device were presented in this article. Each, of course, can solve your dilemma. Having unique features and advantages over the other, each of the tools and methods would absolutely be beneficial for you.
Aside from those, an amazing tool, the DumpMedia Apple Music Converter, was also presented in the latter part of the post. This one has been proven to function effectively in converting your apple music!
Got any other suggestions? Let us know by leaving your comments below!

30% Off >>>