


If You Cancel Apple Music Do You Keep the Songs? Keep Apple Music Forever
If you're a music lover who enjoys amazing songs from artists worldwide, you're probably using a music streaming service like Apple Music. Are you a premium or free user? Premium users pay a monthly fee. If you are a premium user, have you considered whether you will keep your songs if you cancel Apple Music?
The monthly fee may not be too much for users who are addicted to good music. As a subscriber, you can download your favorite playlists and albums and listen to them even without an internet connection.
When you cancel your Apple Music subscription, your songs will disappear. This means that all the benefits of being a premium user will also vanish, and you will become a free user.
Keep reading to find out how to keep your music even after canceling your subscription. This post will assist with the above.
Contents Guide Part 1: What Happens if You Cancel Apple Music Subscription?Part 2: How to Cancel Your Apple Music SubscriptionPart 3: How to Keep Songs After Canceling Apple Music Subscription?Part 4: To Sum It All
Part 1: What Happens if You Cancel Apple Music Subscription?
With an Apple Music subscription, you can enjoy a range of benefits, you can access and stream millions of songs from the Apple Music catalog, including playlists, albums, and individual tracks. You have the option to download songs and playlists for offline listening, which is great for situations where you may not have an internet connection.
Apple Music uses algorithms to provide personalized playlists and recommendations based on your music preferences and listening habits. So you have your personalized recommendations. You also have access to exclusive content such as music releases, live radio shows, and original content produced by Apple Music with ads.
However, if you canceled your subscription to Apple Music or iTunes Match, your music library is removed on all of your devices except for the device your music library is stored on. Any music, including playlists, that you added or downloaded from the Apple Music catalog is also removed.
Part 2: How to Cancel Your Apple Music Subscription
If you are thinking about canceling your Apple Music subscription while keeping the songs downloaded, you should know well how to cancel it correctly. In this part of the post, we will be giving you a brief tutorial on how you can do it basically if you are using an iPhone, an Android phone, or even a personal computer.
How to Cancel Apple Music Subscription Via iPhone
Method 1. Using The Apple Music Application to Cancel Subscription
Canceling your Apple Music subscription using your iPhone is very easy to perform. The same process can be followed in case you are using an iPad. Here are the steps to be done.
- Launch your music application on your iPhone device and head to the “For You” option which you will see at the bottom part.
- You will see your “Profile” icon at the top right part of your screen. Click it.
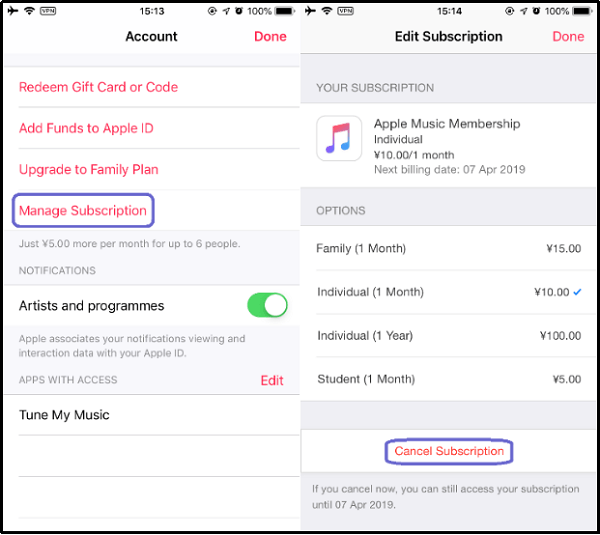
- There would be new options displayed. Hit the “Manage Subscription ” button to proceed.
- The “Cancel Subscription ” option will just be seen at the bottom part of your phone’s screen. By confirming, you are agreeing to cancel your subscription.
Method 2. Using Your iPhone Settings
If you are worried because you do not have the application running on your iPhone anymore, you can do the below steps instead.
- Go to your iPhone’s settings.
- Head to your profile picture followed by going to “iTunes & App Store ”. Tick “Apple ID”, “View Apple ID”, “Subscription”, then “Apple Music”.
- Now, you can just click the “Cancel Subscription” button to finish.
How to Cancel Apple Music Subscription Via Personal Computer
Using your iTunes application on your Windows or Mac computer when canceling your Apple Music subscription is very simple as well. The below must be completed.
- Open your iTunes application.
- Hit the “Account” button at the top area of the screen. From the new options shown, click the “View My Account ” button.
- Now, you will be asked to enter your Apple ID password and hit the “Sign In” button. You will be arriving at your account page.
- Go down until you see the “Settings ” section. You will be seeing “Subscriptions” on the screen. Hit the “Manage” button alongside it.
- All active subscriptions will be seen. From those, look for “Apple Music Membership ”. At the bottom area, hit the “Cancel Subscription”.
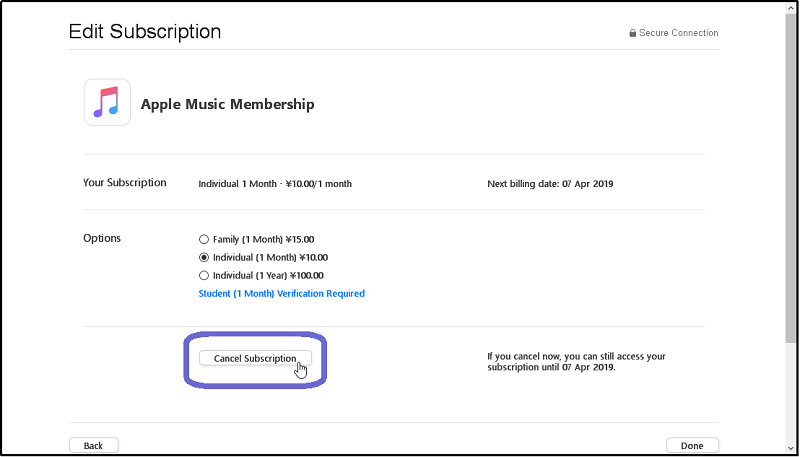
There you have it! After doing the above, your Apple Music subscription will be canceled.
How to Cancel Apple Music Subscription Via Android Phone
Here is the guide that must be followed in case you are listening to Apple music songs using your Android device.
Step #1. Launch your Apple Music application.
Step #2. Once signed in, you will see a three-dot icon at the top right corner of the screen. Click it and hit the “Account Settings” button.
Step #3. From the mentioned option, choose the “Manage Membership” option.
Step #4. Finally, you can just hit the “Cancel Subscription” to complete it.
Now that you have learned how to cancel your Apple Music subscription, we will now be teaching how you can keep the songs downloaded on your device even if you are no longer subscribed to Apple Music.
Part 3: How to Keep Songs After Canceling Apple Music Subscription?
Because Apple Music songs are DRM (Digital Rights Management) protected, many users find it hard to download the songs. The mentioned protection hinders the illegal copying of the content and playing those on unauthorized devices and gadgets. Well, we are fortunate because there are tools ready to solve this problem.
Among the several options you will see on the web, one of the most recommended is this DumpMedia Apple Music Converter. It lets you keep your Apple Music songs despite canceling your subscription.
We’ve created a detailed step-by-step procedure for your reference.
- Download and install the DumpMedia Apple Music Converter.
- Import the Apple Music songs to be downloaded and choose the output format.
- Proceed with conversion and downloading.
We will briefly discuss the above in the next texts.
Step #1. Download And Install The DumpMedia Apple Music Converter
Downloading DumpMedia Apple Music Converter is the first thing that must be completed. This is compatible with both Mac and Windows personal computers. You can have it downloaded from DumpMedia’s official website. Installation can be performed easily since the tool has a friendly interface and navigation is simple.
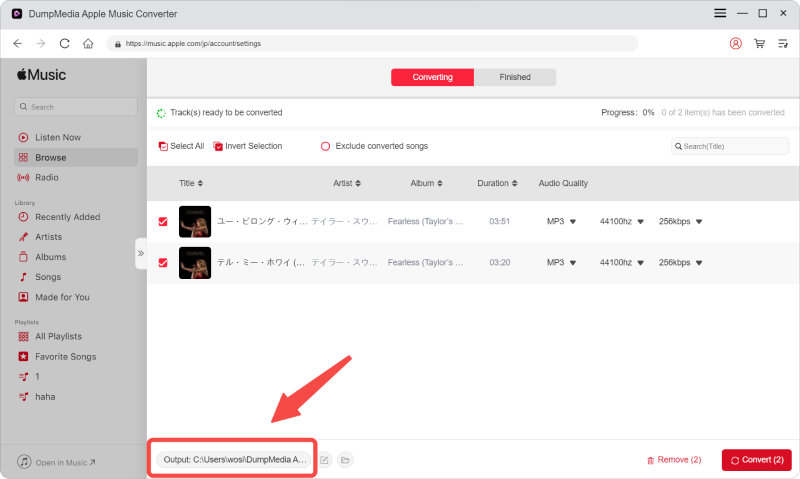
Step #2. Import The Apple Music Songs To Be Downloaded And Choose The Output Format
Now, you need to import the Apple Music songs you wish to download. You can add one song or an album. Batch conversion is supported by this software this is why in a few minutes, you can have the converted files ready.
Once uploaded, you must then choose the output format to be used. There are a lot of selections so make sure to select the format needed. You can adjust output settings as well – the bit rate, sample rate, and more.
Step #3. Proceed With Conversion And Downloading
Once you have set everything right, then you can just simply proceed with downloading and conversion. You can continue by hitting the “Convert ” button at the bottom right corner of the screen. DRM protection is being removed in this process as well.

After doing the above three steps, you will now have the converted Apple Music songs saved on your personal computer (you can also set the output path wherein the transformed file will be saved). Progress bars will be shown on your screen which will help you monitor the status of the conversion process.
By using this amazing tool, though you canceled your Apple Music subscription, streaming of songs is still possible. The only thing you need to do now is just to enjoy and stream offline!
Part 4: To Sum It All
As other users say, subscribing to a premium is somehow disadvantageous as well. Once you feel those drawbacks, you are only left with the option of canceling your Apple Music subscription. Sadly, that will leave you with no songs on your device.
Fortunately, you have this DumpMedia Apple Music Converter ready. You have nothing to worry about keeping Apple Music songs even after canceling your Apple Music subscription. With this tool, you can listen to all downloaded songs anytime you want. The data connection is no longer an issue!
What else are you waiting for? Start with the downloading process now.

30% Off >>>