


How to Remove DRM from iTunes Music in 2026 (What Actually Works)
Many users search for ways to remove DRM from iTunes music so they can enjoy offline playback without restrictions. However, modern Apple Music protection works differently than many people expect. In this guide, we will explain what iTunes DRM actually means, the difference between DRM removal and DRM-free conversion, and the practical way many users save Apple Music songs for flexible offline playback.
Contents Guide Part 1: Can You Remove DRM Protection from iTunes Music?Part 2: Can DumpMedia Remove DRM Protection from iTunes?Part 3: Best Way to Convert Apple Music into DRM-Free FilesPart 4: FAQsPart 5: Conclusion
Part 1: Can You Remove DRM Protection from iTunes Music?
What “iTunes DRM” Actually Means
One of the biggest sources of confusion is that “iTunes DRM” no longer refers to just one thing.
Old Protected AAC Files: In the past, songs purchased through iTunes Store contained DRM restrictions that limited sharing and device playback.
Apple Music DRM: Apple Music uses subscription-based protection rather than permanent ownership. Even downloaded songs require active subscriptions and cannot be transferred freely.
DRM-Free Purchased Songs: Most modern iTunes Store purchases are already DRM-free. These songs can usually be downloaded directly, transferred freely, burned to a CD, and played on multiple devices.
Can You Remove DRM from iTunes Music?
The answer depends on the music source. Many older iTunes songs purchased before 2009 used Apple’s FairPlay DRM protection. These files were called “Protected AAC” files and had playback restrictions. However, most modern iTunes purchases are already DRM-free.
Part 2: Can DumpMedia Remove DRM Protection from iTunes?
This is an important distinction. DumpMedia Apple Music Converter is primarily designed for Apple Music conversion rather than traditional iTunes DRM cracking. In other words, DumpMedia does not directly unlock every historical iTunes-protected file. It focuses on converting Apple Music songs into DRM-free playable audio formats.
This distinction matters because many users searching for ways to remove DRM from iTunes expect direct DRM cracking, while modern solutions are usually based on DRM-free conversion workflows instead.
Part 3: Best Way to Convert Apple Music into DRM-Free Files
If your goal is flexible offline playback, converting Apple Music into standard audio formats is often the easiest solution. DumpMedia Apple Music Converter allows users to convert their Apple Music library into various audio formats, such as MP3, AAC, WAV, and FLAC, for offline playback on any device. Even if the Apple Music app is not working on your device, you can play them on another music player immediately.
Key Features
- Convert Apple Music to MP3, WAV, AAC, and more
- Maintain lossless audio quality
- Batch conversion for playlists and albums
- Save songs permanently on devices
- Transfer files to any device
How to Convert Apple Music to MP3
Step 1. Download and install the software on your computer. It works with both Windows and Mac. The interface is user-friendly, making it easy for beginners.
Step 2. Open the built‑in Apple Music web player inside DumpMedia and log in with your Apple Music account. Browse Apple Music and drag the songs, albums, or playlists you want to download into the converter.

Step 3. In the settings panel, select MP3 as the output format to enable a MP3 download of your selected tracks.
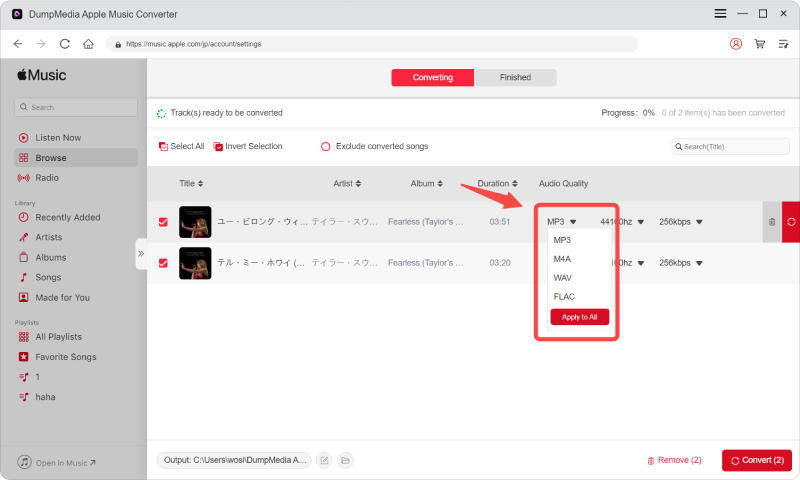
Step 4. Click Convert and download songs directly as MP3 files.

This is the most practical workflow for users looking to remove DRM from iTunes music restrictions.
Part 4: FAQs
Is it legal to remove DRM from iTunes music?
DRM-related laws vary by country and region. In many cases, personal offline use may be tolerated and redistribution is not permitted. Users should always follow local copyright laws and platform terms of service.
Does Apple Music still use DRM?
Yes. Apple Music tracks remain protected and tied to active subscriptions.
Are iTunes purchased songs DRM-free?
Most modern iTunes Store purchases are DRM-free.
Part 5: Conclusion
Understanding how to remove DRM from iTunes music starts with understanding the difference between old iTunes purchases and modern Apple Music subscription content. While traditional DRM removal is less common today, DRM-free conversion remains the most practical solution for users who want flexible offline playback and long-term music access.
*DumpMedia works by decrypting and downloading Apple Music songs into DRM-free files, allowing you to obtain a clean, unrestricted copy of your library for any device. Its functionality does not include the DRM removal of local audio files.

30% Off >>>