


How to Transfer Apple Music to Spotify (3 Working Methods)
If you're searching for how to transfer Apple Music to Spotify, you're likely trying to move your playlists, songs, or entire music library without losing your collection. However, many users quickly realize something frustrating: Apple Music songs don’t transfer directly to Spotify. This guide will show you exactly why and, more importantly, how to solve it using 3 working methods.
Contents Guide Can You Transfer Apple Music to Spotify Directly?Method 1: Convert Apple Music and Upload to Spotify (Best Method)Method 2: Transfer Apple Music to Spotify on Windows and MacMethod 3: Transfer Apple Music to Spotify on MobileFAQsConclusion
Can You Transfer Apple Music to Spotify Directly?
The short answer is no, you cannot directly transfer Apple Music to Spotify. Even if you downloaded songs from Apple Music, they are not standard audio files that Spotify can recognize.
Why Apple Music Cannot Be Transferred to Spotify
The main reason is DRM (Digital Rights Management) protection. Apple Music tracks are encrypted and locked to the Apple ecosystem. So the downloaded files are not accessible as normal MP3 files. Spotify, on the other hand, only supports local audio files (MP3, WAV, AAC). It means that you cannot simply export Apple Music songs and import them into Spotify. This is the biggest barrier when learning how to transfer Apple Music to Spotify.
Method 1: Convert Apple Music and Upload to Spotify (Best Method)
How to transfer Apple Music to Spotify? If you want a 100% working and stable solution, you should convert Apple Music songs into standard formats, then upload them to Spotify. By using a tool like DumpMedia Apple Music Converter, you can bypass DRM restrictions* entirely by converting Apple Music playlists into high-quality MP3, WAV, or AAC files. This approach allows you to store the tracks locally and import them directly into Spotify as local files, ensuring your library remains intact and functional across platforms while maintaining original audio quality.
More Features
- Keep music permanently
- Download entire playlists in batches
- Preserve ID3 tags (artist, album, title)
- Enjoy high-quality audio output
Step-by-Step Guide
How to transfer Apple Music to Spotify? Here are the simple guides to use this DumpMedia Apple Music Converter.
Step 1: Download and install the software on your computer. It works with both Windows and Mac. The interface is user-friendly, making it easy for beginners.
Step 2: Open the built‑in Apple Music web player inside DumpMedia and log in with your Apple Music account. Browse Apple Music and drag the songs, albums, or playlists you want to download into the converter.

Step 3: In the settings panel, select MP3 as the output format to enable a MP3 download of your selected tracks.
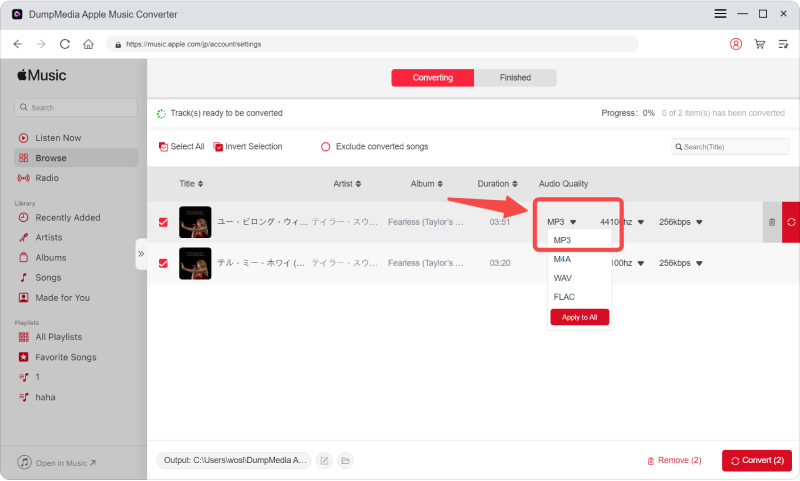
Step 4: Click "Convert" and wait for the process to complete.

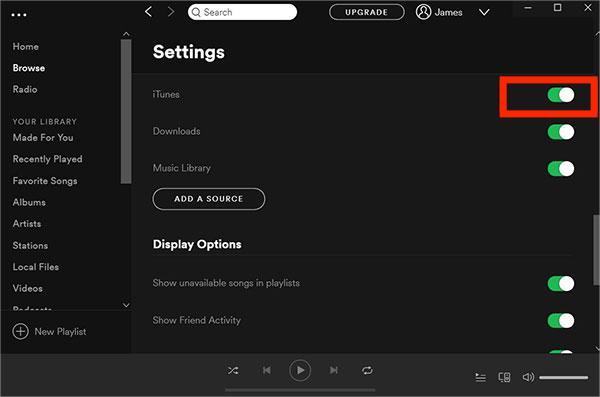
Step 5: Open Spotify. Go to Settings → Local Files. Enable "Show Local Files." Add your converted music folder.
If you're serious about how to transfer Apple Music to Spotify, this is the most reliable solution.
Method 2: Transfer Apple Music to Spotify on Windows and Mac
Another way to solve how to transfer Apple Music to Spotify is using playlist transfer tools. Any Music Converter includes a Playlist Transfer feature that can match songs between platforms. This method directly connects Apple Music and Spotify accounts and transfers playlists automatically.
Step-by-Step Guide
Step 1: Open DumpMedia Any Music Converter on your computer. You will see a clean and intuitive interface designed to make conversion simple, even for first-time users.
Step 2: Choose Tools > Playlist Transfer.
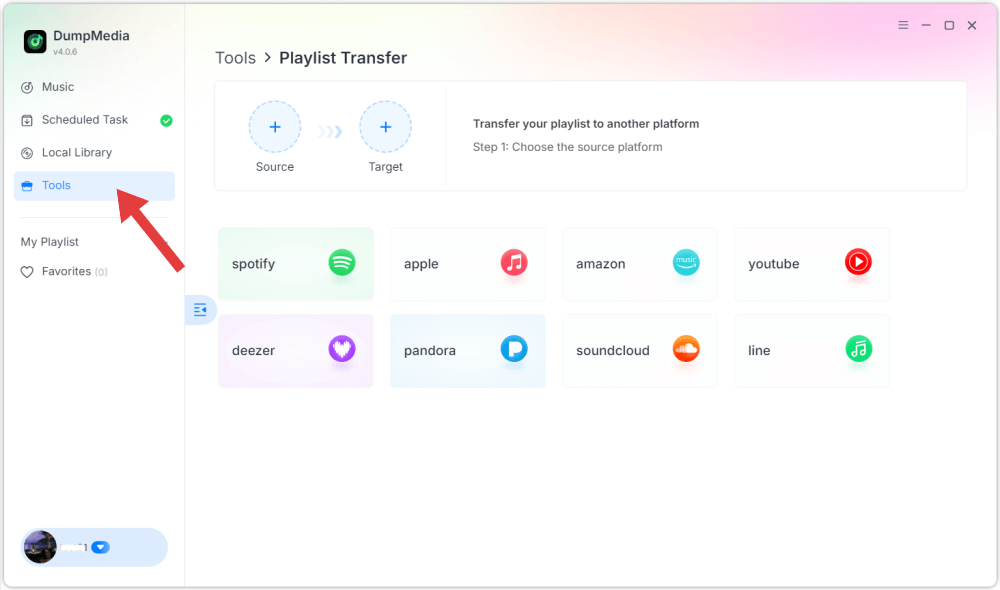
Step 3: Choose Apple Music as a source.
Step 4: Select Spotify as the platform where you want to move your playlist.
Step 5: Find the playlists you want to transfer from Apple Music to Spotify and select all the playlists you want to move.
Step 6: Begin the migration process. The tool matches and transfers songs automatically. Click "Go to Spotify". Your playlists have been moved to a new service, and you can start enjoying your new music streaming service.
Advantages
- Fast and automated
- No file conversion needed
- Easy for beginners
Disadvantages
- Matching is not always accurate
- Some songs may be missing
- Depends on Spotify availability
Method 3: Transfer Apple Music to Spotify on Mobile
How to transfer Apple Music to Spotify using a mobile device? For those who prefer a mobile-first approach, using dedicated apps is a convenient way to transfer playlists directly from your smartphone. Popular tools such as SongShift, FreeYourMusic, and Soundiiz simplify the process by connecting to both of your music services simultaneously. Once linked, these apps scan and match songs across platforms, automatically recreating your entire library in Spotify without the need for a computer.
Step-by-Step Guide
Step 1: Download SongShift from the iOS App Store. On your iPhone, go to Settings > Music and ensure Sync Library is turned ON.
Step 2: Open SongShift and tap the "Connect Music Services" button (or the settings gear icon). Find Apple Music in the list, tap Connect, and authorize the app to access your library.

Step 3: Repeat this for Spotify, logging in and agreeing to the permissions.
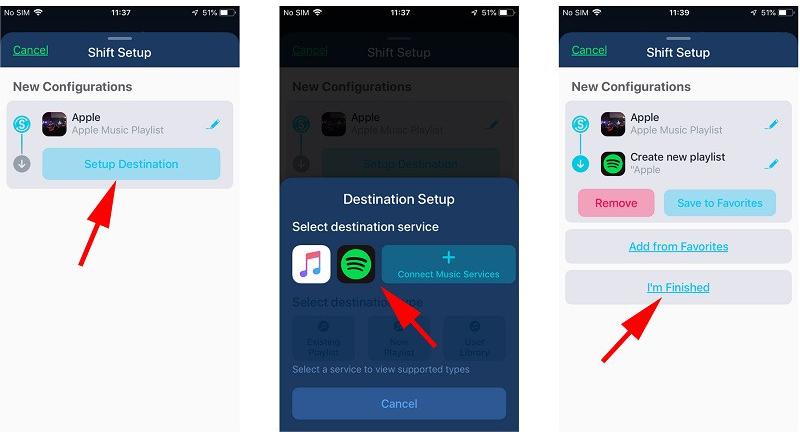
Step 4: Tap the "+" (Plus) icon at the top of the main screen to start a new "Shift."
Step 5: Tap Setup Source and select Apple Music. Choose the media type (usually Playlist) and select the specific playlist(s) you want to move.
Step 6: Tap Setup Destination and select Spotify.
Step 7: Click on "I'm Finished" to let the app begin processing.
Step 8: Once satisfied, tap Confirm Matches. The songs will now appear in your Spotify library.
Advantages
- Complete music transfers without needing a computer
- A simple, step-by-step interface
- Allows you to fix mismatches manually before finishing the transfer
Disadvantages
- Cannot transfer DRM audio
- Matching accuracy varies
- Some features require payment
FAQs
1. Can I transfer Apple Music to Spotify for free?
Yes, but free tools often have limitations and may not transfer all songs.
2. Why do songs fail to transfer?
Apple Music tracks are DRM-protected and cannot be directly accessed.
3. Can Spotify import local files?
Yes, Spotify allows you to import and play local MP3 files.
Conclusion
In summary, if you’re looking for how to transfer Apple Music to Spotify, it’s important to understand that there is no direct way due to DRM restrictions. While playlist transfer tools and mobile apps offer quick solutions, they often come with limitations such as missing tracks or inaccurate matching. The most reliable and complete method is to convert Apple Music into standard formats and upload them to Spotify, ensuring full control and zero data loss. By choosing the right approach, you can successfully move your music library and enjoy a seamless listening experience on Spotify without restrictions.
*DumpMedia works by decrypting and downloading Apple Music songs into DRM-free files, allowing you to obtain a clean, unrestricted copy of your library for any device. Its functionality does not include the conversion of local audio files.

30% Off >>>