


How to Transfer Spotify Playlist to Apple Music [2026 Guide]
If you have been using Spotify, like most folks, you most likely have a ton of playlists created already.
It’s for that reason that making a full-time switch to Apple Music as your go-to music app could be quite a struggle since you don’t want to start all over again or lose what you have created already.
There is no way that you want to give up all those playlists, right? Nor would you want to recreate them at all, right? You need to transfer the Spotify playlist to Apple Music. The question is, how? This article will show you how to transfer your Spotify playlist to Apple Music.
Contents Guide Part 1. Why We Need to Transfer Spotify Playlist to Apple Music?Part 2. How does transferring music work?Part 3. Two Options to Transfer Spotify Playlist to Apple MusicPart 4. Bonus: How to Backup Your Spotify PlaylistsPart 5. Conclusion
Part 1. Why We Need to Transfer Spotify Playlist to Apple Music?
If you’re already comfortable with Spotify, that’s okay. You get quality music from both Spotify and Apple. There is no doubt about that. However, there is one word that you should think about. That word is ownership.
With Spotify, you don’t own your music. You are just given access to all the songs they offer. Whether you are on a free or paid plan, you are just access to their music. You can play it on a limited number of devices.
With Apple, it’s different. You own your music and you are not stuck with a monthly fee. So, think about it. It makes a lot of sense to transfer Spotify playlist to Apple Music so that you could be with a service that gives you more rights to own your music.
Part 2. How does transferring music work?
To transfer your playlists from Apple Music, you'll need to select a third-party service since playlist transferring is not a built-in or automatic feature within the app. An excellent choice is the DumpMedia Spotify Music Converter. It allows you to choose the source, the playlists you want to transfer, and the destination with ease.
These services scan your playlist track metadata and match it to the music in the database of the streaming service you're transferring to. Although rare, errors may occur, particularly with less well-known performers with insufficient or incorrect metadata. When these do arise, you can resolve these issues manually.
When transferring playlists from Spotify to Apple Music, or between any two platforms, the service facilitating the transfer will require access to both your music accounts. This may be concerning if you do not typically share your passwords. However, these third-party services only obtain access to specific information and permission can be revoked from their respective settings pages at any time.
Additionally, you can revoke third-party permissions through the settings menu on any streaming service. To access permissions on Spotify, you must use a web browser because the app alone does not allow for permission access. In the next part, we will introduce you to two methods to transfer Spotify playlist to Apple Music.
Part 3. Two Options to Transfer Spotify Playlist to Apple Music
Here are some ways for you to look into if you want to transfer playlist from Spotify to Apple Music. Continue reading so that you can learn how to transfer Spotify playlist to Apple Music.
Option #1. Use S.t.A.M.P.
S.t.A.M.P. is a tool that can help you transfer Spotify playlist to Apple Music. It’s an acronym where each letter stands for the following Spotify playlist to Apple Music. This is a free app that uses a CSV file, created through Exportify, to transfer Spotify playlists to Apple Music. Take note, it doesn’t transfer it automatically. Read the steps below to learn more about it.
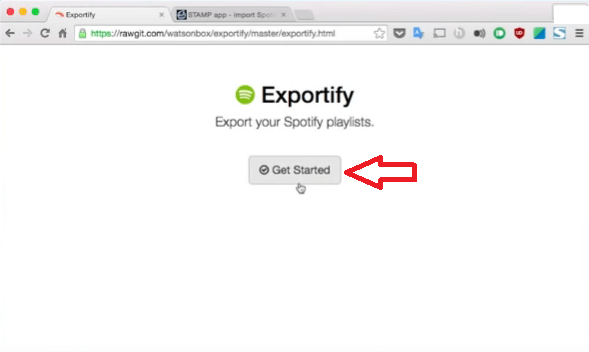
Step 1. Go to the Exportify Playlist
Click on the Get Started tab you see in the middle of the window. You will be asked to sign in to your Spotify account to access your playlist.
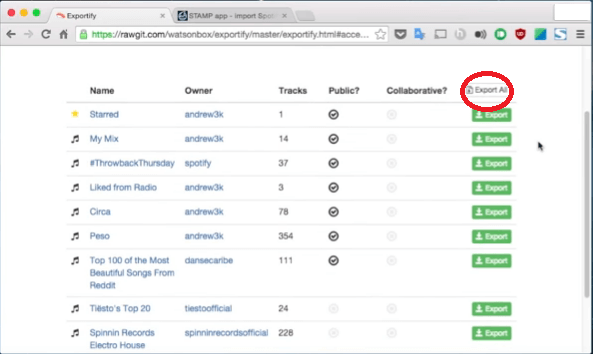
Step 2. Go Through The List
Now you see the list of all your playlists. You will see the Export tab opposite each of your playlists. If you want to export all the Spotify playlists, hit the Export All button on top.
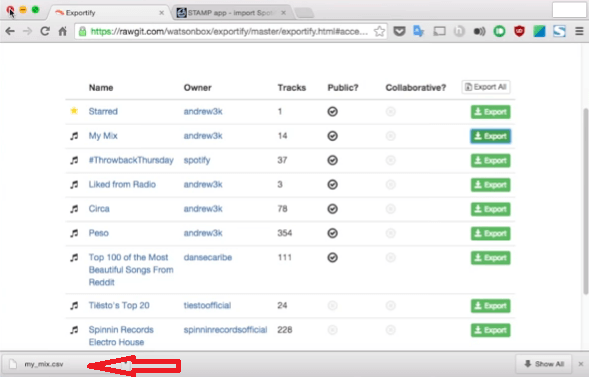
Step 3. Download Your Playlist
You now have the CSV file in your Downloads folder. If you downloaded all of your playlists, you would have to unarchive the zipped file first.
Step 4. Download the S.t.A.M.P. App
Extract the file and move it to your Applications Folder. Go to your Systems Preferences and click on Security & Privacy.
Under the General tab, click on Anywhere under Allow apps downloaded from. Then click on the Privacy tab and make sure S.t.A.M.P. is checked. If it’s not checked, click on the locked icon on the left, the bottom part of the screen, and type in your password to unlock it.
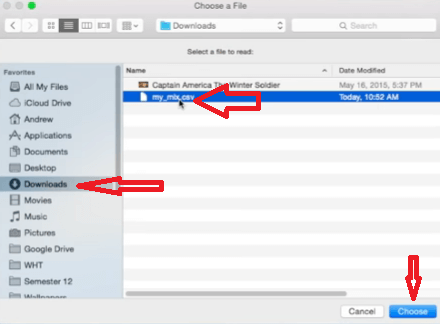
Step 5. Open up S.t.A.M.P.
Click on the Open tab. Click on the Downloads folder on the left-hand side of the screen. Select the CSV file you have just downloaded. That will get iTunes to automatically start searching and adding your songs.
Option #2. Use MusConv
You can also use MusConv to transfer Spotify playlist to Apple Music from the different music streaming accounts that you have. Follow the steps below to use MusConv.
Step 1. Download the Program
You can download MusConv from their website. It offers a download for both Mac and Windows. Keep in mind that this is a paid service. Install and launch it.
Step 2. Take a Look at The Main Menu
You will find the main menu on the left-hand side of the program. There you will see the list of music streaming services. You will also find the account settings on the top, right-hand side of the window.
Step 3. Log In to Your Apple Music Account
Once you do so, you’re going to see all the playlists inside your account.
Step 4. Log In to Your Spotify Account
Click on the Spotify tab on the left-hand side of the MusConv window. That will prompt you to log in to your Spotify account. Click on the Okay button to confirm that you will connect to MusConv. Check the one that you want to transfer Spotify playlist to Apple Music.
Step 5. Transfer Spotify playlist to Apple Music
You can either click on the Transfer Selected button or you can click on each of the buttons opposite your Spotify playlist. No matter what button you choose to click on, you will find another button that will show Spotify. When you click on Spotify, you would have to click on the Normal Transfer to start the process.
Step 6. You Might Have to Log In to Your Apple Music account Again
Go right ahead and log in. After that, you will be prompted to another window where the transfer takes place. Once that is done, you can check your Spotify playlist on your Apple Music.

Part 4. Bonus: How to Backup Your Spotify Playlists
If for some reason, you don’t want to transfer playlists from Spotify to Apple Music, you can just convert them and save them to your computer. This is usually a daunting task because you have to deal with the DRM that comes with music streaming services.
The good news is that you can back up your Spotify Playlists by removing the DRM from the Spotify playlist. With the DumpMedia Spotify Music Converter, you can save the Spotify Music you love on your computer and convert it to Apple Music in a more portable file format whenever you want.
You can eventually do without a music streaming service since you can download your music directly on your computer or to an external hard drive. With that, you can play your playlist offline anywhere you go.
The DumpMedia Spotify Music Converter is a converter and DRM removal tool-in-one. It’s available for both the PC and Mac and you can download a free trial software. This tool is highly regarded by many customers as it’s fast, safe, and reliable.
It’s not like those free software or online converter tools that leave your PC vulnerable to attacks. It may contain adware, malware, and spyware. It’s always best to buy original quality software. This is where DumpMedia is good at.
PROS:
🥰 Ultra-fast conversion rate.
🥰 Adjustable Settings including music format.
🥰 Customer support & 1-month money-back guarantee.
🥰 Friendly GUI, easy to use.
🥰 It’s available for both PC and Mac.
Part 5. Conclusion
With the variety of music streaming apps to choose from these days, you don’t have to worry about choosing and sticking to just one. Since it’s very easy to transfer from one service to another like the way to transfer playlist from Spotify to Apple Music, you can explore all the available music streaming apps.
Should you decide to do without a music streaming service, then you can use the DumpMedia Spotify Music Converter to remove the DRM of your playlists and convert Spotify playlist to Apple Music so that you can play them anywhere and anytime you want.
Have you ever had to transfer Spotify playlist to Apple Music? How did you do it? Share with our readers some of your tips and tricks.

30% Off >>>