


How to Get Apple Music on Mac: 2025 Step-by-step Guide
What devices are you using to play and stream songs particularly those from the Apple Music application? Because the application is supported by almost all gadgets, you are probably using either an iOS device, an Android gadget, a Windows computer, or perhaps a Mac computer. In this blog post, the main idea would be focusing much on how to get Apple Music on Mac.
Streaming of Apple music could be an issue for Mac users who are not aware of the process of doing it. If you have been an Apple Music for some time now and are a Mac user as well, then make sure to keep on reading this post to know more information on how you can successfully keep all Apple Music songs on your personal computer.
Contents Guide Part 1: Get To Know More About The Apple Music ApplicationPart 2: How to Get Apple Music on Your Mac: For Premium UsersPart 3: How to Get Apple Music on Your Mac: For Free And Premium UsersPart 4: To Wrap It All
Part 1: Get To Know More About The Apple Music Application
Apple Music has been considered one of the top providers of amazing songs throughout the world. With just a tap of your finger, you can listen to millions of tracks sung by several different artists.
It is known as one of the best alongside other music streaming services. It has been made compatible and accessible using many devices including smartphones, televisions, speakers, personal computers, and many others.
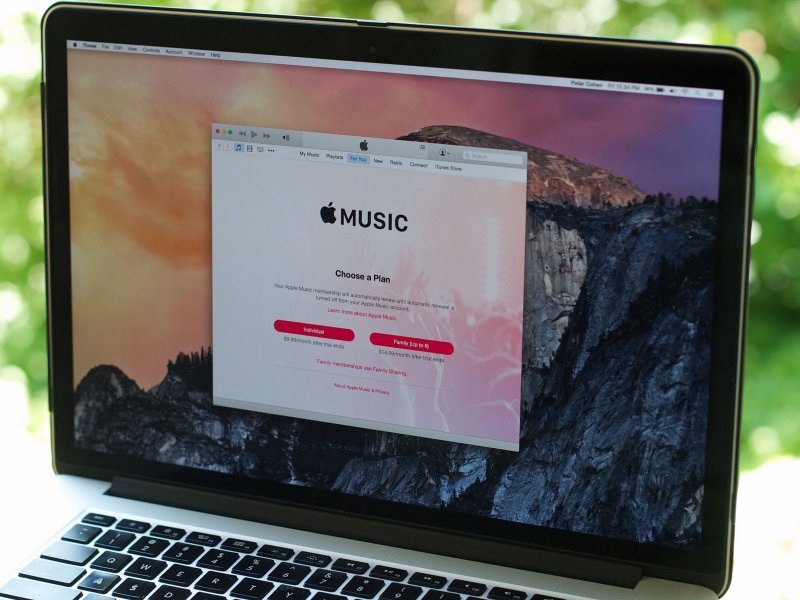
In using this application, the same with Spotify and other sites, there is a need to pay the monthly premium which is ranging from 4.99 USD (student plan) up to 14.99 USD (family plan) to experience all the perks being offered by the application.
If you wish to keep on listening to your favorites even without getting the premium, well, there is nothing to worry about as well. While being a free user, you can also access the songs being offered however, drawbacks and inconveniences while using the application will be experienced.
If you happened to be a premium user, you are surely asking for ways on how you can listen to songs even without paying the fee every month. If you are a free user, then most likely, you are as well in look for a method on how you can avoid all the disadvantages of listening to Apple Music songs even if you are only using a free account.
Luckily, we will be discussing the solution to the above in this article.
Part 2: How to Get Apple Music on Your Mac: For Premium Users
Using Apple Music for quite a long time possibly has been one of your habits. Well, you can listen to songs anytime and anywhere using the application and even get to know other song recommendations.
If you are very fond and have decided to purchase the premium account, then, you must be aware of how you can use it on your Mac computer. Detailed information on how you can finally do it is stated in the next paragraphs.
What Do You Need?
Here is the list of what you need to ensure to use the Apple Music application on your Mac computer.
- Ensure that your Mac computer has the latest operating system. If not, then do the upgrading.
- Make your Apple Music account ready – username and password.
- Keep your Mac computer connected to the internet for successful operation.
Once everything has been settled, then there is a need for you to perform the below procedures.
Step-by-step Guide to Getting Apple Music
- Open your Apple Music application.
- Once the application has been opened, then you need to head to the “Menu” bar which you will be seeing at the top portion of your screen. From the options that you will see, tick the “Music” button following the clicking of the “Preferences” option.
- Now, you need to go to the “General” tab and then select the “Sync Library ”. You will be seeing a checkbox right next to it. Make sure that you will be ticking it.
- Finally, you will just need to hit the “OK” button (a blue button that you will be seeing on the screen) to continue.
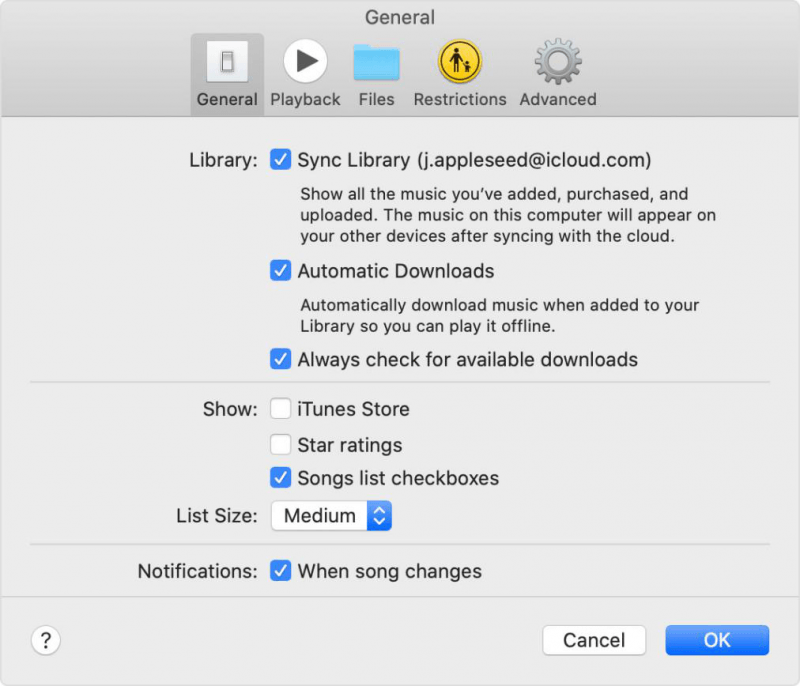
After some time, all your Apple Music songs will be synced to your iTunes library and would be available for streaming. This will take some time in case you are trying to sync a huge number of files. Well, you just need to wait until the process has been completely done.
As you may have understood, to complete the procedure stated in the first part of this post, there is a need for you to avail of the subscription. If you are on a tight budget and really wanted to listen to songs but can only do that in free mode, then I bet you should learn how you can keep all songs on your Mac computer even if you are only a free user. And, that will be discussed in the third part.
Part 3: How to Get Apple Music on Your Mac: For Free And Premium Users
There is this one thing you need to know – you can save all Apple music songs you love on your Mac computer even if you are a free user or a premium user! Worry no more about the premium fees and the inconveniences of listening to Apple Music songs for free. Are you excited to know more about this?
Well, to achieve the above, you need to use a third-party software application. And, here, the tool we are to use is this DumpMedia Apple Music Converter.
Why Can’t You Download Apple Music Songs Directly
You probably knew by now that you cannot download Apple Music songs directly from the application. You probably tried before, but you encountered a certain error stating that you cannot proceed. Well, the reason is that all Apple Music songs are DRM (Digital Rights Management) protected. What is this?
Mentioned protection hinders the illegal and unauthorized downloading of content without prior notice and permission from the owner. With this protection, one cannot download the files directly and can only have those played in the application itself or on authorized devices and gadgets.
Steps To Use DumpMedia Apple Music Converter
Luckily, DumpMedia Apple Music Converter can remove this protection. Here is how.
- Download and install the DumpMedia Apple Music Converter.
- Choose songs to be converted.
- Finish the process by converting.
Of course, we have provided brief details corresponding to each step.
Step 1: Download And Install The DumpMedia Apple Music Converter
You can have DumpMedia Apple Music Converter downloaded directly from its official website. You can even enjoy a free trial period before deciding to purchase the paid version. Once successfully downloaded and installed, just launch the application to arrive at the main interface.
Step 2: Choose Songs To Be Converted
Now, the next thing that you need to do is to choose the Apple Music songs you wanted to be converted. In your library, you can just tick the checkbox right next to each song if you wanted such to be downloaded and transformed. Keep in mind that you can choose not only one but a bunch of songs since the tool supports batch conversion.

You can also perform customization by indicating your desired bit rate or sample rate. Make sure to state the output path (where the new file will be saved).
Step 3: Finish The Process By Converting
Lastly, you can finish the process by hitting the “Convert ” button which you can immediately see at the bottom right corner of the screen.

The procedure which you need to follow to get the Apple Music songs you love on your Mac computer is just too easy. And, this will only take a few of your minutes. After some time, you can expect that all songs converted will be saved in the specified folder you put.
Part 4: To Wrap It All
Take note that in every problem you are encountering, there would always be a set of solutions available. Here, we just tackled the major solutions on how you can get your favorite Apple Music songs saved and kept on your Mac computer – the solutions, if you are a premium user or a free user, are stated in the earlier part of this post.
It is still recommended to use the DumpMedia Apple Music Converter for you to get all the Apple music songs you want. You can be assured that the original quality will be maintained (100%).
Added to that, DRM protection (which is the main issue for downloading) would be removed alongside the conversion process. The tool’s performance has been known to be the best assuring you with fast conversion speed.
Are you a Mac user and an Apple Music lover? Why not try the guide above and start downloading your most loved Apple Music songs?

30% Off >>>