


How to Add Apple Music to PowerPoint Presentations (2025)
You have to get the message across. That’s the whole point of a PowerPoint presentation. If you can’t, then the time you put into creating the PowerPoint presentation becomes useless. Knowing how to add Apple Music to PowerpPoint just makes your time worth it.
The question is, do you know how to add Apple Music to PowerPoint presentation? Not just any music but Apple Music. if you’re wondering how that’s doable since Apple Music is protected by DRM, well, it is. Just keep on reading to learn how to add Apple Music to PowerPoint presentations.
Contents Guide Part 1. Why Add Music to PowerPoint Presentations?Part 2. How to Add Music to PowerPoint Presentation?Part 3. Convert Apple Music for PowerPoint Presentations Part 4. Conclusion
Part 1. Why Add Music to PowerPoint Presentations?
Adding some background music to your PowerPoint presentations can strengthen the message you want to relay. Music creates an ambiance for the PowerPoint presentation, making it more interesting for the audience.
When you add some music to your PowerPoint presentation, you have more chances of grabbing the attention of your audience. You have more impact on them and chances are, they won’t forget you. The message of your PowerPoint presentation is ingrained. That makes your PowerPoint presentation very successful and worthwhile.
If your work requires to make a lot of presentations, there is no doubt that you need to know how to add music to them.
Part 2. How to Add Music to PowerPoint Presentation?
Before anything else, do you know how to add music to PowerPoint presentations? This question doesn’t necessarily refer to just Apple Music but any kind of music. If you don’t know how to add music to PowerPoint presentations, then read on to continue.
Knowing how to add any kind of music to a PowerPoint presentation is the first thing you need to know. Once you know how to do it, it will be a cinch to add Apple Music to any of your PowerPoint presentations.
Just follow the steps below to learn how to add music to PowerPoint presentations.
- Create a presentation.
- Select the first slide.
- Click on Audio.
- Insert background audio file.
- Test PowerPoint presentation with audio.
Step 1. Create a Presentation
Open up PowerPoint and create a blank presentation. Go ahead and create a couple of slides. Just click on the New Slide tab on the menu above.
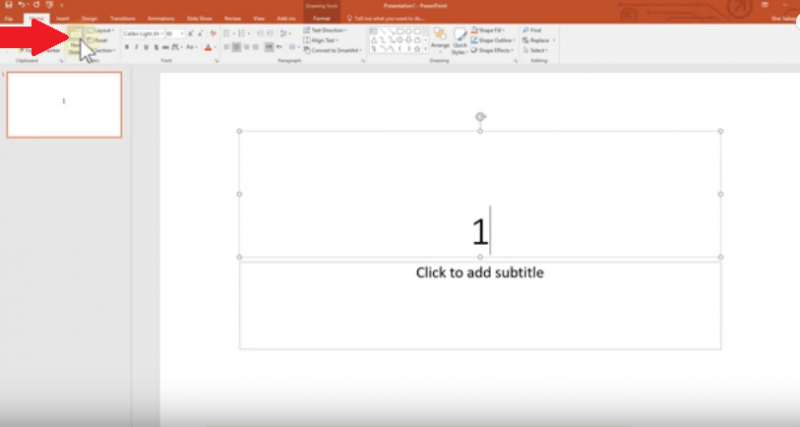
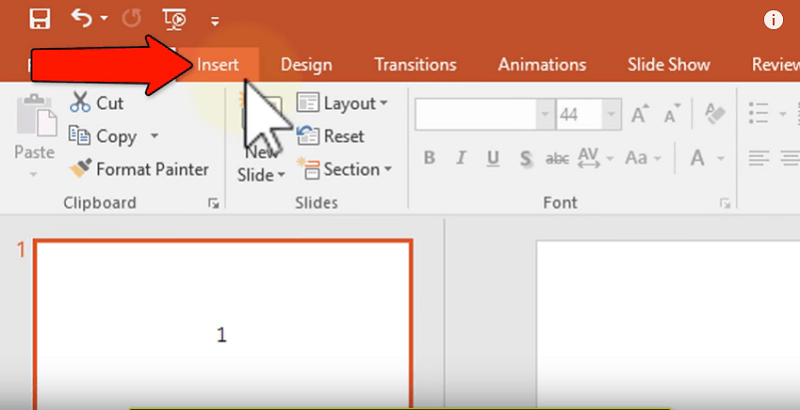
Step 2. Select the First Slide
Click on the first slide on the left panel. It will appear on the main screen. Then take your cursor to the Insert tab you see on the top menu.
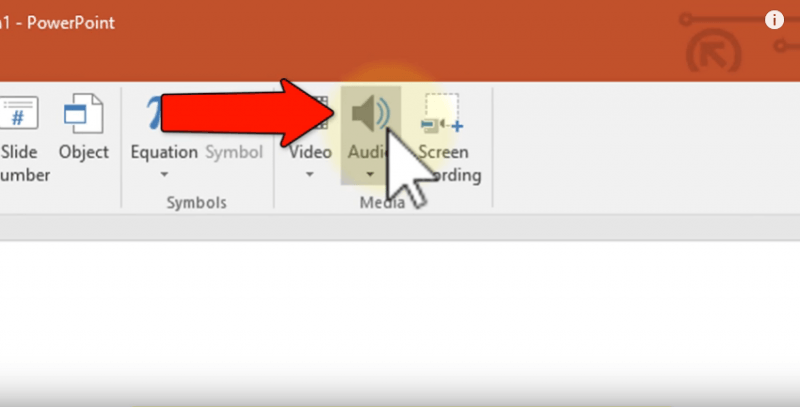
Step 3. Click on Audio
Once you click on the Insert tab, take a good look at the lower menu. Take your cursor to the far, right-hand side and look for Audio. Click on it. Then click on Audio on My PC from the drop-down menu.
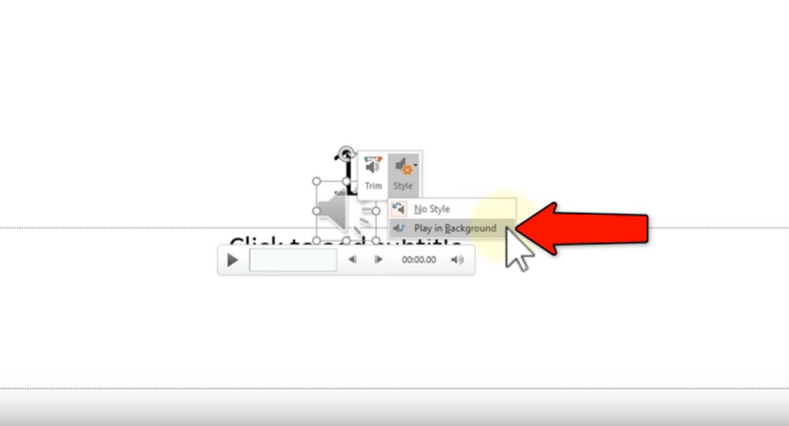
Step 4. Insert Background Audio File
You will be brought to a new window. Find and click on the audio file you want to add to your PowerPoint presentation. Then right-click on the speaker icon you see on the screen. Click on Style and choose Play in Background from the drop-down menu.
Step 5. Test PowerPoint Presentation with Audio
You can now test your PowerPoint Presentation by clicking on the PowerPoint tab. This is the fourth tab you see on the top menu.

Part 3. Convert Apple Music for PowerPoint Presentations
Now that you know how to add music to your PowerPoint presentations, you can easily add Apple Music. You might be asking, why to add songs from Apple Music when they’re all protected by DRM. The answer to that question is that you have more song options from Apple Music.
Before you can add a song from Apple Music to your PowerPoint presentation, you would have to convert it first. You simply cannot use any of the songs from Apple Music outside the app. You would have to convert Apple Music first before you can add it to any of your PowerPoint presentations.
Yes, the DumpMedia Apple Music Converter is the recommended program to convert your Apple Music so that you could add it to your PowerPoint presentations. With just a couple of clicks, the DRM is removed from the songs. When that’s removed, transferring the song to the PowerPoint presentation is going to be very easy.
The best thing about it is that you’re not breaking any rules by transferring and using the song on your PowerPoint presentation. With the DRM removed, you’re safe to use the song. The steps below will show you how you can use the DumpMedia Apple Music Converter.
- Download The DumpMedia Apple Music Converter
- Select and Add Songs from Apple Music
- Convert Song
- Add to Powerpoint Presentation
The steps below are more detailed. Read on to see how you can have a better understanding.
Step 1. Download The DumpMedia Apple Music Converter
Go to this website. Once you’re on it, you have direct access to the DumpMedia Apple Music Converter. Click on the download link that says I need a Mac/Windows Version. Wait for just a couple of seconds to download. Then install and launch on your computer.
Step 2. Select and Add Songs from Apple Music
You can select and add songs from Apple Music directly to the program. What that means for you is that you don’t have to go to your Apple Music app. Once you launch the program, you will find the songs from your Apple Music right there.
All you have to do is to click on the music icon on the left part of the DumpMedia Apple Music Converter. After you do that, you’re going to see all the songs from your Apple music on the main screen of the program. Choose the song you want to add to your PowerPoint presentation.

Step 3. Convert Song
Once you have chosen the songs from Apple Music, you can customize the settings of the output first. You will find the output settings on the bottom part of the program. Take your cursor and choose a file format for your output.
While you’re at it, choose a location for your song. If you know the location where you saved your song, you won’t have a hard time adding it to a PowerPoint presentation. After customizing the output settings, you can finally proceed to convert the song. Just click on the Convert button.

Step 4. Add to Powerpoint Presentation
Now, you’re all set to add the song from Apple Music to your Powerpoint presentation. Just follow the steps in Part 1. When you get to the part where you have to add audio, go to the same location where you have saved the song with the DumpMedia Apple Music Converter. That’s it. You’re all done.
Part 4. Conclusion
You can create interesting PowerPoint presentations with songs from Apple Music. After learning how to add Apple Music to PowerPoint presentations, you can use any song from the Apple Music to make your PowerPoint presentations more interesting.
Do you use PowerPoint a lot? How do you make it interesting for your audience? Feel free to share with our readers how you do it.

30% Off >>>