


Top 5 Free DVD Burners for Mac
There are a lot of people who are really fond of watching movies and videos. This could be done in a lot of ways – by watching online (through a secure internet connection), via mobile devices and gadgets, or even using simple video storage tools such as USB drives and DVDs. In this article, the focus would be more on the use of DVD discs.
Are you a Mac user and are currently looking for a free DVD burner? If yes, we are to highlight the different and free DVD burners for Mac computers in this article.

The most suitable way to play videos is definitely by using DVD discs. This as well is quite cheaper and a lot more convenient to use. If you are a person who wanted to secure a copy of a movie in a DVD disc and desires to replay it from time to time even without an internet connection, you are on the right page since we got the list of tools which would absolutely be beneficial for you.
Contents GuidePart 1. The Best Options of Free DVD Burners for Mac Computers LosslesslyPart 2. A Bonus Application Software to Convert The Burned DVD FormatsPart 3. The Summary
Part 1. The Best Options of Free DVD Burners for Mac Computers Losslessly
Option 1: Burn
The burn is considered one of the top DVD burners one can use on his Mac computer. It is indeed reliable and trusted which will provide you the means of burning DVD discs easily. This software ensures that files are kept safe and secured. Even personalization of DVD discs could also be done in this tool through the interactive and easy to use menus being offered. You need not worry as well in conversion since Burn can easily turn any video in the correct format with your own choice of video size. Moreover, there would be no need to worry about the cost of purchase since this tool is free software!
But, how will you be able to use this application software? You need to follow these procedures.
Step 1: Of course, you need to have the blank DVD disc inserted in your Mac computer’s drive. Once inserted, launch the program.
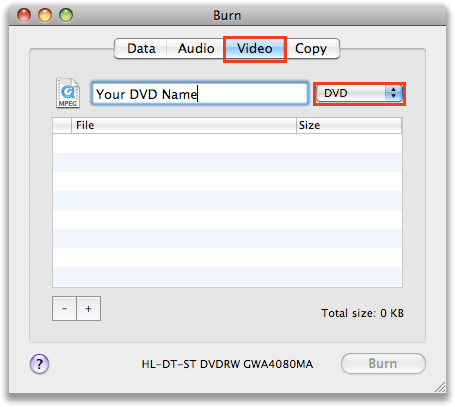
Step 2: Once launched, the screen will be showing you four options for burning. This includes Data, Audio, Video, and Copy. You need to choose the Video mode.
Step 3: Choose the video you desire to burn onto the disc. Once selected, drag and drop it into the interface. Note that this software only supports MPG format. You do not have to worry if you got a video of a different format since Burn will automatically convert it to MPG once imported.
Step 4: Once dropped, you can now tick the “Burn ” button to start the burning process.
The only drawback of this application is that one does not have the option of choosing DVD menu templates.
Option 2: DVDStyler
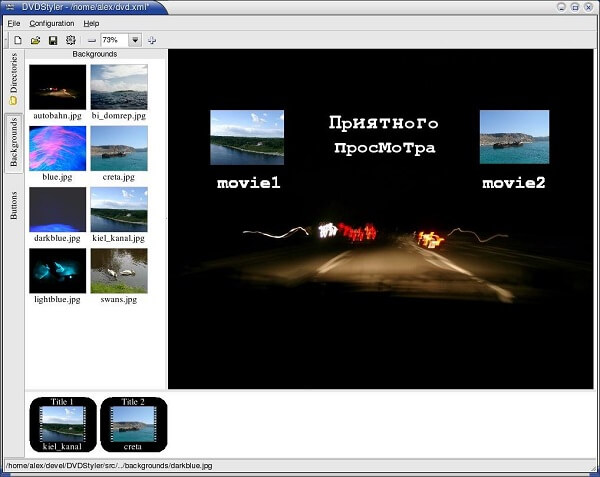
Another free DVD burner one can use on a Mac computer is this DVDStyler. Unlike Burn, this tool has menu templates that can be utilized by a user. You have the option of customization since this tool allows adding photos as the DVD menu’s background. You can as well adjust the settings of the video. However, this software also got some disadvantages including the use of a quite old interface and not that good screen resolution.
But if you would still want to use this one, you can check on these steps.
Step 1 : Insert the blank DVD disc into the drive and make sure to have this DVDStyler installed on your Mac computer.
Step 2 : Launch the program and to be able to arrive at the main interface.
Step 3 : Once opened, you can perform the dragging and dropping of videos needed to be burned. As mentioned, you have the option to add a picture as the menu’s background. You can choose any photo you desire.
Step 4 : Click the “Buttons” option which you will see on the left side of the screen. Once clicked, the next step would be to tick the donut-like icon located in the top bar menu of the interface to begin the process.
After some time, you will be seeing a notification on the screen once the process has been successfully completed.
Option 3: The use of iTunes
Whether you believe it or not, you can use iTunes to burn videos onto your DVD discs. For some who already got this application installed on their Mac computers, this would be the most conventional way to solve the dilemma.
Using this iTunes will require you to perform these methods.
Step 1: Insert a blank DVD disc onto your Mac computer’s drive.
Step 2: Once properly inserted, your computer will automatically recognize this drive. You need to click the DVD’s icon you will see on the desktop. Tick on it and rename the disc.
Step 3: Double click the icon. Once opened, you can perform the dragging and dropping of video files to be burned.
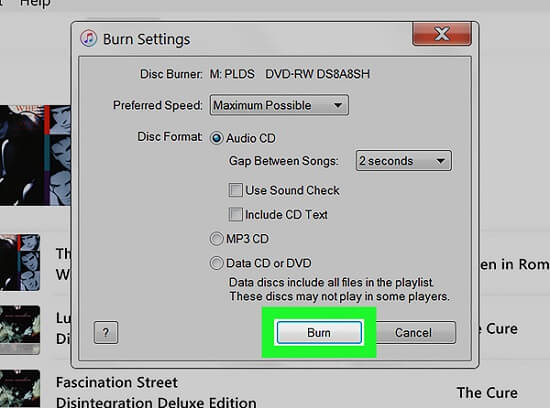
Step 4: Once imported, tick the “File” button in the top left corner. You will see a drop-down list. From there, choose “Burn Disc” to begin the whole process.
Option 4: Wondershare DVD Creator
If you are still not satisfied with the first three mentioned above, you still got this Wondershare DVD Creator. Yes, this as well is free! You can have the program downloaded on your Mac computer without purchasing it. This, of course, allows the user to burn videos of different formats to any popular DVD or disc types. Batch processing could also be done in just a click requiring a few minutes. Moreover, you can perform some editing functions such as trimming, cropping, video enhancing, adding of subtitles and even watermarks.
This could be used by following just these simple steps.
Step 1: Of course, ensure that a DVD disc is inserted on your Mac’s drive and install this Wondershare DVD Creator.
Step 2: Open the application to see the program’s interface.
Step 3: You can begin the process by performing the dragging and dropping of video onto the screen.
Step 4: Once imported, you can tick the “Menu ” button on the top of the screen and you got the option to personalize your video by adding DVD menu templates. Once done, you can also tick the preview button to see how the output will look like.
Step 5: Finally, click the “Burn” button to begin the whole process. You can edit the disc name and specify the folder where you can save the output file.

Part 2. A Bonus Application Software to Convert The Burned DVD Formats
There is this one tool that is capable of performing a lot of functions most especially the conversion function. If you are one in need, you might want to check this DumpMedia Video Converter which has been used and trusted by a lot of users in the modern era.
The main feature of this tool is video conversion to different desired formats without quality loss, even maintaining the original look. This supports numerous formats such as the popular MP4, AVI, WMA, WAV, FLAC, and a lot more! In addition, you can easily convert DVD and videos to GIF, video or audio. This as well as editing and enhancing functions wherein you can perform adjusting of brightness, contrast, saturation, and volume control. Even adding subtitles is possible! Aside from its main function, this one is software with a user-friendly interface and offers easy steps to perform the desired processes. We are definitely recommending this converter for users.
Downloading and even the installation of this program could be done in just a few minutes and would require only a few clicks. You got to have your converted video by just following a few and simple steps.
To proceed with video conversion, you must do this simple step by step guide.
Step 1: Of course, you are required to ensure that this DumpMedia Video Converter would be downloaded and installed on your Windows of Mac computers.
Step 2: Launch the program and click the “Add files ” button to select the desired media file to convert. You can as well drag and drop the files directly from the location to the main interface of the application.
Step 3: Select the desired output format by ticking the “Convert All Tasks to: ”. You got a lot of options you can choose from such as MP4, MOV, WMV, AVI and many more.

Step 4: Once done, choose the destination folder wherein the output or converted file would be saved by clicking the “Browse ” button.
Step 5: Click the “Convert ” button to begin with the conversion process.
Once you are done with these steps, you can preview the video and check the converted file by tapping the “Open Folder” option. By performing just these five simple steps, you go to have your converted video in just a few minutes.
Part 3. The Summary
This article presented you with four awesome and free ways of burning videos to DVD discs on your Mac computer. All those could be fully utilized by anyone by just following the simple step by step guides highlighted above. Have you seen this helpful to your needs? Let us know your thoughts by leaving some comments below.

30% Off >>>