


How to Export/Burn iMovie to DVD [2026 Guide]
iMovie is an app for iOS and Mac operating systems that allows you to create and edit stunning movies. It’s a great tool for content and media enthusiasts as it allows you to freely do whatever you want to your videos. Plus, the videos you create can be shared with friends and family members to platforms such as YouTube and Vimeo.
iMovie enthusiasts would love to know how to transfer an iMovie to DVD. This is because they might want to play their movies on televisions for more fun and excitement. Plus, the feeling of having your own video played on a DVD player can be thrilling.
Thus, in this article, we will teach you how to export or burn iMovie to DVD. In this way, you can watch the videos you have edited on your DVD players. Plus, you can share the burned DVD discs to friends and family members. You can even collect these burned DVDs to make sure you store the data in a safe place. So, let’s get started on how to do this.
1. How To Export And Burn iMovie To DVD
When it comes to putting your iMovie to DVD, there are two parts. First, you have to export the iMovie project. Then, you can burn it to a DVD using two methods. The first method involves burning it with Finder. In this method, you can’t play the DVD using a DVD player. It’s like saving a file to a DVD disc. The second method involves using a DVD burning tool to burn the file to a DVD disc. In this method, the movie can be played within DVD players.
Are you confused? We’ll put it in an outline to make it clear. Let’s get this straight:
- Part 1: Exporting iMovie Project To A File
- Part 2: Burning The Movie To A DVD Disc
- Method 1: Using Finder To Burn iMovie To DVD Disc (Not Playable On DVD Players)
- Method 2: Using A DVD Burning Tool To Make A Playable DVD Disc
This outline can help you clearly visualize what to do if you want to create a DVD out of an iMovie project. We will be explaining the steps clearly below. Simply follow our steps and you’ ll have your iMovie to DVD project complete. Read on to learn more.
Part 01: Exporting iMovie Project To A File
Here are the steps to exporting your iMovie project to a file:
Step 01: Plugging in an external DVD drive to the Mac computer.
Typically, Mac computers don’t have DVD drives or optical drives built into them. Thus, you’ll have to buy an external DVD drive you can plug into the USB. Once you have purchased an external DVD drive, you’ll have to use the cable to plug it into your Mac computer.
Do this through one of the USB ports of your Mac computer. Take note that you can buy your own USB drive that’s generally called “Apple USB SuperDrive.” You can purchase it through any Apple store for a reasonable amount of money. Also, if you have purchased an external DVD drive that has a USB 3.0 cable along with it, you might need to buy another USB-C adapter. This will be for your Mac computer.
Step 02: Insert your blank DVD disc to an external DVD drive.
Make sure you are inserting a DVD-R disc or a DVD-RW disc. Also, ensure that the logo of the disc is facing upwards with the readable part downwards. For your burning process to be completed successfully, the readable DVD disc must be empty or blank.
If a window appears that prompts you to take a particular action, simply press Ignore. At present times, it might be difficult to find DVD-R and DVD-RW discs that can be burnt. However, you can find a lot of them on the Internet.
Step 03: Launch iMovie.
In this step, you simply have to open the iMovie application on your computer. To do this, simply find the icon with a camera in it. The background of this icon would be color purple. Once you find this icon, double-click it to open the iMovie app.
Step 04: Open your specific iMovie project.
Press the menu for File. Then, press Open. Now, locate the iMovie you wish to export from iMovie to DVD. Find the folder that has it. Then, double-click this specific iMovie project in order to open it within the application.
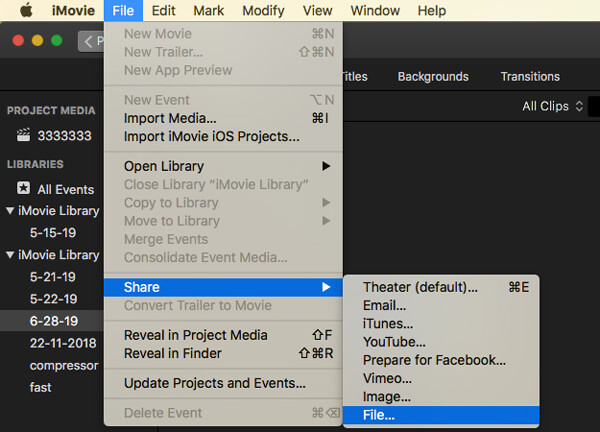
Step 05: Share the iMovie project.
Now, press the Share button. Use your mouse cursor and then locate it towards the upper-right part of the app’s interface. A menu will appear. Typically, the menu will be in drop-down form. Finally, press the icon for File. This icon looks like a film strip. It can be found within the drop-down menu that appears.
Step 06: Enter your desired file name.
There’s a bold text that is located within the top section of the pop-up window that appears. Click this bold text. After this, brainstorm an appropriate file name for you the iMovie project you’re going to export. Type this file name onto the previous bold text.
Step 07: Set the appropriate format for exporting.
Now, in this step of converting iMovie to DVD, you have to go to the “Format ” heading. Find the item located to the right of it. The format will typically have the option “Audio Only ” as the default setting. Change this setting to “Video And Audio.”
Step 08: Edit the options you wish to use.
There are multiple options you can change for your video. These options include the following:
- Resolution – Usually, the standard resolution for high-definition (HD) devices is 1080p. However, you can select a smaller resolution to make sure you have a smaller size for your files. But if you want a better resolution, you can select another option.
- Quality – When you press the Quality setting, a drop-down menu will appear. For this, you can select a lot of options for quality. You can choose the “High ” setting to have a high-quality output file.
- Compress – For compression, you can select “Better Quality ” to ensure that you have an excellent output file. However, you can also select “Faster” in order to make sure the exporting process is completed quickly. The options are up to you.
Step 09: Press “Next” and select the desired saving location.
In this part, you have to press the “Next” button. This is usually colored blue and is located within the bottom-right part of the interface. Now, after you have pressed “Next,” the window for saving your file will appear.
In the window that shows up, click the drop-down box labeled “Where.” Then, find the folder where you wish to save the output file. For instance, you can choose the Desktop or another folder that you wish. Then, press Save. The movie will now start to export the file.
Step 10: Press “Show.”
When you are prompted, you will now press “Show.” This is an option that will appear inside a notification that will be located within the screen’s top-right section. It will usually be displayed when the exporting process is completed. Once you press “Show,” it will take you towards the folder for the movie you have exported to a file.
Now, we will move on to the second part which involves burning your iMovie to DVD. Take note that this involves two different methods. Just read on to learn more about burning your iMovie for storage purposes and DVD player playback reasons.
Part 02: Burning The Exported Movie File To A DVD Disc
As stated, there are two methods of doing this. Let’s start with the first method which involves burning iMovie to DVD with Finder. With this method, the DVD disc won’t be playable on standalone DVD players. However, it will be viewable on optical drives that can read DVD discs such as those in computers.
Method 1: Using Finder To Burn iMovie To DVD Disc (Not Playable On DVD Players)
Step 01: Select and copy the exported movie file.
Press the previously exported iMovie file by clicking it with your mouse. This is the file you want to export to a DVD. Then, press the keys “Command” + “C”. As an alternative, you can also press “Edit.” Afterward, you can press “Copy.” In this way, you are copying the iMovie video file you have exported in the first part.
Step 02: Select the DVD.
Go to a Finder window and look at the lower-left part of the interface. Select your own DVD disc by clicking it. The folder of this DVD disc will now open. As an alternative, you can double-click the icon of the DVD within the desktop. This will also open the DVD disc folder.
Step 03: Paste the copied movie file.
Press the keys “Command” + “V” in order to paste the movie file on the DVD folder. Or, you can also use another method which involves clicking “Edit ” and then pressing “Paste.” Now, the movie will appear within the window of the DVD disc.
Step 04: Press File and select the option to burn DVD disc.
In this part of burning iMovie to DVD, you have to press “File.” This is a menu that is located in the screen’s upper-left section. Now, a menu that typically appears in the drop-down form will appear. Press the option that says “Burn [File Name] To Disc.” Press this option.
Step 05: Input a name for the DVD disc.
Within the section or text field that is labeled “Disc Name,” type out the name of the DVD disc you wish. Simply think about an appropriate file name that corresponds to the iMovie file you want to export as a DVD disc.
Step 06: Select your speed during the burning process.
In the drop-down box that is labeled “Burn Speed,” simply press the option. Then, select the setting that you prefer within the drop-down menu. Remember that slower burn speeds would result in a more accurate burning of your data to that of the DVD disc.
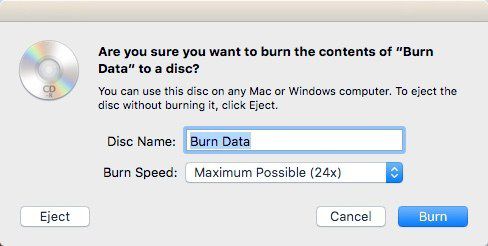
Step 07: Press “Burn.”
Now, in this part, you have to press the “Burn ” button that is colored blue. This is found within the window’s bottom-right section. The video will now be exported or burnt to a DVD disc. Once the entire burning process is finished, a chime sound will be heard. Then, the icon for the DVD disc will disappear from your Mac computer’s desktop location.
Method 2: Using A DVD Burning Tool To Make A Playable DVD Disc
This method involves using a free burning tool that is compatible with Mac operating systems. In this way, the burnt iMovie to DVD disc will be playable within standalone DVD players. Here are the steps on how to do it:
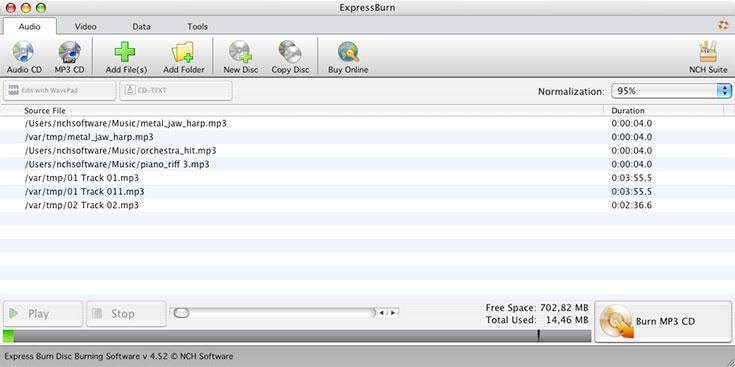
Step 01: Download and install the Burn application.
Download “Burn” within its official page. Then, install the application on your Mac computer. Launch the application on your Mac afterward. Press the tab for “Video.” This is usually located within the upper portion of the interface.
Step 02: Input the name you want for your DVD.
Press the text field within the top part and then change the text “Untitled ” to a new name for your DVD disc. Press the icon for “+” afterward. Now, a Finder window will be launched. Choose the iMovie video you have exported on the first part of this guide.
Step 03: Press “Open.”
Click the “Open ” label that is located within the Finder window’s bottom-right section. This will copy the video file to the Burn window. Press the drop-down box for “File Type.” Then, select “DVD-Video” within the drop-down menu that appears.
Step 04: Press “Convert” if the option is possible.
If the option to “Convert ” appears, then press it. Then, follow the on-screen instructions to do so. This will make sure that your DVD will be playable on standalone DVD players. Then, press the “Burn” button located on the bottom-right section of the window.
Step 05: Follow the next instructions.
After the iMovie to DVD burning process is complete, a notification might appear. Or, you can simply wait until the progress bar disappears from the screen. Once the entire burning process is complete, you can simply eject the DVD disc from the external DVD drive.
2. How To Convert Your Exported Video To Desired Format
Once you have exported the iMovie to DVD file in the first part, you can convert it to another format. In this way, it will be playable on other devices besides standalone DVD players. For this, you have to use DumpMedia Video Converter. It can convert exported iMovie files to other formats and widely supports a lot of file types. It is a great multi-purpose tool with blazing-fast conversion speeds. Plus, you can use it to download audio and video files from multiple websites.
3. In Conclusion
In this article, we’ve told you how to export and burn iMovie to DVD discs. We’ve outlined the steps on how to do so. In this way, you can copy the entire process and use it for all the movie files you have. We also recommend using DumpMedia Video Converter to convert exported iMovie files to another format. So, they can be playable in various devices and operating systems.
Now, we’d love to hear your thoughts on what we just stated in this article. How do you export and burn iMovie to DVD? Simply put your comment in the section below. You can also interact with other users if you wish.

30% Off >>>