


How to Convert M4P to WAV Efficiently (2026 Guide)
It’s common knowledge. The music files you download from the iTunes store are in the M4P format. This particular file format is protected and if you want to play it on Windows, you would need to convert M4P to WAV since the latter is the standard audio file format of Windows.
It’s just the way it is. Apple protects their music with their file format. That way, it’s harder for consumers to transfer the audio files they had purchased from Apple to other systems.
It just makes the audio files coming from Apple incompatible with Windows. To be able to play audio files from Apple on Windows, you would need to convert M4P to MP3 files or WAV.
Contents Guide Part 1. Why You Need to Convert M4P to WAV?Part 2. The Best M4P to WAV ConverterPart 3. How to Convert M4P to WAV?Part 4. Other Methods to Convert M4P to WAVPart 5. Conclusion
Part 1. Why You Need to Convert M4P to WAV?
Apple owns the encrypted music file format called M4P. This particular file format is DRM-protected. To keep it contained, it’s incompatible with non-Apple products. That makes it hard for anyone to transfer this particular audio file to another system like Windows.
You can only play an M4P file format on iTunes or any authorized Apple device. If you want to listen to an M4P audio file outside the Apple platform, you would have to convert M4P to WAV. Without doing that, there is no way you can listen to an M4P file format on a non-Apple device. This is the reason why you need to convert M4P to WAV if you want to enjoy M4P files on any devices.
Part 2. The Best M4P to WAV Converter
As we mentioned above, M4P is not compatible with all music players or devices, which can limit the accessibility and functionality of your music library. But luckily, converting M4P to WAV allows you to access your music library on a wider range of devices and playback systems, while also preserving the audio quality of your files. This could be achieved by some professional M4P to WAV converters. Next, we are going to introduce to you the best M4P to WAV converter that you could try-DumpMedia Apple Music Converter.
The DumpMedia Apple Music Converter can convert your DRM-protected files to any format you choose. This is a well-known tool that makes file format conversion very easy. It boasts several features that distinguish it from other file format conversion tools.
It not only removes DRM from your iTunes music but from Audible audiobooks as well. That way, you can play all your audio files on other devices. Thanks to this particular Apple music converter, you can also play those songs that you love offline. If you’re worried about losing the quality of music with it, don’t be. You get the same music quality from the original file
Here are what this M4P to WAV converter have in conclusion:
1. High-Quality Audio Conversion
With the cutting-edge recording technology, DumpMedia Apple Music Converter can record Apple Music audio files without damaging sound quality and keeping all ID3 tags same as original file.
2. Support for Different Audio Devices and File Formats
DumpMedia Apple Music Converter supports a wide range of audio devices and file formats, including M4P, MP3, and WAV, to accommodate diverse user needs and preferences.
3. Easy-to-Use Interface
DumpMedia Apple Music Converter offers a user-friendly and intuitive interface that allows users to easily navigate the conversion process, import their M4P files, and initiate the conversion to WAV without any hassles.
4. Customizable Settings
Users could customize various settings such as sample rate, bit rate, audio channels, and other relevant parameters to tailor the converted WAV files to their specific requirements and preferences using DumpMedia Apple Music Converter.
5. Batch Conversion Support
The converter also supports batch conversion, allowing users to convert multiple M4P files to WAV simultaneously, thereby saving time and streamlining the conversion process.
Part 3. How to Convert M4P to WAV?
Since DumpMedia Apple Music Converter is an excellent tool for converting M4P to wav, here we also give the step-by-step guide about how to use this particular Apple music converter for you. Now, look at the detailed steps that can help you understand how easy it is to use the DumpMedia Apple Music Converter.
Step 1. Download the DumpMedia Apple Music Converter
First and foremost, click the below icon to download the DumpMedia Apple Music Converter. This particular website is secure. Hence, your personal information stays confidential and protected. Once you download this amazing tool, launch it so that you can start using it.
Step 2. Select Audio Files Under Playlists
When you look at the DumpMedia Apple Music Converter, the Playlists will be on the left-hand side. Take your cursor to that area and select the folder where your audio files are located. For example, if you have your audio files in Library, click on Library.

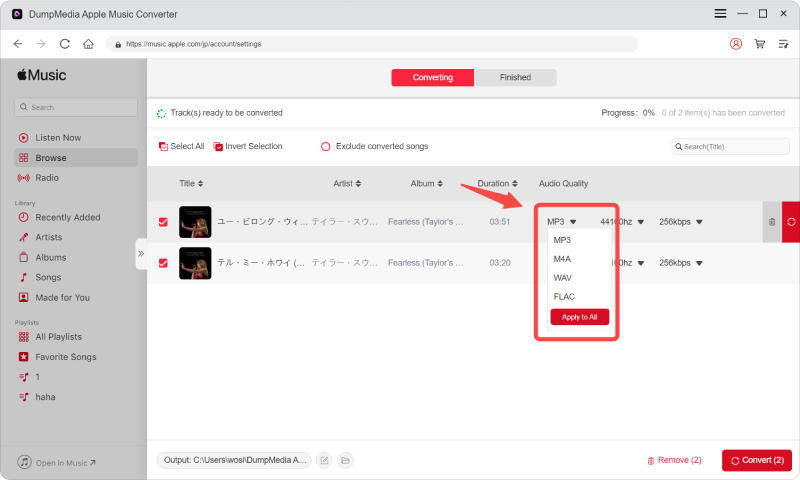
Step 3. Choose and Tweak Files to Convert
Once your audio files appear on the main screen, choose which ones you want to tweak by checking the box seen before each file. Then tweak the output settings in the bottom part of the program. Choose WAV on the Output Format field.
Step 4. Click on the Convert Button
At this point, you should be all set to convert your M4P to WAV. Just click on the Convert button you see on the right, bottom part of the screen.

Part 4. Other Methods to Convert M4P to WAV
After learning the above M4P to WAV converter, if you still want to know some other ways to convert M4P to WAV, we have also listed some for you. Go on to learn how to convert M4P to WAV with other tools.
1. Convert M4P to WAV via SoundTaxi
Another program you can consider using is SoundTaxi. SoundTaxi is a platform that uses artificial intelligence to analyze audio data and identify sounds and noises in real-time. It could easily convert your DRM protected and any non-protected music and movie files toMP3, M4A (iPod), WMA or WAV (audio) and MP4, AVI (DivX) or WMV (video)at high speed and CD quality legally.The steps below will show you how you can use it to convert M4P to wav.
Step 1. Download Program
You would need to download this particular program first. To access it, go to their website. Keep in mind that their website is not secure. You can go for their free trial. Download the program and install.
Step 2. Select Files
Launch the program. Once you see it on your screen, take your cursor to the first tab on the top left-hand side. This first tab is represented by a + sign. Click on it to select and add files.
Step 3. Wait for the Conversion to finish
Once you have selected and added a file, it will convert right away. Just wait for the conversion to finish.
2. Convert M4P to WAV via Wondershare Video Converter
Wondershare Video Converter is a powerful software that allows you to convert videos between different formats, including MP4, AVI, WMV, FLV, and 3GP. You can also use it to convert audio files, such as MP3 and WAV, and convert them into different audio formats, such as AAC and M4A.
The software supports both Windows and Mac operating systems and is easy to use. You can add multiple video and audio files to the converter, select the output format, and customize the settings as per your requirements. The steps below will show you how you can use it to convert your iTunes audio files so that you could transfer and play them on any non-Apple device.
Step 1. Download the Converter
You would have to go to their website first. From there, you can download this particular converter.
Step 2. Import M4P Files
Open the program. Then click on the Add button you see on the top, left-hand side of the screen. Once you click on it, you will be taken to a folder where you can choose the files you want to convert. Click on the files that you want to convert. As soon as you have clicked on them, they will appear on the Wondershare screen.
Step 3. Adjust File Settings
You can adjust the output settings by taking your cursor to the gear icon on the far, right-hand side of the screen.
Step 4. Choose Output File
Take your cursor to the bottom part of Wondershare to choose an output file. Click on Convert Audio and choose the WAV file format. While you’re there, click on the output path and choose a destination folder. Once you have done all that, click on the blue Start button you see on the bottom, right-hand side of the screen.
3. Convert M4P to WAV with iTunes
In addition to the above three professional tools, you can also use iTunes to convert M4P to WAV with iTunes. To convert M4P to WAV using iTunes, you can follow the steps below:
1. Connect your Apple device to your computer using a USB cable.
2. Open iTunes and select your device from the left sidebar.
3. Click on the "Music" tab and locate the M4P file you want to convert.
4. Right-click on the M4P file and select "Convert" > "Create WAV Version."
iTunes will begin converting the file to WAV. Depending on the size of the file, this process may take some time. Once the conversion is complete, the WAV version of the file will appear in your iTunes library. These steps should enable you to successfully convert your M4P file to WAV using iTunes.
Part 5. Conclusion
Knowing how to convert M4P to WAV is pretty important. That way, you can play those files on an unlimited number of devices, be it Apple or not. While you do have options to convert your M4P audio files to WAV, you’re safer using the DumpMedia Apple Music Converter.
Have you ever tried converting your M4P files? If yes how did you do it? Our readers would love to hear from you.

30% Off >>>