


iTunes Get Album Artwork not Working? (Fixed Guide)
Your music collection is important. You not only want to preserve the songs but the artwork that comes with it, right? Unfortunately, there are cases when iTunes get album artwork not working. This could be pretty annoying especially if you want everything in place.
If you’re paying for an Apple Music account, you deserve to see the album artwork. This article will show you how you can fix the issue. Make sure to read until the end to see how you can preserve the album artwork.
Contents Guide Part 1. Why Your Album Artwork is not Showing? Part 2. How to Fix iTunes Get Album Artwork not Working ErrorPart 3. Bonus: Preserve Album Artwork Issue with the DumpMedia Apple Music ConverterPart 4. Conclusion
Part 1. Why Your Album Artwork is not Showing?
There are various reasons as to why iTunes get album artwork not working. It could be that there’s just not enough space on your Mac.
Another possible reason is that Apple Music has collected a lot of caches. While caches are not exactly bad, it could slow down your Mac as well.
So, it’s best to check on the cache from time to time. For some folks, they have found that iTunes get album artwork not working because of a recent update. The album artwork could have been displayed for some time but disappeared after a recent update.
These are just a few of the possible reasons as to why you’re not seeing the album artwork.
Part 2. How to Fix iTunes Get Album Artwork not Working Error
Don’t worry. There are ways for you to solve the issues of album artwork not working on iTunes. Check out the various solutions below.
Solution #1. Make Sure Your Mac Has a lot of Space
The steps below will help you check if you have enough space on your Mac.
Step 1. Go to the Apple Logo
Take your cursor to the Apple logo on the top menu. Then click on About This Mac from the drop-down list. About This Mac is the first option you will see on the drop-down menu.
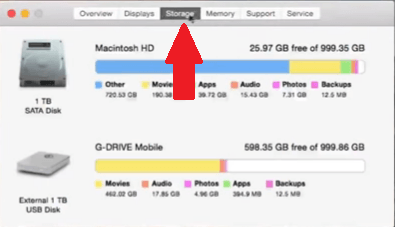
Step 2. Go to Storage
Once you click on About This Mac, a pop-up window will appear on your screen. Click on the Storage tab you see on the pop-up window. You can see what’s taking up most of your space on you click on the Storage tab.
Step 3. Go to Finder
Another way for you to find files that you need to delete is by going to Finder. Click on Finder on the Dock. Once a new window appears, click on the All My Files folder on the left-hand side.
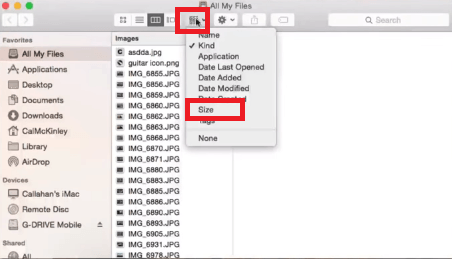
Step 4. Select Files by Size
On the top menu of the All My Files window, click on the fourth tab from the left. A drop-down list will appear. Select Size. That will organize the files from least to greatest in terms of what is taking up your Mac. Go through the list of files and delete the ones you don’t need.
Solution #2. Reset your Apple Music Library
One way for you to fix the issue is by resetting your Apple Music library. The steps below will show you how to do it.
Step 1. Uncheck iCloud Music Library
Take your cursor to the top menu and click on iTunes. Select Preferences from the drop-down list. Once the General Preferences window appears, uncheck iCloud Music Library. Then click on the OK tab.
Step 2. Quit iTunes
Take your cursor back to the iTunes tab on the top menu. Click on it and choose Quit iTunes from the drop-down menu.
Step 3. Launch iTunes by Holding Down on Option
Once you iTunes is back up again, click on the Create Library tab on the pop-up window. Type in a name in the New iTunes Library window. Then click on the Save tab. Click on the iTunes tab on the top menu and select Preferences. This time, check the iCloud Music Library box. Then click on the OK tab below.
Step 4. Click on Songs
Once the iCloud Music Library loads and your songs show up, select Songs under the Library list on the left side. Choose a song. Click on the Edit tab on the top menu and choose Select All. Click on the Song tab on the top menu and click on Delete from the drop-down list. Confirm your action by clicking on the Delete Items on the pop-window.
Step 5. Quit and Open iTunes
Hold down on the Option key to quit and open iTunes. Then click on the Choose Library tab. Go to your old iTunes Library and open it by clicking on the Open tab below. Click on the iTunes tab on the top menu and select Preferences. Check the iCloud Music Library and click on the OK tab below.
Solution #3. Clean out iTunes Cache
The steps below will show you how you can clean out the iTunes cache.
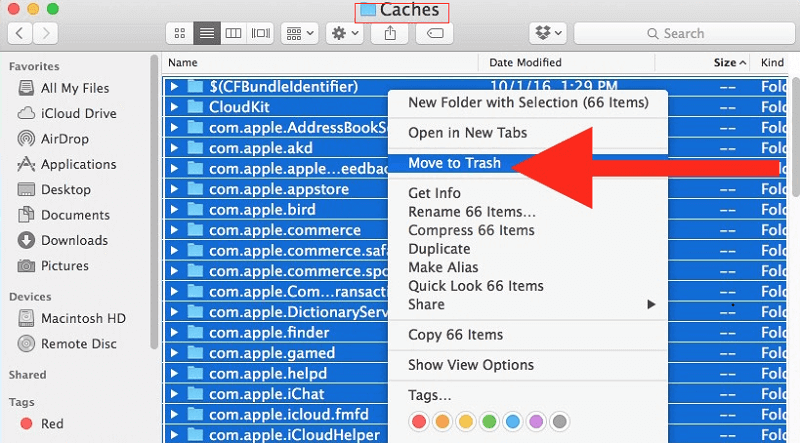
- Close iTunes. Then click on the Finder. Press down on Command + Shift + G shortcut.
- Once the Go to Folder shows up, paste the path ~/Library/Caches/com.app.itunes.
- Once the files show up, select the files you want to delete. Transfer them to Trash.
- Now, you can open iTunes and check if the album artwork is finally working. If not, you can repeat the steps.
Part 3. Bonus: Preserve Album Artwork Issue with the DumpMedia Apple Music Converter
If you want to avoid having any issues with your Apple Music, consider converting and downloading songs with the use of the DumpMedia Apple Music Converter.
This is a program that allows you to grab your favorite songs from the Apple Music app. It converts the songs into an unprotected file so that you could easily transfer it on your iTunes without having to rely on the functions of the Apple Music app.
The best thing about downloading songs with the DumpMedia Apple Music Converter is that it retains the profile settings of the album. While it converts the protected format into an unprotected format, it retains critical data such as the album artwork.
That way, you can easily transfer the song to iTunes with all the necessary data. The DumpMedia Apple Music Converter not only preserves the sound quality of the songs but the data that come with them as well.
Part 4. Conclusion
I can happen. iTunes can get album artwork that’s not working. It’s for that reason that you won’t be able to see the album on your list.
Of course, you can always use the DumpMedia Apple Music Converter to avoid this particular issue but you can also consider using any of the solutions mentioned above.
Have you ever experienced this issue? Were you able to resolve it? if yes, how? Feel free to share with us some of your tips and tricks.

30% Off >>>