


Easy Way of Stabilizing Shaky Videos in iMovie
Recording footage that is perfectly stable on handheld iOS devices is hard to achieve. The majority of the videos you have taken yourself are unstable and too shaky to watch which cannot be prevented because your camera might have shaken during the recording process. Fortunately, iMovie stabilizes shaky video can be done for smooth playback on various devices.
You may not know but iMovie comes with a lot of features compatible with all macOS versions. It can help in analyzing every single frame of your video clip. Once it detects that motion in your recorded camera video is out of normal, it rotates your videos and thus removing the shakes.
Wondering how you can stabilize your shaky footage using iMovie? Read on to know more as we will be discussing a step-by-step guide on how to do this along with our most recommended video converter software for converting your iMovie videos in this article.
Contents Guide Part 1. How Do You Stabilize a Shaky Video? Part 2. Most Recommended Professional Video Converter for Your iMovie VideosPart 3. Wrapping It Up
Part 1. How Do You Stabilize a Shaky Video?
Aside from being able to stabilize your shaky videos so that you can play them smoothly on your devices, iMovie also allows you to correct distortions in the video images which occur when you move the camera a lot while you were recording.
Image distortions mostly occur during quick movements of panning or when you record footage in fast motions. This type of distortion in motion is called the rolling shutter distortion which can cause your videos to appear skewed or wobbly.

Now onto the steps on how to stabilize your shaky videos in iMovie, below is a summary of the whole process.
Step 1: Download and launch iMovie.
Step 2: Add your shaky footage to iMovie.
Step 3: Apply video stabilization to your footage.
Step 4: Adjust the default stabilization amount.
Step 5. Reduce the rolling shutter distortion of your footage.
Below is a detailed description of each step.
Download and Launch iMovie
If your Mac does not have iMovie installed, you can always install the application from your Mac’s App Store for free. You can find the App Store on your computer’s Dock or Finder in the Applications folder.
After launching the App Store, just search for iMovie then you can start downloading it. When the download is completed, launch iMovie in the same way you launch the App Store. During the initial launch of iMovie, you need to sign in with your Apple ID so you can start using the app.
Add Your Shaky Footage to iMovie
First, import your footage to iMovie by going to File > Import Media. Click on the Import to: dropdown button to select the iMovie folder where you want to add your footage. Since you don’t have one yet, you should create a folder first.
After which click on the location of the footage that you are going to deshake from the left section of the interface. Choose your footage and click on the Import Selected button at the bottom of the window. Create a new iMovie project and then add your footage to the project’s browser by dragging it.
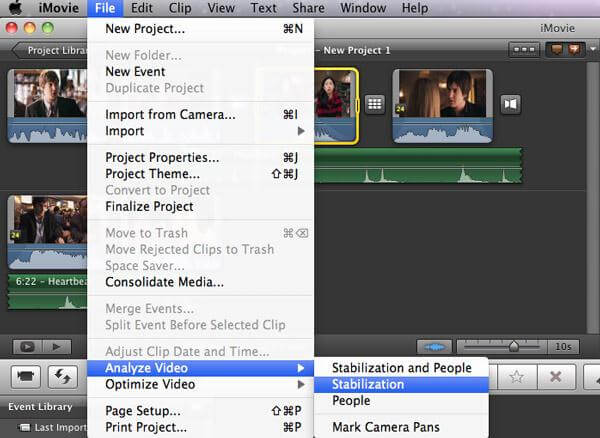
Apply Video Stabilization to Your Footage
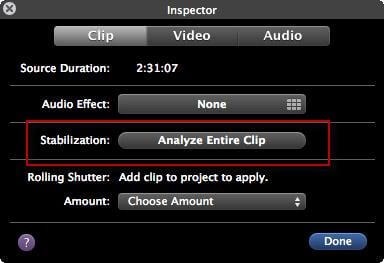
Make sure that you select your footage because iMovie will not know which video will be applying Video Stabilization. At the top of the window, you will find the Adjustments section containing icons such as Crop Video Speed. Find the icon for Stabilization which looks like a video camera with two horizontal lines above and below it. Click on the icon.
Tick the Stabilize Shaky Video box. This checkbox will be replaced with an indicator of activity until the analyzation and stabilization of your clip are completed. Once the process is completed, the indicator will become a checkmark while the slider at the right will display the stabilization amount is applied to your footage.
Adjust the Default Stabilization Amount
You can readjust the stabilization amount applied by iMovie. Just drag this slider to the left or to the right to achieve your desired results. If you want a preview of the changes that you have made on your footage, find the Play button and click on it. If you are not satisfied with the results, just click on Reset and repeat the whole stabilization process.
Reduce the Rolling Shutter Distortion of Your Footage
On the right side of the Stabilize Shaky Video slider, you’ll see the Fix Rolling Shutter option. Click on the checkbox to start the process. Upon clicking this checkbox, an activity indicator will replace it until the analyzation and fixing process is completed.
Click on the pop-up window for Fix Rolling Shutter and select the amount of correction for the rolling shutter you want to apply to the clip.Again, if you want to see the results of your selected settings, just play your clip.
WARNING:
Do note that the video stabilization process crops your footage so that it can turn it into a more stable one. A stabilization value of 40% helps you eliminate camera shakes. However, your footage will be zoomed in significantly resulting in pixelated footage especially if your video has a low resolution. That is why you should pay attention to the stabilization value you are going to select for your footage because you might end up deleting large portions in your video.
Part 2. Most Recommended Professional Video Converter for Your iMovie Videos
We recommend using DumpMedia Video Converter as a tool for converting your iMovie videos. DumpMedia is a powerful and high-speed all-in-one audio and video converter, downloader, editor, and player. It can convert your multimedia files into many formats with minimum quality loss. Enjoy the convenience of a friendly interface equipped with a lot of features to meet all of your video needs.
Features of DumpMedia Video Converter
- Enhancement of video quality. Fix dark, overexposed, and shaky videos by upscaling from SD to HD video resolution and adjusting the brightness and contrast of your videos.
- Video editing. Clip, crop, rotate, and add watermarks to your videos. Aside from the brightness and contrast, you can also adjust the hue, saturation, and volume of your videos. You can even combine multiple videos into one single file and preview the results in real-time.
- Video and audio conversion. Convert your audio and video files to your desired high-quality formats to eliminate playback incompatibility issues.
- Support for various devices. DumpMedia supports many devices such as iPod, iPad, iPhone, Samsung Galaxy, Blackberry, Nokia Lumia, Google Nexus, and others.
- Supports video conversion to and from different resolutions. Convert your videos to and from SD, HD, FHD, and UHD resolutions. You can also rip your homemade DVDs to MP4.
- Ultra-high video conversion speed. Convert your video files 6x faster than normal without quality loss and re-compression.
Now, to convert your multimedia files to your desired formats, download the software first and follow the steps below:
Step 1: Download and launch the DumpMedia Video Converter
Step 2: Add your iMovie video file to the application
Step 3: Choose your desired output format and destination folder
Step 4: Start the conversion process
Below are the more detailed steps for converting your iMovie files to your chosen formats using DumpMedia.
Download the DumpMedia Application
Before you can start using the application, of course you need to download the software first. The good news is, DumpMedia has a free Mac version for you to try the software first before you decide on whether it is the right tool for you or not but we assure you that you will not be disappointed with its features.
After downloading the DumpMedia installer, launch the application by following the steps below for MacOS operating systems.
- Click on the Launchpad icon in your computer’s Dock. The launchpad icon is a gray circle with a darker gray rocket at the center.
- Type DumpMedia on the Search bar at the topmost part
- Hit the Return button on your keyboard to launch the application.
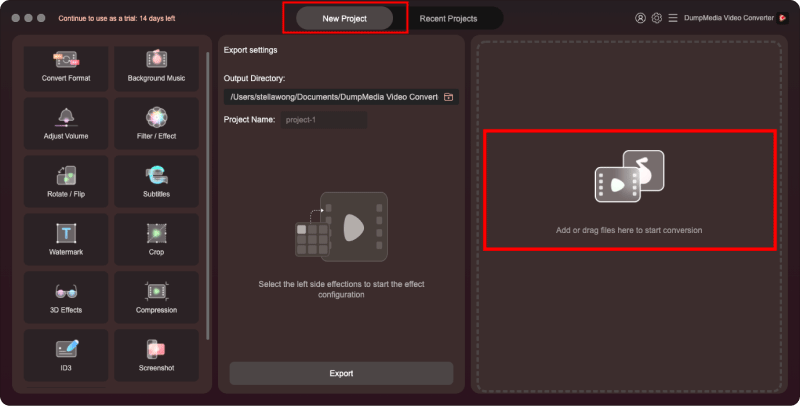
Add Your iMovie Video File to the Application
Click the Add Multiple Videos or Audios button located at the top-left section of the interface to import your files or you can drag-and-drop them directly into the main interface.
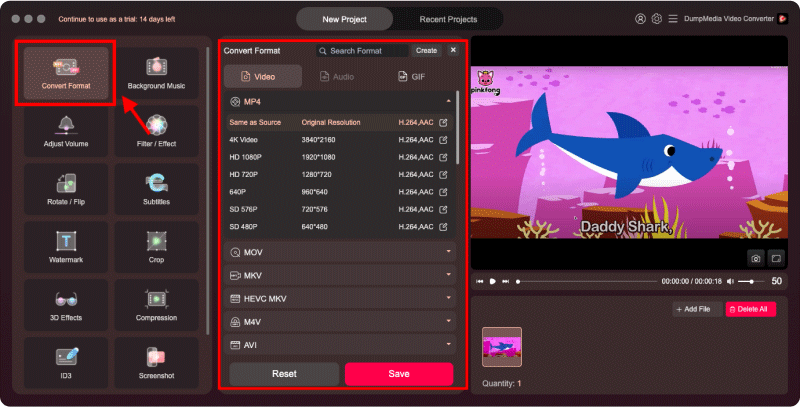
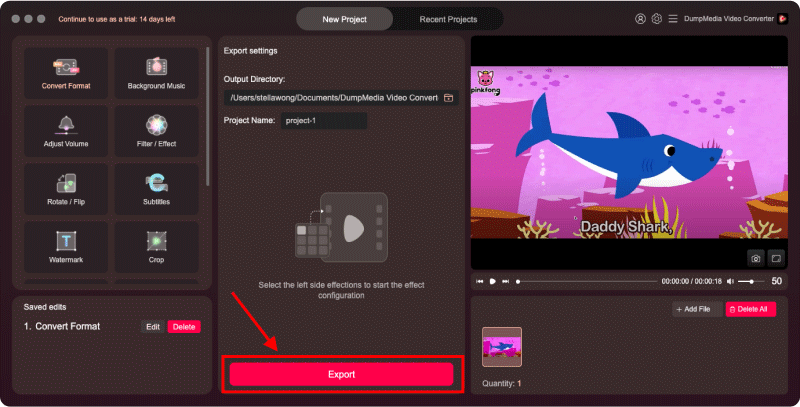
Choose Your Desired Output Format and Destination Folder
Look for the Convert Format button. Select your desired output format. At the bottom of the interface, click on the Save button and browse your computer to the desired destination folder of the converted files.
Start the Conversion Process
Click the Convert button to start the conversion of your audio or video file. Wait for the conversion to complete.
Bonus Tips: Aside from converting video to the compatible format, you can also enhance your video quality by using the Dumpmedia Video Converter. Are you exciting?
Part 3. Wrapping It Up
Because of the nature of video cameras, especially the handheld ones, sometimes your recorded videos come out shaky and is very uncomfortable for you to watch. But you do not need to worry about this problem anymore because you can easily and quickly fix shaking footage with the help of iMovie using the steps we have discussed in this article.
Furthermore, if you want to convert your stabilized camera recordings to other formats that you desire, it is recommended to use DumpMedia Video Converter for a conversion with minimum quality loss.

30% Off >>>