


How To Rip DVD To Computer [2025 Guide]
Some people can call DVDs to be outdated devices are most media are now digital. However, if you have a precious DVD collection, you might want to save their content on your computer. In addition, you might also wish to convert them to other media formats so they can be transferred and used on different types of devices.
For this, you will need to rip the DVD to the computer. In this way, you can get a digital copy of your DVD and be able to burn them back again into a blank DVD. Or, you can convert them using a video converter tool and put them on mobile devices for personal use.
In this article, we will teach you how to rip your DVDs to your Mac and Windows computer. We will be showing you tools that will allow you to copy your DVDs to your computer regardless of the operating system you use. Read on to learn more.
Contents GuidePart 1. How To Rip DVD To Computer Using HandbrakePart 2. How To Rip DVD To Computer With OS X El CapitanPart 3. Convert Ripped DVD Digital Files To Other File FormatsPart 4. In Conclusion
Part 1. How To Rip DVD To Computer Using Handbrake
Ripping DVDs might look complicated. However, it’s very easy to do. There are different options when it comes to programs you can use to rip DVDs. However, in this section, we’re going to make use of Handbrake.
This program is very easy to understand and use. In addition, it works on multiple operating systems including Linux, Mac, and the very popular Windows. The instructions below will help you use Handbrake to rip DVDs to the computer.
Step 01: Visit the homepage of Handbrake. On this site, you should download the tool. After this, you have to install it on your computer by following the on-screen instructions.
Step 02: Usually, the default settings of Handbrake allow you to rip unprotected DVDs. However, usually, original DVDs have copy protection within them. To work your way around it, the installation of “libdvdcss ” is necessary. Simply download the file in the pages below:
- Download Link For Systems Using 32-Bit (Windows)
- Download Link For Systems Using 64-Bit (Windows)
- Download Link For Mac computer (MacOS)
Step 03: After you have downloaded the file, you have to install it on your computer. Then, on Windows, you have to put the file libdvdcss-2.dll in your program folder for Handbrake. On Mac, you simply install it. However, if you have El Capitan, you’ll have to follow different steps (this can be seen below).
Step 04: Insert the disc you wish to rip. Launch the Handbrake tool. Then, press the Source button. This is located in the upper left part of the interface. Select the drive of the DVD from the particular list that appears. Now, Handbrake will start to scan the entire DVD. This will take about a few minutes.
Step 05: Once the scanning process is complete, go to the drop-down menu for Title. This is located in the upper left part of the screen. Now, you will have the option to choose which sections of the DVD you wish to rip.
If it is a movie disc, usually, the longest title is the actual movie. If your DVD contains a series, typically, it’s 22 minutes or 44 minutes long. Plus, you have to rip each show separately.
Step 06: Press the Browse button. This is located on the right side of the interface. Go to the location where you want the movie file to be saved. Simply type the name you wish inside the box. Then, press OK.
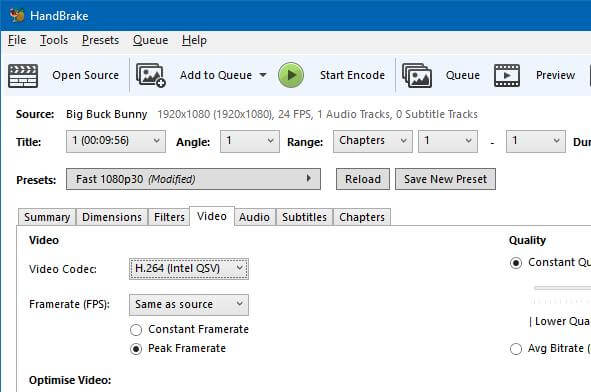
Step 07: Go to the right side of the interface and look for the bar called “Presets.” Now, you will be able to select the output format. If you want the result of rip DVD to the computer to be used on that same device, press Normal. You can also choose a High Profile. However, if you wish to watch something on your iPhone or iPod, you can choose another type of preset.
Step 08: Press the Start button located at the top part of the interface. This will take a few minutes to a few hours depending on the size and length of the video you wish to rip. You might want to eat or do something else while waiting.
Step 09: Once the ripping process is complete, a pop-up will appear. You can simply open the new movie file to watch it. Or, you can also transfer it to another device.
Now, you have completed the steps necessary to rip the DVD to the computer. Now, let’s get on with how to do it if you have OS X El Capitan.
Part 2. How To Rip DVD To Computer With OS X El Capitan
Mac users that have the operating system El Capitan or higher have to go through System Integrity Protection, also known as SIP. This is a security feature that was created to protect system processes and files within Mac computers.
Unfortunately, System Integrity Protection can lead to damage to software. It also removes the downloaded “libdvdcss” file necessary for Handbrake to work. The way through this is by disabling SIP. However, you don’t have to. Here’s what you should do instead.
Step 01: Shut off Handbrake on your Mac computer. Now, launch the Finder window. Type out the following: CMD+SHIFT+G. After this, paste the following in the path here: /Library/SystemMigration/History/.
Step 02: Within this folder, you might be able to see another folder labeled “Migration-[random numbers and letters].” Launch this folder and then you will locate another folder named “QuarantineRoot.” Now, you should open this folder again. Once you launch this folder, you will see the file labeled “libdvdcss.2.dylib.”
Step 03: Now, launch another Finder window. Type out the following again: CMD+Shift+G. Now, you should again paste it in another path known as /usr/local/lib. However, if this folder isn’t available, you should for another folder with the path /ur/local. Now, make a brand new folder and name it “lib.” After, you have created this new “lib” folder, open it.
Step 04: Drag the file “libdvdcss.2.dylib” from the previous window to the folder you created found in /usr/local/lib. Usually, the computer will ask for your administrator password. Type out your password and wait until the copying process is complete.
Step 05: After implementing this, you should restart Handbrake. The app will now scan for the libdvdcss file and you can now use the software.

Part 3. Convert Ripped DVD Digital Files To Other File Formats
Now that you have finished the ripped DVD to a computer process, you can convert it to another format. For this, you can use DumpMedia Video Converter. The tool allows you to convert from various input formats to a multitude of output formats as well.
It has blazing-fast speeds allowing you to save time and effort when it comes to converting files. In addition, it allows you to download files from the Internet using its downloader tool. Plus, it can be used to edit videos if you wish.
Part 4. In Conclusion
In this guide, we have taught you how to rip DVDs to a computer. You can do this by using the DVD ripper tool Handbrake. Then, the digital files can be converted to another output format using DumpMedia Video Converter. In this way, you can enjoy your DVD content across multiple devices and operating systems. Enjoy watching!

30% Off >>>