


How to Record GoToMeeting (without permission) | Quick Guide
The GoToMeeting software is fast becoming every professional’s favorite tool in online meetings, teleconferencing, and even in demonstrations of sales. This is because GoToMeeting is extremely flexible software. You can use the tool using any browser along with the majority of mobile devices with the choice of using a camera or not.
GoToMeeting provides a lot of excellent features too which you can also enjoy using its free version. If you want more powerful functionalities, you can opt for its professional versions.

Given GoToMeeting’s popularity, we are going to show you methods on how to record a GoToMeeting session for whatever purpose in this article. But first, let us discuss what the GoToMeeting platform is in the next section. Then we will give you steps on how you can record a GoToMeeting session on your computer (Windows and Mac) or mobile devices (iOS and Android).
For recording on your computer, we give you two methods on how you can do this either through:
- GoToMeeting’s default recording feature, or
- Other recording software such as ApowerREC and CamStudio.
Contents GuidePart 1. What Is GoToMeeting And Its Notable Features?Part 2. Ways to Record GoToMeeting Sessions on Your ComputerPart 3. Ways to Record A GoToMeeting Session on Your Mobile DevicesPart 4. To Wrap It All Up
Part 1. What Is GoToMeeting And Its Notable Features?
GoToMeeting is an online meeting tool for professionals that makes the connection between people in any way one desires easier. This tool is especially favorable for companies having virtual employees everywhere because it is very cost-effective and easy to assemble everyone through an online meeting. Rather than making all of them fly to the headquarters every time a huge annual meeting happens.
With GoToMeeting, scheduling, hosting, and recording an online webinar and meeting is possible. Its free version has full features but it only allows you to connect to two other people. This is perfectly fine in some situations.
Just like many commercial services that are based on the web, tiered pricing gives you various features which will depend on how much you are eager to pay. GoToMeeting’s top-tier version allows you to accommodate attendees of up to one hundred.
Some of the notable features of GoToMeeting are the following:
- A collaboration of Business Messaging.
- Lessened note-taking of transcriptions,
- Scheduled and instant meetings,
- Customized collaboration settings, and
- All-in-one solution for conference rooms.
Part 2. Ways to Record GoToMeeting Sessions on Your Computer
Method 1. GoToMeeting’s Default Feature of Capturing Sessions (Windows and Mac)
The GoToMeeting platform has its own default feature for screen recording which is useful most especially for those who are always on the go requiring an instant screen recorder.
To use the application, Just launch it and follow these steps:
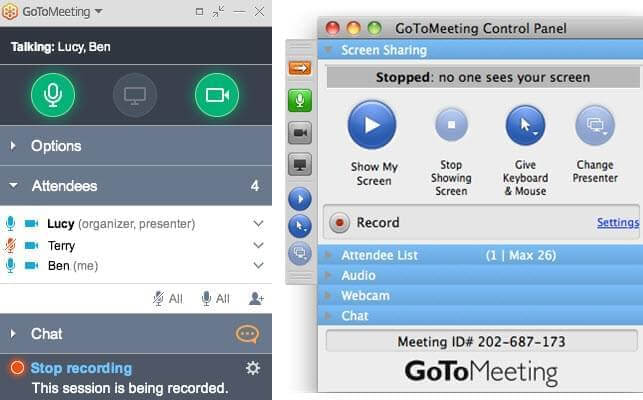
Step 1. Navigate to GoToMeeting’s Control Panel section and scroll down to the bottom.
Step 2. Click on the Record this meeting option to begin recording.
You’ll notice that the recording button will glow. A notification pop-up reminding the meeting attendees that the meeting is being recorded will show on their screen.
Step 3. When your meeting is finished, tap the recording button again and it will turn into a green color telling you that you have stopped the recording.
Step 4. You need to convert the recording through GoToMeeting’s Recording Manager before you can upload it or share it with the other attendees.
#1: Disadvantages of GoToMeeting’s Screen Recording Feature
The GoToMeeting application is not able to generate video outputs of high quality because some users can encounter blank screens on their recorder video files. And as mentioned earlier, GoToMeeting requires you to convert your recording using additional steps so that you can share it or save it on your local storage
Not satisfied with the default converted video recording format from the GoToMeeting app? You can use DumpMedia Converter Software to convert your recording to other formats which will be discussed in the next section.
#2: DumpMedia Video Converter: Best Video Converter Software
DumpMedia is a powerful and high-speed all-in-one audio and video converter, downloader, editor, and player. Enjoy the convenience of a friendly interface equipped with a lot of features to meet all of your video needs. The software supports many formats including MPEG, 3GP, FLV, MKV, AVI, WMV, MOV, MP4 along with other regular video formats. To convert your recorded GoToMeeting videos to other formats you desire, download the software first and follow the steps below.
Step 1. Launch the DumpMedia application.
For Windows users :
Step 1a. Go to the Search icon (magnifying glass) beside the Windows icon in your computer’s Task Bar.
Step 1b. Type DumpMedia on the text field.
Step 1c. Click on the DumpMedia application on the search results.
For MacOS users :
Step 1a. Click on the Launchpad icon in your computer’s Dock. The launchpad icon is a gray circle with a darker gray rocket at the center.
Step 1b. Type DumpMedia on the Search bar at the topmost part
Step 1c. Hit the Return button on your keyboard to launch the application.
Step 2. Click the Add Files button located at the top-left section of the interface to import your files or you can drag-and-drop them directly into the main interface.
Step 3. Look for the Convert all tasks to text at the top right corner of the interface. Select your desired output format.
Step 4. At the bottom of the interface, click on the Browse button and browse your computer to the desired destination folder of the converted files.
Step 5. Click the Convert button to start the conversion of your audio file.
Step 6. Wait for the conversion to complete.

Method 2. Screen Recording Applications for Windows
#1 ApowerREC
ApowerREC is a robust and reliable screen recorder providing you various modes for screen recording which you can choose from. You can record:
- Your whole screen,
- A specific part of your screen,
- Audio only, or
- A game.
Unlike some screen recording software, ApowerREC has a minimal interface allowing very easy usage. Furthermore, aside from its recording feature, it also has a Task Scheduler functionality which allows you to capture your screen without you needing to be around.
#2 CamStudio
The next one is CamStudio which helps you record audio and video screen activities without regard to the source. It has a straightforward interface where annotating, autopan, and player controls are embedded. The application’s support for hotkeys is also a useful feature for managing recordings easily. It also supports hotkeys for managing your recording easily.
However, CamStudio has also its own disadvantages. Aside from working only on Windows, its feature for screen annotations is very hard to use as it is full of complicated settings which brings confusion to users especially the beginner ones.
Part 3. Ways to Record A GoToMeeting Session on Your Mobile Devices
Part 3A. Recording A GoToMeeting Session on iPhone or iPad
Before you can record a GoToMeeting session on your iOS devices, you would need to ensure that screen recording is enabled in your device’s Control Center. You can access Control Center settings using any app.
#1: Enabling Screen Recording in the Control Center
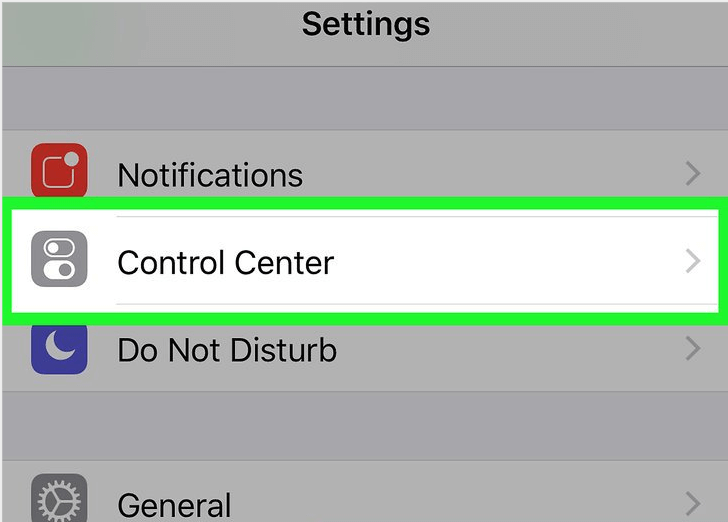
Step 1. Open your device’s Settings which you can normally find on your home screen.
Step 2. Scroll down to the bottom part of your screen and tap on Control Center.
Step 3. Tap Customize Controls.
Step 4. Tap the green circle with a plus sign inside it beside Screen Recording to ensure that screen recording is added as an option in your device’s Control Center. But if the circle beside Screen Recording is a red one and contains a minus sign instead of a plus sign, this means that the screen recording option is already in the Control Center. No further changes are required if this is the case.
Step 5. Go back to one level of the Settings by tapping the back button.
Step 6. Toggle the Access Within Apps option to ON. If you see that the switch is already green, just leave it as is.
#2: Recording the Meeting
Step 1. Launch the GoToMeeting application on your iPad or iPhone. The app’s icon is an orange one containing a white flower with six petals. You can find the icon on your home screen.
Step 2. At the bottom-left part of your screen, tap the Join a Meeting button.
Step 3. Enter the meeting’s ID on the text box and tap on the orange Join button beside it. This process will add you to that meeting.
Note: The meeting ID is a series of numbers that will be provided by the administrator of the meeting.
Step 4. Swipe up starting from your screen’s bottom part if you are ready to begin the recording process. The Control Center will open up.
Step 5. Tap the icon with a circle inside a circle (similar to a bulls-eye), this is the recording icon. A countdown will commence and the recording will begin.
Step 6. Go back to your meeting by closing the Control Center.
Step 7. To stop the recording process, swipe up from the bottom of your screen again to re-open the Control Center.
Step 8. Tap the same button you used to start the recording earlier except it is currently red. The recording will stop and will be saved to your device’s gallery.

Part 3B. Recording A GoToMeeting Sessions on Android
Android devices do not have a built-in screen recording feature so you need to download a third-party application from Play Store before you can record your GoToMeeting sessions by following the steps below.
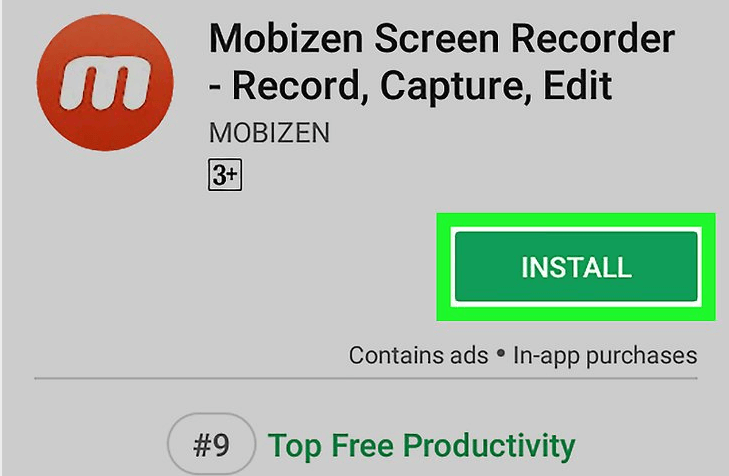
Step 1. Install an application for screen recording in Play Store.
Step 1a. Launch the Play Store application. You can find it in your device’s application drawer.
Step 1b. The type screen recorder in the search box then presses the search button to find a screen recording app.
Step 1c. Select an app so that you can see its details. Read the app’s reviews before you download one to ensure that it is legitimate. Or you can opt for Genius Recorder, DU Recorder, or Mobizen Screen Recorder.
Step 1d. Tap the green INSTALL button.
Step 2. Launch the screen recording app you installed. If you haven’t closed the Play Store yet after installing the app, just tap on the OPEN button. Otherwise, look for the app on your home screen or the application drawer and tap the app’s icon.
Note:
- Most screen recording apps walk you through short tutorials introducing the app’s functionalities.
- After finishing the tutorial, you will see a floating object somewhere on your screen (normally on the right or left section). This icon stays at that part whenever your recording app is running.
Step 3. Launch the GoToMeeting application. The app’s icon is an orange one containing a white flower. You can find it on your app drawer. You will notice the screen recording app’s floating icon while the GoToMeeting app is running.
Step 4. While inside the GoToMeeting app, press your screen recording app’s floating icon. A menu with additional options or icons will open.
Step 5. Press the Record button which is normally a black or red circle to start recording all of the sound and video from your device.
Step 6. Join a GoToMeeting session by entering the meeting ID on the text box. Follow the on-screen steps to join the meeting. If you are ready to stop the recording, proceed to the next steps.
Step 7. Open the notification panel on your device by swiping down starting from your screen’s top part. You will see a notification saying Recording in progress.
Step 8. Tap the red or black square beside that notification to end the recording process. This automatically saves your recorded video to your device’s gallery.
Part 4. To Wrap It All Up
Taking notes during your online meetings in the GoToMeeting platform is much easier when you record your sessions. All of the methods we have shown you above to help you do this should work well on your computer and mobile devices. If you don’t want to bother yourself in installing third-party applications when you are in a rush, you can use GoToMeeting’s default recording feature and convert the recorded video to other format in case you need to using DumpMedia Converter Software.
On the other hand, you can use other software such as ApowerREC and CamStudio to record your GoToMeeting sessions if you want more advanced features. But if you want to record your sessions on your mobile devices, all you have to do is enable screen recording on your iOS device’s Control Center. For Android users, Android has no built-in recording apps so you need to download one from Play Store. Genius Recorder, DU Recorder, and Mobizen Screen Recorder would be our recommended Android recording apps.

30% Off >>>