


How to Record Gameplay on PS4 2026
For a lot of players out there, sharing their gameplay on various video sites has become a practice that enhances the gaming experience. Considering that a lot of players love to utilize Facebook, YouTube, Twitter, and Twitch (a streaming service) in order to show their own experiences with video games, it’s perfectly sensible that the PS4 console allows you to make and upload your gaming clips on the Internet.
If you don’t know the ins and outs of how to record gameplay on PS4, you might find the actual process to be complicated. What’s worse is you might even wipe out past saved videos accidentally. This is possible if you don’t know which controls to utilize and how to use them.
In this article, we’ll teach you how to record gameplay on PS4. In this way, you can share your gaming experiences with others. Let’s get started.
Contents GuidePart 1. How To Record Gameplay On PS4Part 2. How To Convert PS4 Gameplay Videos FormatPart 3. In Conclusion
Part 1. How To Record Gameplay On PS4
#1: Adjust the Settings for Your Video
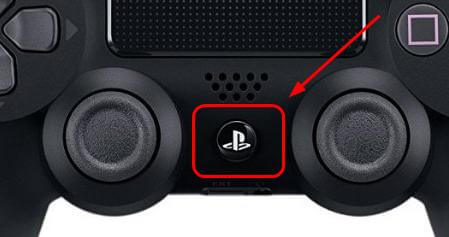
First, press and hold the PS4 controller Share button. This will launch the Share menu. In the interface, you’ll have the ability to change a lot of settings regarding how you actually share the video content you make on the console. This includes video settings as well.
The settings you opt for in this step will be used once you upload videos online. By this time, you may want to prepare the PS4 console to record a specific length for your video clips. In order to set this up, go to the menu labeled “Set Video Length.”
In this menu, you can set the length of time the PS4 console will record your gameplay once you start to push the Share button. It can be set to record a minimum of 30 seconds to a maximum of an hour. However, the default length is set to about 15 minutes.
#2: Start to Play the Game
This part is not that complicated. Of course, if you want the details on how to record gameplay on PS4, you will play the game itself. You can start playing the actual game you want to record. For this, you’ll have two different options. The first option will allow you to create a new recording by pressing the Share button. This will record until the set video length you did in the previous step or until you simply press the Share button once again.
The alternative to this is to record the video of what happened in the past. The PS4 console has the ability to save your gameplay for the last 15 minutes up to the current gaming session. For instance, if you were able to do something amazing and you didn’t press the Share button during that time your PS4 was still able to save data worth the last 15 minutes. Doing these two things will be explained later on. Typically, it will entail similar controls. However, there are variations to these two types of recordings.
#3: Begin Your New Recording
Before you begin playing the game you might wish to start recording. For this, you simply start the recording process by pushing the Share button two times. It’s similar to double-clicking using your computer’s mouse. In this way, the recording will start off.
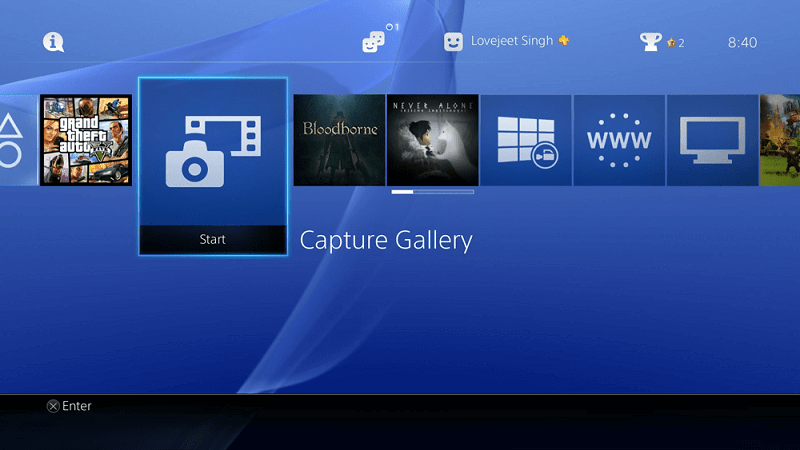
Now, the console will record until the time recording length you have set in step one. If you wish to end the process of capturing the gameplay, you simply press the Share button two times again. Once the recording process is finished, the video clip will be placed inside the folder “Capture Gallery.” This folder can be found in the PS4’s home screen.
When you want to know how to record gameplay on PS4, you have to ensure that the video game you want to capture doesn’t deactivate recording features automatically. For instance, there are certain games that will temporarily stop the recording features to avoid spoiling you in stories. In order to work your way around it, you should utilize the capture card as opposed to the share features built-into the console.
#4: Save PS4’s Captured Video For The Past 15 Minutes
If you realized that you did an excellent job of playing a game during the last 15 minutes and you didn’t double-press the button for sharing, then you’re still in luck. The PS4 console is continuously recording your gameplay. However, it just doesn’t actually save the recording. That is unless you tell it to save the recording manually.
The gameplay session for the past 15 minutes is always saved by the console and is located within the video cache. Thus, if you forgot to press the Share button, you can still get the past 15 minutes of gameplay with ease.
An important thing to remember is that if you wish to get the past 15 minutes of your video gameplay, you must avoid pushing the Share button twice. This is because doing so will delete the video from the cache. It will start a new recording once you press the Share button and overwrite data of the past 15 minutes.
In order to check the past 15 minutes of gameplay, press and hold down the Share button. The menu will launch again. From this interface, choose “Save Video Clip.” Or, you can also press the Square button. This will allows you to save the video clip and place it in the Capture Gallery.
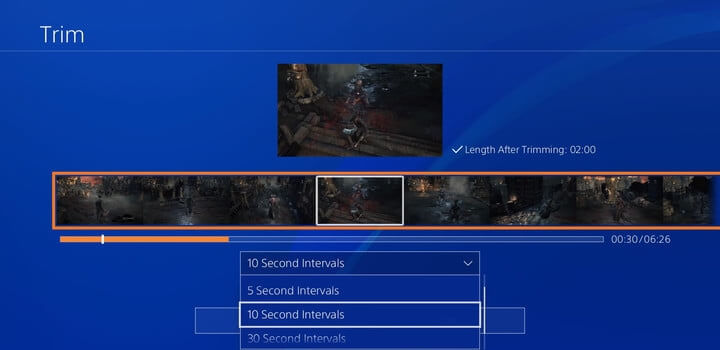
#5: Trim Your Gameplay Video
On this step of how to record gameplay on PS4, you’ll edit the video. You might want to trim it to make it “upload-able ” to video platforms. You can trim the video by going to the Capture Gallery. Simply select the video and press the Options button using your PS4 controller. It will show a menu allowing you to “Trim ” the video. Once you trim the video, you can remove parts of your video in order to make it shorter.
#6: Share Video Online
Once you have trimmed the video, you can share it online. In order to do this, your PS4 console must be connected to your social media site accounts. Once you choose a social networking platform from the menu for “Share Video Clip,” it will show you on-screen prompts that will allow you to log into your account. Once you have logged into the account, you simply choose your video, write out any comments or notes (or tweets). And then, you can make some customizations specific to the platform. Finally, you can simply share it online afterward.
#7: Transferring the Video to Your Computer
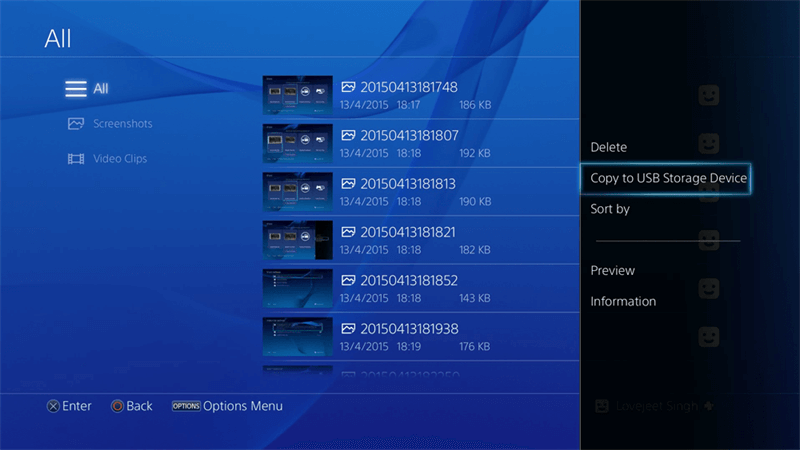
The final step of how to record gameplay on PS4 involves transferring the video file to your computer. If you like to get a copy of your video, you simply plug a USB into one of the ports on your PS4. Then, go to the Capture Gallery and highlight the video you wish to move. Press the Options button and then check out the menu that is located on the right side of the interface. Press “Copy To USB Storage Device.”
You will be redirected to the Capture Gallery’s grid view. From here, you can choose the videos you wish to transfer to the USB. Do this by pressing the X button. Once everything is selected press Copy. Then, press OK.
Part 2. How To Convert PS4 Gameplay Videos Format
Once you have copied your gameplay video clip to your computer (through the USB used earlier), you can convert it from one format to another. In this way, it can be compatible with mobile devices and other platforms.
For this, you have to use DumpMedia Video Converter. It allows you to convert gameplay videos from one file type to another. The converter has a lot of options when it comes to input formats and output formats. It’s a great way to make shareable gameplay video content that is portable and compatible with various devices.
Part 3. In Conclusion
In this guide, we’ve told you the steps on how to record gameplay on PS4. You simply follow the six easy steps above. Plus, you can use DumpMedia Video Converter in order to convert the gameplay videos you copied from your PS4 to your computer. In this way, you can watch the videos on various devices and upload it on multiple online platforms.

30% Off >>>