


How to Transfer Music from iTunes to USB Flash Drive on a Mac (2026)
Many Mac users often ask how to transfer music from iTunes to USB flash drive on a Mac to enjoy their favorite songs on different devices or create portable music libraries. While transferring non-DRM iTunes tracks is straightforward, Apple Music songs or DRM-protected tracks cannot be copied directly. This guide will show you both the official iTunes method and a more reliable solution for all types of music, including Apple Music.
Contents Guide Part 1: Official Method to Transfer iTunes Music to USB Part 2: Best Method to Transfer Apple Music to USBPart 3: FAQsPart 4: Summary
Part 1: Official Method to Transfer iTunes Music to USB
If your music library contains non-DRM tracks, you can transfer them to a USB flash drive on your Mac using iTunes. Here’s how:
- Connect your USB flash drive to your Mac.
- Open iTunes and navigate to your music library.
- Select the songs or playlists you want to transfer.
- Drag the selected files to your USB drive icon in Finder.
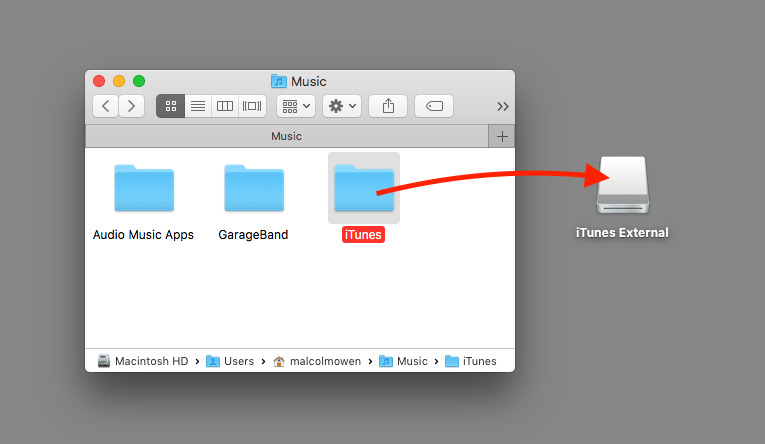
This method works well for standard iTunes tracks.
Limitations of the Official iTunes Method
Although iTunes allows you to copy standard songs, there are significant limitations:
- Apple Music DRM Protection: Songs downloaded from Apple Music cannot be copied directly to USB.
- File Format Restrictions: Some iTunes tracks may not be in MP3 format and may not play on all devices.
- Playlist Limitations: Large playlists can be tedious to transfer manually.
These limitations mean that even after learning how to transfer music from iTunes to USB flash drive on a Mac, you may still encounter playback issues or restrictions.
Part 2: Best Method to Transfer Apple Music to USB
For Apple Music or DRM-protected iTunes tracks, DumpMedia Apple Music Converter offers a complete solution. By converting your music to MP3, WAV, AAC, or FLAC, you can freely transfer your files to any USB flash drive without restrictions.
Why Choose DumpMedia Apple Music Converter?
- Convert Apple Music to MP3 for universal playback
- Maintain original audio quality
- Batch convert multiple songs or playlists
- Preserve ID3 tags (artist, album, title)
- Easily transfer converted files to iPhone, USB or other devices
This solves the main problem users face when trying to figure out how to transfer music from iTunes to USB flash drive on a Mac for Apple Music tracks.
Step-by-Step Guide Using DumpMedia
Step 1. Open the software on your computer. It works with both Windows and Mac. The interface is user-friendly, making it easy for beginners.
Step 2. Open the built‑in Apple Music web player inside DumpMedia and log in with your Apple Music account. Browse Apple Music and drag the songs, albums, or playlists you want to download into the converter.

Step 3. In the settings panel, select MP3 as the output format to enable a MP3 download of your selected tracks.
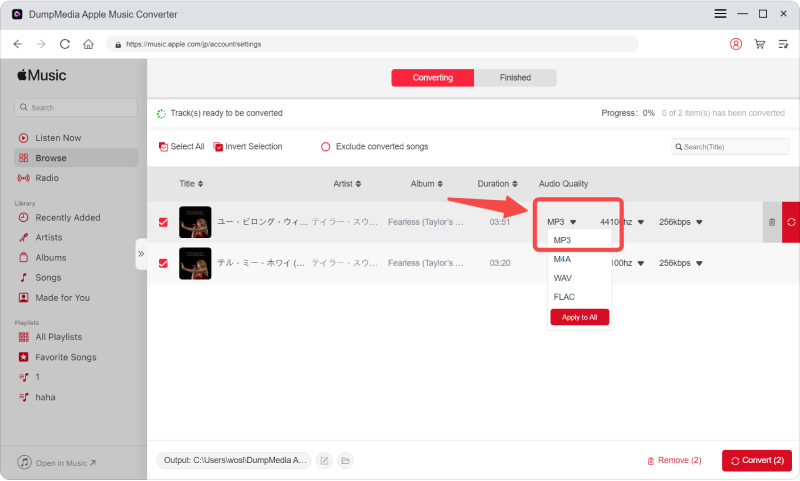
Step 4. The last step would be hitting the “Convert” button to begin the conversion process.

After these steps, your music will play on any device, and you can finally achieve a true solution for how to transfer music from iTunes to USB flash drive on a Mac.
Part 3: FAQs
1: Comparison – iTunes vs DumpMedia
- iTunes: Works only with non-DRM files, limited format, manual transfer, subscription-dependent for Apple Music.
- DumpMedia Apple Music Converter: Donwload all Apple Music tracks to universal formats without DRM, supports batch conversion, preserves quality and metadata, and ensures portability.
For users with Apple Music subscriptions, DumpMedia provides a much smoother experience for transferring music to USB flash drives.
2: Can I transfer Apple Music songs to USB using iTunes?
Only non-DRM iTunes tracks can be transferred. For Apple Music files, you need a converter like DumpMedia.
3: How do I transfer music from iTunes to USB flash drive on a Mac safely?
Follow the official iTunes method for standard tracks, or use DumpMedia for Apple Music songs.
4: Will my converted music maintain quality?
Yes, DumpMedia preserves the original quality and ID3 tags.
5: Do I need a subscription to Apple Music to convert songs?
Yes. You must have access to the tracks in your library, but DumpMedia can convert them for offline use even if your subscription ends later.
Part 4: Summary
Learning how to transfer music from iTunes to USB flash drive on a Mac is straightforward for standard tracks, but Apple Music DRM-protected songs pose challenges. DumpMedia Apple Music Converter provides a reliable, efficient, and high-quality solution, allowing you to convert and transfer all your Apple Music tracks to USB without limitations. For anyone who wants a complete, hassle-free solution, DumpMedia ensures your music is fully portable and ready to enjoy on any device.

30% Off >>>