


How to Burn CDs to iTunes for Free in 2025
“I have been loving some songs on my CDs but since using them is no longer on-trend, I wish to have them on my iTunes library. Can you give me a guide to finally burn CD to iTunes library?”
The use of CDs has been so trendy before. More so, people find them as good storage devices to keep the songs that they love. But since technology has been improving era by era, the introduction of more methods to stream and store music files has been very popular. Nowadays, you can just use music streaming platforms and other apps that can store and manage your media files like iTunes.
Actually, in this post, we will be dealing more with the “burn CD to iTunes” topic. The iTunes app has been very helpful to a lot of users as this software is not only a media player but is as well an app that’s capable of keeping and letting you manage your media files including music files more efficiently.
The good thing is that you can burn CDs on iTunes. So, if you wish to have some of the music files on your CDs imported to your iTunes library, it is a relief to know that it is possible, right? Once the importing process has been made successfully, there is no need to bring the actual CDs with you every time you wish to listen to the songs you have saved in them. You can just rely on your iTunes app and listen to what your iTunes library has!
Contents Guide Part 1. What to Do When You Insert A CD?Part 2. Burn Songs from CD to iTunes libraryPart 3. (Recommended) Convert iTunes Songs to MP3Part 4. Summary
Part 1. What to Do When You Insert A CD?
To start the process of how to burn CDs to iTunes, of course, the first thing that you will do is insert the CD into your computer’s CD drive. You need to choose what happens when you insert a CD into your computer’s drive.
- Head to your iTunes app. Open it on your PC. Afterward, hover your mouse over to the top section. Tap the “Edit” button and then the “Preferences” button. You then need to click the “General” option next.
- You need to tick the “When a CD is inserted” pop-up menu then select from these options:
- Show CD – you can let the iTunes app just open the CD. Playing it or importing its content won’t happen.
- Play CD – the iTunes app will then play what the CD has but won’t import its content.
- Ask to Import CD – the iTunes app will then open the CD and you will be asked if you wish to import its content.
- Import CD – by tapping this, the iTunes app will proceed with the importing process.
- Import CD and Eject – the iTunes app will automatically import the CD content and then eject it after the process. This is a very efficient option just in case you wish to import several CDs to your iTunes library.
Now that you know what you must do first after inserting a CD into your computer’s CD drive, we will now be heading to the discussion of how to burn a CD to the iTunes library in the next part of this article.
Part 2. Burn Songs from CD to iTunes library
If you try to burn CDs to iTunes, you will be amazed since the iTunes app is quite too fast in doing the job. Most songs are usually imported within just a few minutes whereas an entire CD can be imported within just 10 minutes.
To finally burn CD to iTunes, you can follow this procedure.
Step #1. Make sure to insert the audio CD you wish to burn into your computer’s CD or DVD drive. If your computer does not have a CD or DVD drive, you can also use an external drive. If you wish to see more information about the CD, you can just tap the “CD button” that is just in the top area of the iTunes window (in the left side area).
Step #2. You will be asked what you wish to do as a new window pops up on your screen. You can choose either of these two.
- Import all songs on the CD – Click “Yes”, then the iTunes app will start importing what your CD has. Once done, head to step 6.
- Prevent certain songs from being imported – Tap “No”, then head to the third step.
Step #3. You shall see the list of the songs to appear on your iTunes window. Remove the checkmark that is next to a song that you don’t like to be imported into your iTunes library. If you are not seeing the checkboxes, tick the “Edit” button then choose “Preferences”. Hit the “General” button next and then select the option for “List view checkboxes”.
If you are not connected to a WiFi network or if the iTunes app can’t display the information of the CD, you shall notice that the songs are named “Track 01”, “Track 02” and so on.
Step #4. Finally, to burn CD to the iTunes library or add the selected songs, you have to click the button for “Import CD” which is just at the top right of the iTunes window.
Step #5. Select an import option then tick the “OK” button. If you are wondering if you can still use the iTunes app while the importing is ongoing, yes, that is possible. If suddenly, you wish to cancel the importing process, just tap the “Stop importing” button. Those songs that were processed before you cancel will be added to your iTunes library.
Step #6. When the importing of the songs is completed, tick the “Eject” button that is at the top right of your iTunes window.
Now, you just finished the process of how to burn a CD to iTunes. Since you already have the songs added to your iTunes library, you can now start playing them, creating a playlist with them, and many more that you like.
Part 3. (Recommended) Convert iTunes Songs to MP3
We are glad that we just helped you with the process of how to burn a CD to iTunes. Now, we will be sharing a method of how you can convert your iTunes songs to MP3. You might be thinking that this is quite a hard process especially if you have iTunes songs that are encrypted with Apple FairPlay’s protection.
Don’t worry. You can use apps like the DumpMedia Apple Music Converter to proceed with iTunes to MP3 conversion and DRM removal process.
Click to have a free try! It's 100% secure!
Several apps are capable of doing iTunes to MP3 conversion.
With the DumpMedia Apple Music Converter, you can have your iTunes songs converted not only to MP3 format but to other output formats it supports like M4A, FLAC, AC3, and more.
As mentioned, it’s capable of getting rid of the songs’ DRM protection so you can have the songs accessed on any media player or device. The app also ensures that output files will be high quality. ID tags will be kept, and output profile settings can be customized.
More so, the DumpMedia Apple Music Converter can function as a powerful audiobook converter. This might have surprised you but it’s true. So, if you are also an audiobook lover, you can use this app to transform the audiobook files that you have into the format you desire.
This app works fast and has a UI that’s easy to handle.
To use this DumpMedia Apple Music Converter to convert your iTunes songs to MP3 format, you can simply follow these steps.

Step #1. Install the DumpMedia Apple Music Converter on your computer and then launch it. Start previewing the Apple Music songs or iTunes tracks that you wish to convert to MP3. You can process several songs in one go so selecting a bunch will be fine.
Step #2. Under the “Output Format” section, choose MP3. You can also change some settings if you like. Setting up an output folder is recommended so don’t forget to do so.
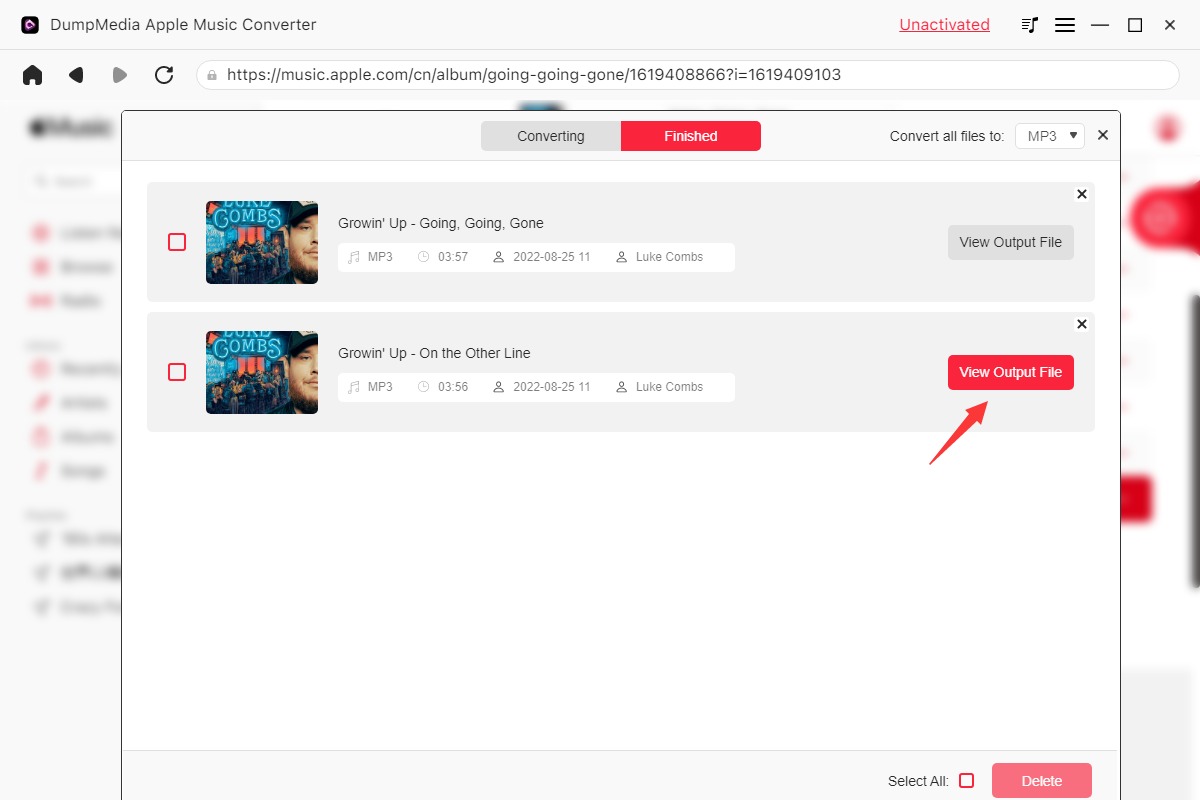
Step #3. Once you are okay with the setup, tap the “Convert” button and the app will then start converting the iTunes songs to MP3 format as you wish. The DRM removal procedure will also happen.
In just a few minutes, you will be having the MP3 version of the iTunes songs available on your computer for forever keeping, offline streaming, and even sharing with friends!
Part 4. Summary
Now that you learned how to burn CDs to iTunes, we are happy it would be more convenient for you to stream those music files that you have saved on your CDs now. You can just import them all to your iTunes library and then listen to them anytime you want to. If you also wish to convert some iTunes songs to MP3 format or any other format that you like, try using the DumpMedia Apple Music Converter!

30% Off >>>