


How to Burn iTunes Music to CD on PC (2025 update)
“I recently found out that the iTunes app is very reliable and flexible in some ways. Imagine? Apart from being a file manager, I really can use this app to burn some songs to my CD using my computer. My only dilemma now is that I am not quite sure about the procedure of how to burn songs from iTunes to CD on PC. Can someone help?”
You read that right! The iTunes application is indeed a great app as it can even do the burning process of tracks to your CD disc. If you wish to save your favorite tracks on a CD to have them played on any CD player or on your car stereo, you can fully use the abilities of the iTunes app. Burning songs to CD is also a good way to save backups or copies of the music that you really like. You can even share them with your friends!
However, since the iTunes app is free of use, there will always be limitations. You can only process the burning of the DRM-free tracks via iTunes. If you have protected files, it is still better that you seek help from professional and trusted tools like this DumpMedia Apple Music Converter.
Don’t worry. We will make sure to discuss every bit of information that we know you need. Let’s start learning the procedure of how to burn songs from iTunes to CD on PC then!
Contents Guide Part 1. Preparatory Work before iTunes CD BurningPart 2. Convert iTunes Music with Apple Music ConverterPart 3. How to Burn Music from iTunes to CD on PC?Part 4. Summary
Part 1. Preparatory Work before iTunes CD Burning
Before we learn how to burn songs from iTunes to CD on PC, there are still some other important things that you must first look into.
There are only four important things to check and know.
- You need to know first what CD type you wish to use. There are three options for you – Audio CD, MP3 CD, or Data CD. Learn the differences between each and compare it with what you actually need before you start with the “how to burn songs from iTunes to CD on PC” procedure.
- Of course, you need to have a blank CD. It is not suggested to use a CD-RW one as this does not always play when inserted into a CD player.
- You need a computer must have a CD drive burner that can accommodate the burning process.
- Since you are to use the iTunes app, it is always recommended that you have it in the latest version available. You can always check if an update is needed by heading to the Apple Store or Google Play Store. An “Update” button signifies that there is a new version available that you can download and install.
- If you aim to learn the “how to burn songs from iTunes to CD on PC” procedure because you have Apple Music files that you want to process, you have to know that these files are protected under the Digital Rights Management Protection policy. And so, it’s part of the preparation to check what professional and reliable tool you can use to firstly remove the DRM protection of the Apple Music songs and have them converted to a format supported by iTunes or other apps like Windows Media Player. We suggest using the DumpMedia Apple Music Converter. You can actually learn more details about this app as you move to the second part of this article. We will highlight how you can do the conversion and DRM removal process through this app.
Part 2. Convert iTunes Music with Apple Music Converter
Before you deal with the steps of how to burn songs from iTunes to CD on PC, you must be aware that there are iTunes or Apple Music songs that can’t be processed immediately as you wish as they are under DRM protection. With this encryption, downloading, accessing on all players, and even burning them to a CD can’t be done. This is why a lot of users tend to look for applications that can help remove this DRM encryption.
Additionally, these protected files are usually in AAC file format that is not that playable on a majority of media players and devices. There is a need for you then to convert the files to a more flexible format like MP3 and the like.
With this, you have to look for an all-in-one converter then! Why not try using this DumpMedia Apple Music Converter?
The DumpMedia Apple Music Converter has the ability to convert your Apple Music files to its supported output formats without thinking about the risk in the quality of the output files. You can still be assured that 100% original quality will be maintained as well as the ID tags and metadata information.
Additionally, it can remove the DRM encryption of the songs within just minutes and just by tapping a few keys on your keyboard! Also, it can even work as an audiobook converter. Yes! If you are not into Apple Music only, and you also love audiobooks, using the DumpMedia Apple Music Converter can help you even with audiobook conversion!
This application also works at a fast speed. With its 10x faster conversion speed, you can have the output files ready right away after just a few minutes. It is just easy to handle as it has functions that are simple. When it comes to the installation needs, there are only a few things you need to take into consideration and complete. For the details, you can visit DumpMedia’s official website.
So, before you do the “how to burn songs from iTunes to CD on PC” procedure using either iTunes or Windows Media Player (what we’ll discuss in the third part), you need to learn first how you can utilize DumpMedia Apple Music Converter.
Here’s the procedure that you can follow.

Step #1. Complete the installation needs, get the installer of DumpMedia Apple Music Converter, and then start the installation process. Once successfully completed, start by launching the app. Preview and then select the Apple Music song to be converted and burn to CD. Remember that since this app can convert a number of songs in one go, you can add a bunch if you want.
Step #2. On the bottom area of the screen, there are options displayed. You can start customizing the output settings as you like. You can select what output format to use and specify an output folder as well to easily access the transformed files after the conversion process.

Step #3. You can now tap the “Convert” button that is just at the bottom right area of the screen. The app will then perform the conversion and DRM removal process as expected.
The app works pretty fast so you can expect to see the output files within just minutes.
Now that you already have the DRM-free Apple Music songs, we will now be learning how to burn songs from iTunes to CD on PC. And, the information you need is on the next part so read on.
Part 3. How to Burn Music from iTunes to CD on PC?
Of course, now that we have the transformed Apple Music files, we can now deal with the procedure of how to burn songs from iTunes to CD on PC. We will be explaining here how you can do it using the iTunes app as well as the Windows Media Player app. Surely, there shouldn’t be issues on your side since both are easy to download and install (just in case you don’t have them yet on your PC).
We’ll start with the discussion of how to burn songs from iTunes to CD on PC using iTunes itself then.
Burn the Converted Apple Music to CD on PC with iTunes
In doing the burning process of the DRM-free Apple Music songs via iTunes, you only need to do and follow five easy steps. Each will be explained and highlighted in this section.
Step #1. You need to launch your iTunes app first. Once you are on the main page, click the “File” button that is just at the top area of the screen, and from the new options displayed, select the “Add File to Library” menu. This will allow you to start importing the converted Apple Music songs to your iTunes library.
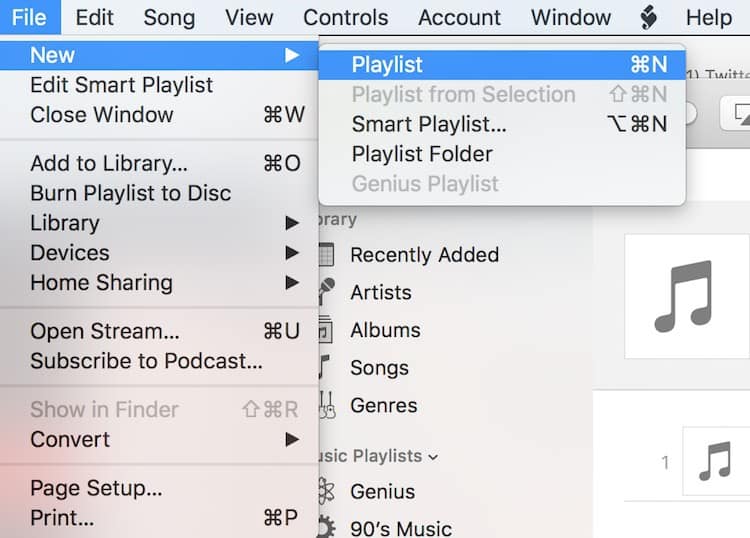
Step #2. There is a need for you to create a new playlist first. To do so, just tap the “File” button again and then tick “New”, then “Playlist”. You can name the newly created playlist as you like. Open it and start dragging and dropping the transformed files to add them to the playlist created.
Step #3. You need to insert the blank CD (that you just prepared) into your computer’s CD drive and wait until it’s detected by your computer.
Step #4. Highlight the playlist you created with the converted songs and then right-click. Choose the “Burn Playlist to Disc” option. You will notice that a popup window will appear wherein you can modify and select the burning speed, disc format, and more.
Step #5. To start the burning procedure, tap the “Burn” button.
As simple as that, you just completed the “how to burn songs from iTunes to CD on PC” procedure through the help of the iTunes app. We will now be tackling how to burn songs from iTunes to CD on PC via Windows Media Player.
Burn the Converted Apple Music to CD on PC with Windows Media Player
Now that you know the process of how to burn songs from iTunes to CD on PC using iTunes, we will now be sharing a guide that you can follow if you are to use Windows Media Player. If you are not comfortable using the iTunes app, you can try using this player as this also has an interface that anyone can handle.
Step #1. Insert the blank CD into your computer’s CD drive.
Step #2. Open the Windows Media Player on your computer and then head to the “Burn” tab that you’ll see right away in the right sidebar or pane of the screen. You shall see a burn list that is empty.
Step #3. Head to the folder where you saved the converted Apple Music songs and start dragging and dropping them t the burn list in the Windows Media Player. There is a burn panel. Tap the menu and you shall see more options displayed. You have to choose “Audio CD”.
Step #4. Once you are done performing up to the third step, you can now click the “Start burn” button. The Windows Media Player will then start burning those MP3 files that you have to the blank CD that you inserted. After the whole burning process, the CD will automatically be ejected from your computer.
Now, the CD is ready for playback on any CD player that you have. You can also have the songs streamed on your car’s stereo if you want to. Additionally, you can even share the CD (with the Apple Music songs) with your friends and family members. There shouldn’t be any issues on the CD disc during streaming since the songs in it are already free from DRM protection!
Part 4. Summary
You just learned how to burn songs from iTunes to CD on PC using the iTunes app as well as via Windows Media Player through this article. You just have to remember that the Apple Music files should be DRM-free before you are able to do the burning to CD process.
The DRM removal process and conversion can be done through DumpMedia Apple Music Converter. If you have any other queries relating to the topic, feel free to leave some comments in the section below and we’ll get back to you right away.

30% Off >>>