


Export iTunes playlist to MP3 (2026 Update)
When you export iTunes playlist to MP3, your intention most likely is to put them in a portable MP3 player. This MP3 player can be used both for sports and outdoor activities. MP3 players unlike smartphones have very simple electronics. Because of this, it can readily be put on a strap in your arms.
It can also be put in your pocket without the bulky feeling. This creates freedom of movement that you can't do with an iPhone or smartphone. Once you experience this freedom, you'll never go back to exercising with a bulky gadget with you.
Contents Guide Part 1. How to Export iTunes Playlist to MP3 with Simple Steps? Part 2. How to Export DRM-Protected iTunes Playlist to MP3 Part 3. Summary
Part 1. How to Export iTunes Playlist to MP3 with Simple Steps?
To export iTunes playlist using simple steps is equivalent to using iTunes' built-in conversion tool. Apple put several capabilities in iTunes. It can play, browse and download songs. Additionally, it can also do song conversions. Many people don't know this added capability, so we're here to let them know.
Once you've done your export, you can transfer these songs to an MP3 player. Having a gadget smaller and lighter than an iPhone or an Android smartphone is very convenient. You can bring them along with your exercise routine or outdoor activities. Nothing is more comfortable than feeling light and easy while doing your workouts.
Listed here are the steps to import your songs to MP3 using iTunes / Apple Music:
- Download then install iTunes from the Apple website. Find the latest version that fits your Operating System. The file is huge and installation and operation can become very slow at times. If you have a Mac, it's much better because Apple Music may be installed by default in their OS.
- Go to Edit->Preferences and switch to the General tab. Choose and click Import Settings.
- On the Import Using dialog menu, choose the MP3 Encoder option as an encoder. Click OK to continue.
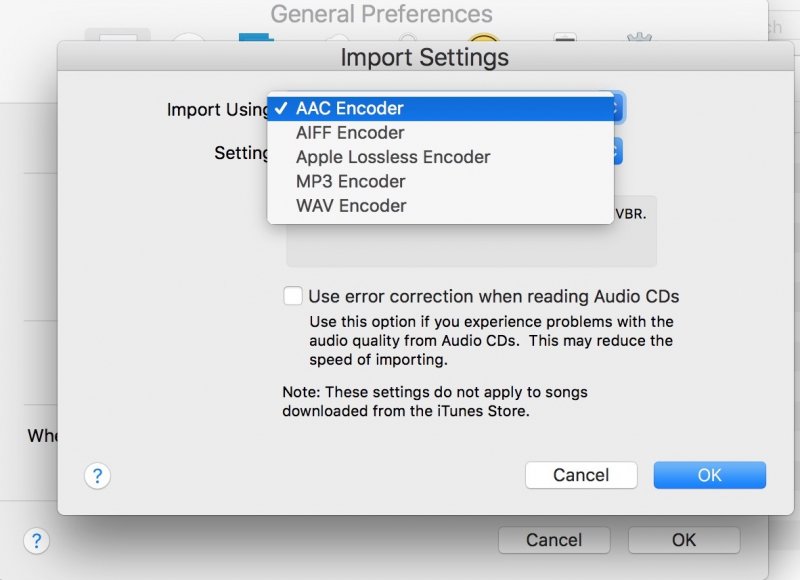
- Click OK again to finish.
- You can now convert your personal songs to MP3. Choose songs from your iTunes or Apple Music library. Highlight or select them. Choose them from your Playlists if you like.
- In the iTunes or Apple Music menu at the top, go to File->Convert->Create MP3 version.
- Try to check these songs along with the original file when the conversion is finished. Then right-click on the song. Choose Show in Windows Explorer option on a PC. On a Mac, show this in a Finder window.
Once you learn how to export iTunes playlist to MP3, you'll find out you can't convert a lot of songs. It's because of DRM. In the next section, we'll teach you a method on how to overcome this.
Part 2. How to Export DRM-Protected iTunes Playlist to MP3
You may not be happy with the export iTunes playlist to MP3 process if you use iTunes alone. You'll find out that you can't convert protected files. You'll be surprised how many they are! The reason behind it is DRM. DRM stands for Digital Rights Management. This prevents music files from Apple to be copied by music pirates.
However, you know for yourself that you are not a music pirate. You just want to copy these iTunes or Apple Music songs to your mini MP3 player. For this, you'll need a versatile third-party tool.
This tool we'll introduce is the DumpMedia Apple Music Converter. Download and install DumpMedia Apple Music Converter below. It is available for both PC and Mac:
Here are the steps to convert iTunes to MP3 using DumpMedia Apple Music Converter:
- Open DumpMedia Apple Music Converter. Go to the Library tab. You'll see your iTunes songs smartly synced with DumpMedia. All you have to do is choose your songs.
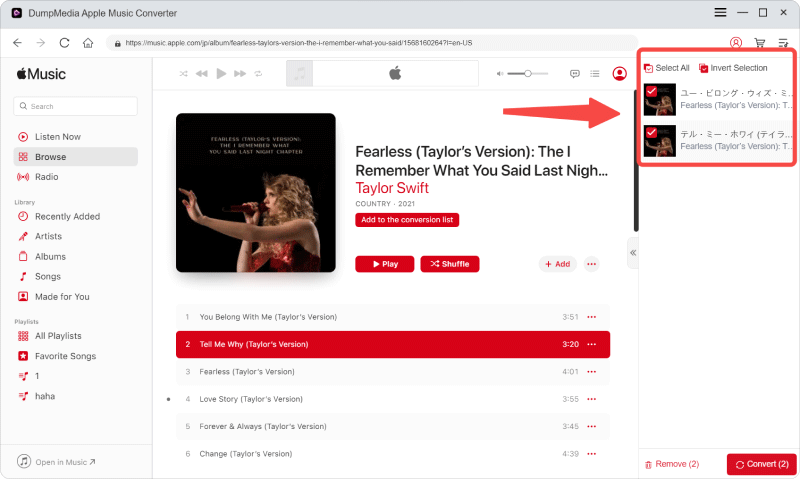
- You can optionally change the output directory or metadata (ID3) settings below. You can also change output formats (MP3, FLAC, M4A, and WAV music formats are available.) and output settings.
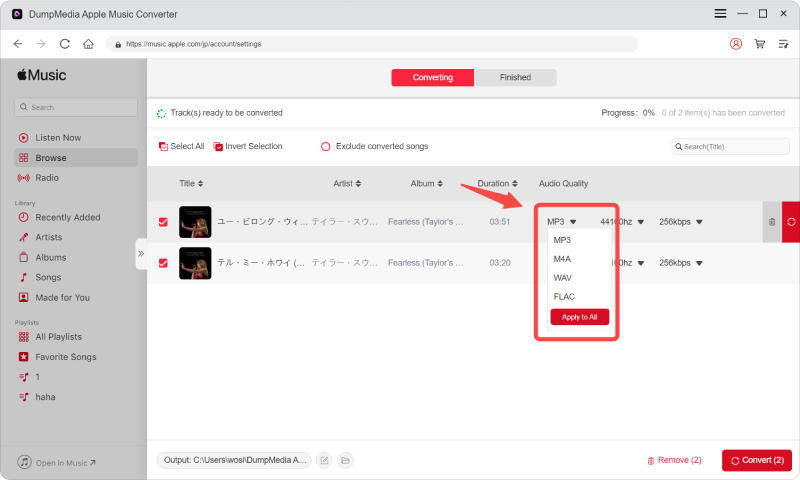
- Click Convert to start converting. It's that simple.

- After the conversion finishes, go to the Finished tab. This area will contain all your finished conversions. Click View Output File and a new file browser window will appear.
Once you've finished conversion, you can download these songs to your MP3 Player. Enjoy them while doing sports or doing outdoor activities. You no longer need an internet connection.
You don't need an Apple-certified device. Because of DumpMedia Apple Music Converter, the restrictions of listening to your iTunes or Apple music have been removed.
Purchase a license key to unlock all features of this wonderful tool. With this, you get the privilege of timely software updates. You also get a guaranteed 24-hour reply customer support system. Everything you wished for in a commercial app.
Part 3. Summary
In summary, we've presented the steps for you to export iTunes playlist to MP3. You can use iTunes for this. We presented it in detail. Convert your songs and playlists and transfer them to your MP3 player. However, you'll realize that many songs can't be converted because of copy protection.
Click to have a free try! It's 100% secure!
So here comes the second method to export your playlists - use DumpMedia Apple Music Converter. DumpMedia Apple Music Converter is the best iTunes or Apple Music conversion software in the market today. It can convert your Apple Music files into other popular music formats very fast.

30% Off >>>