


Highly Recommended iTunes to MP3 Converters (2026 Update)
Who hasn’t heard of iTunes? Everybody has. It’s the place where you get music, books, movies, TV shows, and even podcasts. There’s a lot that you can get from iTunes. The only thing about it is that the output formats are limited. You would need to convert your iTunes files to play on other non-Apple devices.
In spite of the limitation, iTunes to MP3 converter is still possible. You can utilize iTunes to MP3 converter so that you can play your songs, movies, podcasts on non-Apple devices.
You may have searched for how to convert m4p to mp3. If need, you can click here to learn the detail.
You just have to explore iTunes to utilize it as an MP3 converter. And they're also some top recommended iTunes to MP3 Converters for your consideration.
If you want to learn how you can do it, continue reading.
Contents Guide Part 1. Why Convert iTunes Files to MP3?Part 2. Converting iTunes Files to MP3 By iTunes ItselfPart 3. Top Recommended iTunes to MP3 Converters for ConsideringPart 4. Conclusion
Part 1. Why Convert iTunes Files to MP3?
As you very well know, the usual iTunes format is Advanced Audio Coding or better known as AAC. This is the default format of your iTunes files. iTunes also supports file formats such as WAV, Apple Lossless, and AIFF. Those files are exclusive to Apple devices. You can’t play them on non-iOS devices.
MP3 is the most popular digital music format. All portable music players support the MP3 format, together with a lot of mobile phones. Since it’s supported by most devices, it’s the recommended file format.
Part 2. Converting iTunes Files to MP3 By iTunes Itself
The good thing is that you can utilize iTunes to MP3 converter. So, if you want to convert your iTunes music to MP3, follow the steps below.
- Open iTunes and click on the iTunes logo on the menu above.
- Select Preferences from the drop-down list.
- Click on the Import Settings tab that you will see on the next pop-up window.
- Take a look at the Import Using field. You will see the format of the file there. Most likely, it says WAV Encoder. That means, your files are using that particular format.
- Take your cursor to the File tab on the menu above.
- Select Create New Version from the drop-down list. If you notice, the only file you can create is the WAV format. Since WAV Encoder is on the Import Using field, it’s the only format that your iTunes can create.
- Go back to Preferences to change the import settings to be an MP3 format. That way, you can have the option to change it to that particular file format.
- Click on the Import Using field and select MP3 Encoder.
- Choose the best quality in the Setting field.
- Click on the File tab on the menu above.
- Select Get Info and add some tags to the song. The tags will be embedded in your file. So, if you share your MP3 file, the recipient gets the same information as well.
- Click on the OK button. Now, you have the option to convert to MP3.
- Check your iTunes library for your MP3 file.
Tips: Some people have encountered the issue of how to convert iTunes M4B audiobooks to MP3. How to solve the problem? Just open the link to see the guide.
Part 3. Top Recommended iTunes to MP3 Converters for Considering
You have another option to convert to MP3. If you find that utilizing iTunes is a bit too complicated to convert to MP3, then below are some options to consider.
Option #1. DumpMedia Apple Music Converter
This is an easier way to convert your iTunes to the MP3 format. If you want to save the music from your favorite video or just save a file from your iTunes library, take the easier way out by making use of the DumpMedia Apple Music Converter.
Check out how easy it is to use iTunes to MP3 Converter.
- Download the DumpMedia Apple Music Converter.
- Select the music you want to convert.
- Select MP3 for the output format.
- Convert your iTunes file to MP3.
Continue reading to learn more about the detailed steps in using the DumpMedia Apple Music Converter.
Step 1. Download the DumpMedia Apple Music Converter
You can go to this website called DumpMedia.com. Take a look at the menu above and you will see the Apple Music Converter there. Click on it. Look at the mid, bottom part of the screen and you will see a link that says I need a Mac/Windows version. Click on it to download the software. After you download, install and open the DumpMedia Apple Music Converter.
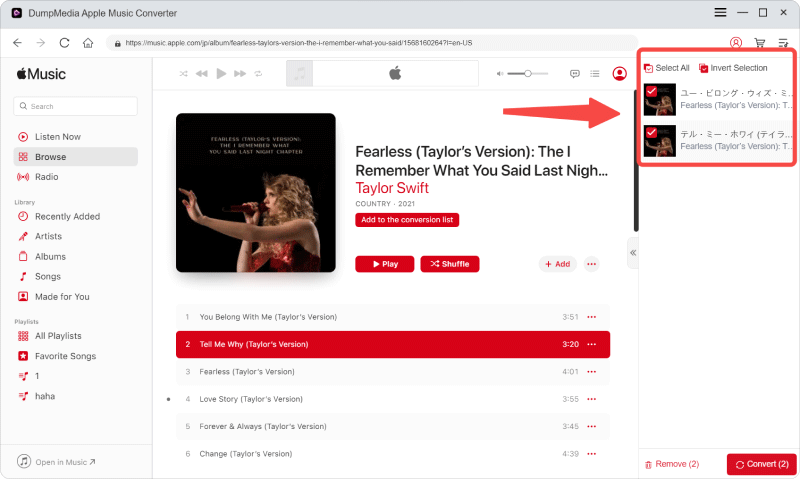
Step 2. Select the Music You Want to Convert
Look at the left panel of the DumpMedia Apple Music Converter. Under PlayList, click on Library. Then select a song from the list you see on the main part of the screen.
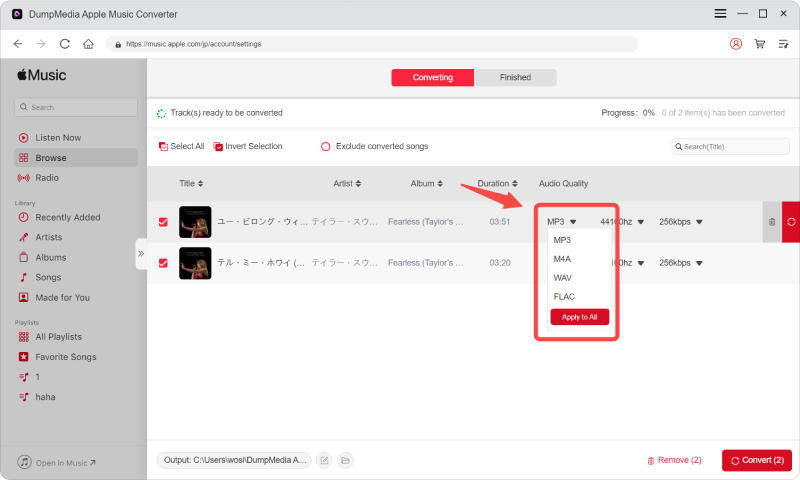
Step 3. Select MP3 for the Output Format
Go to the Output Format on the left, bottom part of the screen and choose MP3. Choose a location on the Output Path field.
Step 4. Convert Your iTunes File to MP3
Click on the Convert button on the right, the bottom part of the screen. The DumpMedia Apple Music Converter will start the process of converting your file. The Converting tab on the top part of the screen will be highlighted as the conversion takes place. Once the conversion is done, the Converted tab will be highlighted instead.

As you can see, the DumpMedia Apple Music Converter is easy to use. You can now play your iTunes playlist and get music on your Kindle device. Keep in mind that DumpMedia Apple Music Converter supports other file formats such as AC3, M4A, FLAC, M4R, AU, and MKA to mention a few.
You also don’t have to worry about the DRM since that is automatically removed when the file is converted. Hence, is the reason why the DumpMedia Apple Music Converter is a great option to consider.
Option #2. Convert Apple Music to MP3 Program
- Open the Convert Apple Music to MP3. Your iTunes will open as well.
- Take your cursor to the Playlist section of the Convert Apple Music to MP3 and select Apple Music Catalogue that contains your iTunes songs.
- Check the songs you want to convert.
- Select MP3 on the output settings. You will find this on the bottom part of the screen.
- Select the destination folder for your output.
- Click on the convert button on the top, left-hand side of the screen.
Option #3. Any Audio Converter
- Launch Any Audio Converter.
- Add a song from iTunes by clicking on the + sign. Your iTunes folder will show up on the Any Audio Converter. You can choose the song or songs you want to add by checking each song.
- Change output settings to MP3.
- Convert
Part 4. Conclusion
You can easily expand the accessibility of iTunes to your other devices. Now that you know how to use iTunes to MP3 converter, you now have more formats to choose from. You’re also not just limited to using iTunes to MP3 converter since you can also use the DumpMedia Apple Music Converter to get the job done.
So, it’s up to you as to which software to use to convert to MP3. One thing is for sure, both software work very well.
How do you convert your iTunes? Share with our readers how you do it.

30% Off >>>