


How to Cancel Apple Music Subscription in 2026
If you are looking for how to cancel Apple Music, the process is actually simple, but it depends on the device you are using. In this guide, you will learn how to stop Apple Music billing on iPhone, iPad, Mac, Windows, and web browser. We will also explain what happens after cancellation and how to keep your music permanently if needed.
Contents Guide Part 1. What Happens When You Unsubscribe Apple Music?Part 2. How to Unsubscribe Apple Music on Phone/Desktop?Part 3. Common Problems When Cancelling Apple MusicPart 4. How to Keep Your Music After Cancelling Apple Music?Part 5. FAQPart 6. Final Thoughts
Part 1. What Happens When You Unsubscribe Apple Music?
Before learning how to cancel Apple Music, it is important to understand what will happen:
- You can still use Apple Music until the end of your billing cycle
- Downloaded songs will no longer be playable after subscription ends
- Your playlists and library may be removed or restricted
- You will lose offline access to music
Once you understand this, you can safely proceed with how to unsubscribe Apple Music subscription without surprises.
Part 2. How to Unsubscribe Apple Music on Phone/Desktop?
This is the most common method for users searching how to cancel Apple Music.
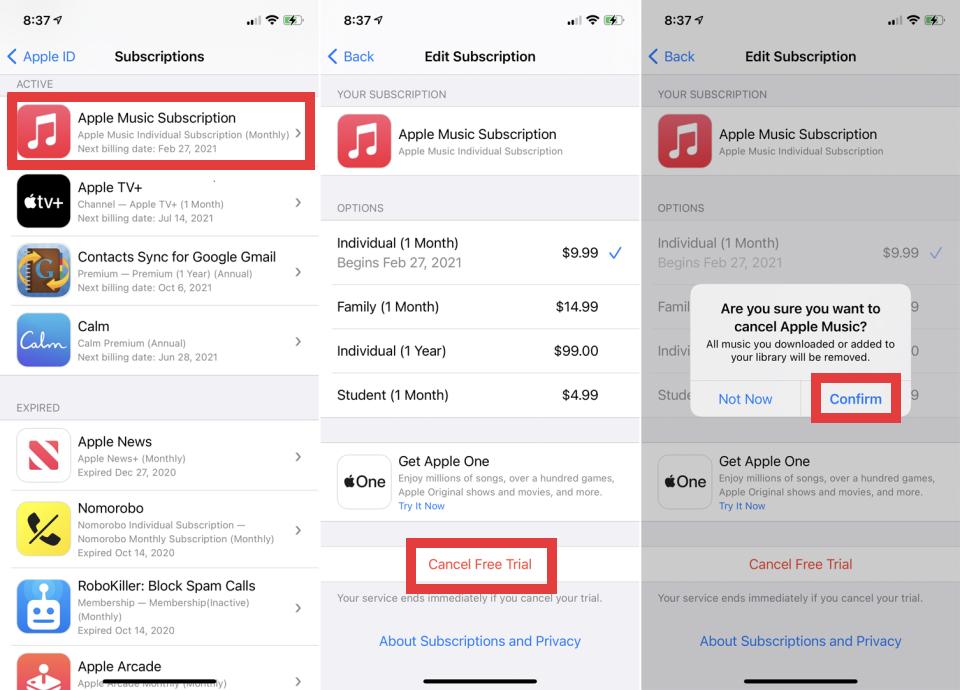
Cancel Apple Music on iPhone or iPad
- Open Settings
- Tap your Apple ID (your name at the top)
- Go to Subscriptions
- Select Apple Music
- Tap Cancel Subscription
- Confirm cancellation
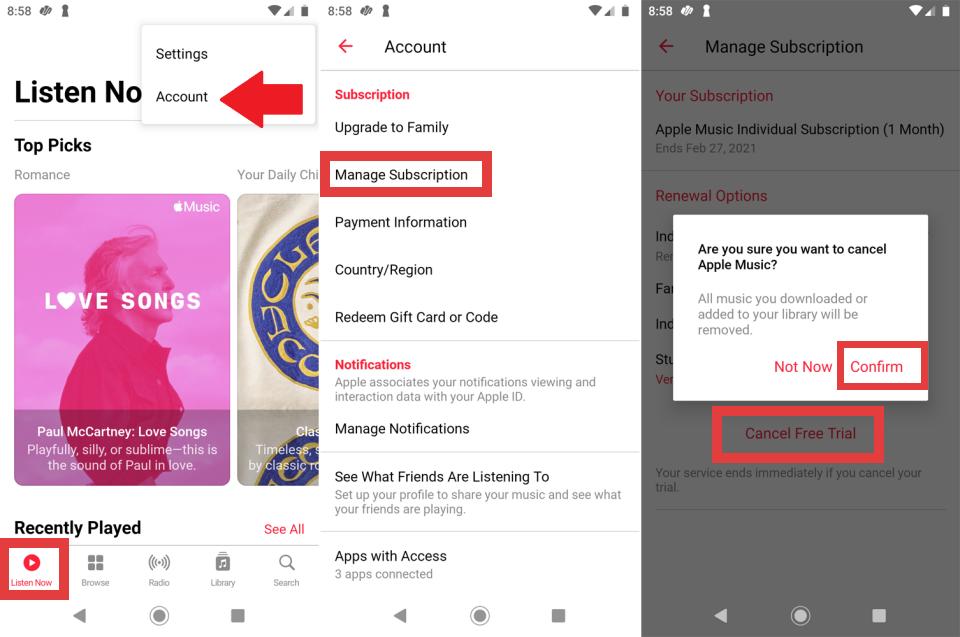
Unsubscribe Apple Music on Android
- Open Apple Music
- Tap the More button (three-dot icon) in the top-right corner
- Tap Account
- Select Manage Subscription
- Tap Cancel Subscription and confirm
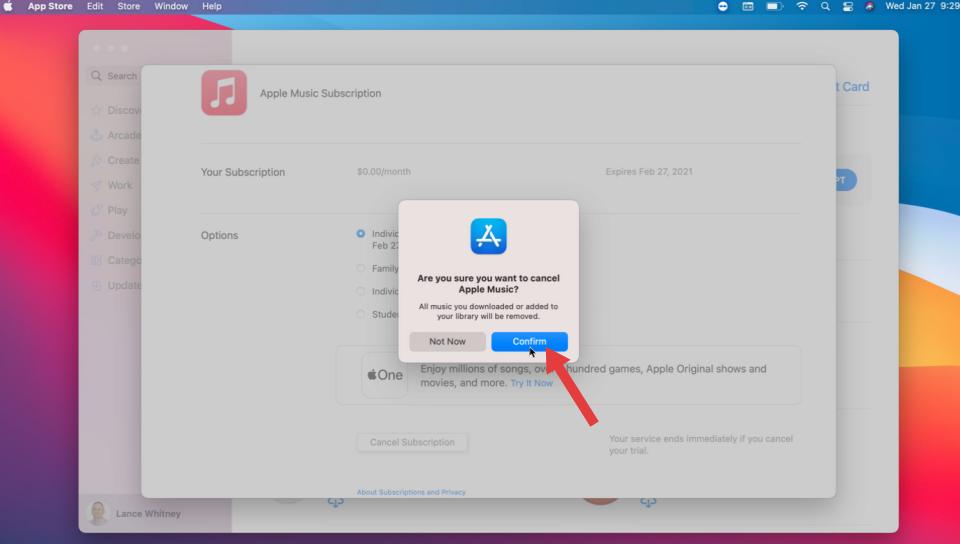
Unsubscribe Apple Music on Mac
- Open App Store
- Click your profile icon
- Select Account Settings
- Scroll to Subscriptions
- Find Apple Music
- Click Cancel
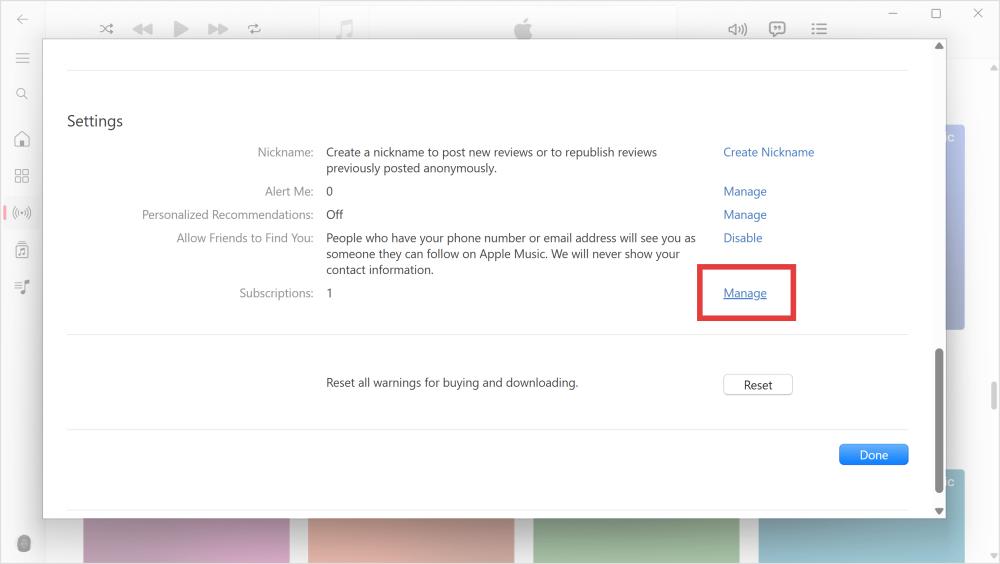
Stop Apple Music Billing on Windows
- Open Apple Music
- Click on your name/profile icon
- Select View My Account
- Find Subscriptions and click the Manage link next to it
- Select Apple Music
- Find Apple Music in the list and click Edit
- Click Cancel Subscription and confirm
Once completed, your Apple Music subscription will stop auto-renewing.
Part 3. Common Problems When Cancelling Apple Music
Canceling an Apple Music subscription is generally straightforward, but users occasionally run into specific hurdles. Here are the most common issues and what you should know about your library.
“Cancel Subscription” button not showing
- Already Cancelled: If you don't see the button, check if the screen shows an "Expires" date in red. If it does, your subscription is already successfully scheduled for cancellation and will simply not renew.
- Check Different Apple IDs: If you have multiple Apple accounts (or family members), ensure you are signed into the exact account that initiated the subscription. Check your email for "receipt from Apple" to confirm which ID was billed.
- Third-Party Billing: If you subscribed through a wireless carrier (e.g., Verizon, T-Mobile) or another provider, the cancellation button will not appear in Apple's settings. You must contact the carrier or third-party provider directly to cancel.
Glitchy Interface
If you are certain you are looking at the right subscription but the "Cancel" button is unresponsive or spinning, try logging out of your Apple ID in Settings and logging back in, or performing a hard restart of your device.
Part 4. How to Keep Your Music After Cancelling Apple Music?
One major concern when learning how to cancel Apple Music is losing downloaded music. Once your subscription ends, Apple Music songs will no longer be playable, and you cannot transfer Apple Music files directly. To keep your music permanently, you need to convert songs into local audio files before canceling.
A tool like DumpMedia Apple Music Converter allows you to convert Apple Music songs into MP3, WAV, FLAC, and other formats. By backing up your songs before your Apple Music subscription ends, you can ensure your library remains intact and avoid the risk of having your Apple Music playlists disappear. This is especially useful if you want to cancel Apple Music but still keep your favorite tracks.
🏆Why Choose DumpMedia Apple Music Converter
- Built-in Apple Music player - to directly log into your Apple Music library and choose all songs you like.
- Original sound quality retained - keep a better quality status to save original music effects.
- Keep ID3 Tags and metadata information - extract music files with original ID3 tags as well as metadata information.
- Batch playlist downloading speed - ensure ultra-fast playlist downloading speed, which can accelerate faster and facilitate higher music download efficiency.
- Customize output settings - to choose your favorite bitrate and sample rate based on your needs.
Keep Your Apple Music Using DumpMedia Apple Music Converter
Instead of losing access after cancellation, you can safely keep your library while completing how to cancel Apple Music subscription. Here's how to use DumpMedia Apple Music Converter:
Step 1. Download and install DumpMedia Apple Music Converter on your Mac/PC. Launch it, and you will see the interface. Use your Apple Music account to log in.
Step 2. Search for Apple Music songs, playlists, or albums. Simply click "Add to Convert" to add them to the conversion list.

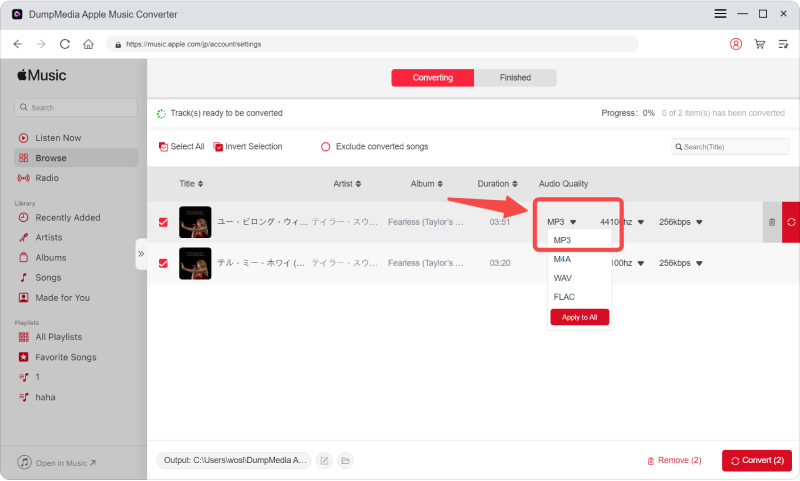
Step 3. After DumpMedia automatically parses songs, the format is set to MP3 by default on the conversion interface. If you want to change, click the "MP3" dropdown menu and choose one. Also, you can change the bitrate or the samplerate.
Step 4. As the settings are completed, users can process the conversion by hitting the "Convert" icon. Then DumpMedia will download Apple Music songs to MP3 within seconds with its super-fast speed.

Part 5. FAQ
1. Can I cancel Apple Music anytime?
Yes, you can cancel Apple Music anytime, and your access continues until the billing period ends.
2. Will I lose my music after canceling Apple Music?
Yes, downloaded Apple Music songs will no longer play after your subscription ends.
3. Can I still use Apple Music after canceling?
You can use it until your paid period expires, then access stops.
4. Why can’t I cancel my Apple Music subscription?
Usually due to incorrect Apple ID, Family Sharing, or third-party billing.
Part 6. Final Thoughts
Learning how to cancel Apple Music is simple, but the most important part is understanding what happens after cancellation. If you only want to stop billing, the steps above are enough. However, if you want to keep your music permanently, consider using DumpMedia Apple Music Converter before canceling your subscription.

30% Off >>>