


Here Is How To Put DVDs On Kindle Fire in 2025
When talking about handy devices wherein you can watch movies, surely, you won’t forget about iPads or Android tablets like the Samsung tab. It’s true that with the perks and benefits these devices can offer. However, if you prefer a more economical gadget, a Kindle Fire would be best for you. This article will talk more about it and the procedure of how to put DVDs on Kindle Fire.
Kindle Fire is a useful device if you are into media streaming – reading electronic books, listening to your favorite music, or even watching movies. But since it is a bit thin and does not have the storage needed for a DVD drive, playing DVD movies might be difficult. But you shouldn’t be disappointed! With a good companion, you’ll be able to watch the DVD movies you love! if you want to learn how to put DVDs on Kindle Fire, continue reading this article and find out.
Contents Guide Part 1. How to Convert DVDs to Kindle Fire Supported Format?Part 2. How to Put DVDs on Kindle Fire?Part 3. Summary
Part 1. How to Convert DVDs to Kindle Fire Supported Format?
There are vital things you need to know first before finally doing the steps of how to put DVDs on Kindle Fire. As mentioned, you cannot play a DVD disc directly on your Kindle Fire since it has no DVD drive the same as other tablets. The only way to watch DVD movies on your Kindle Fire is to rip them first. And take note that if you got DVDs that are not homemade, there is a need to decrypt them as well.
Ripping DVDs won’t be possible with just using your personal computer, a good companion or a professional tool is required. This is the most important thing needed before finally checking out how to put DVDs on Kindle Fire.
- As stated, a good DVD ripper is needed.
- The DVDs with the movies or videos you wish to stream on your Kindle Fire.
- A personal computer that has a DVD drive. You can use one without as long as it can support an external DVD drive.
Now, this portion of the article will be talking in detail about how to put DVDs on Kindle Fire through the help of an amazing professional converter named DumpMedia Video Converter. This one works as a DVD ripper as well!
The DumpMedia Video Converter, apart from having the ability to rip DVDs and convert its content to its supported formats, can also process videos and audio. So, if you have media files like audios and videos that you wish to transform into another format, you can further utilize this tool.
The good thing with DumpMedia Video Converter is that it allows customization of the content you are processing. You can edit and add some effects or subtitles as you wish, further enhance the video, or even rotate or flip it.
There are lots of output formats it supports – FLAC, MP3, MP4, AVI, WMV, and more. Added to this, it functions quite fast. It can work 6x faster than any other professional converters without risking the quality of the output files! And it is so easy to handle and use. In fact, even without a reference or guide, you will be able to use this DumpMedia Video Converter with ease.
Now that you know a lot of details about this professional DVD ripper and converter, we will now be guiding you on how to put DVDs on Kindle Fire by ripping and converting the DVD first. Here’s the procedure.
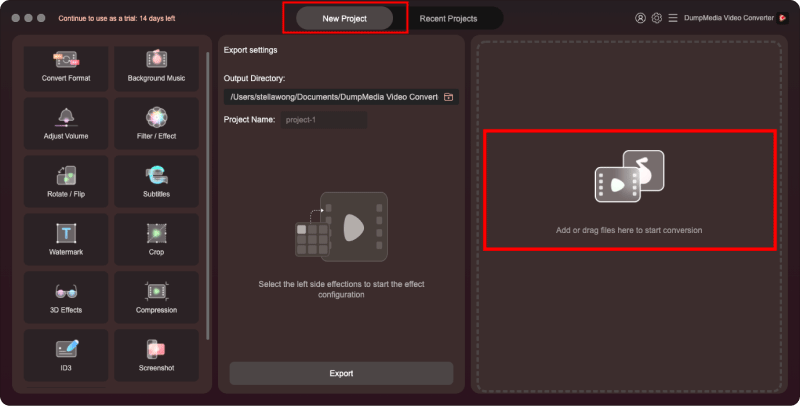
Step #1. You need to put the DVD disc on your PC’s DVD drive first. Wait until your computer detects the DVD disc. Make sure that you have installed the DumpMedia Video Converter successfully on your personal computer. Once installed, just open and then launch.
Step #2. Start adding the DVD files onto the main page of this app. You can simply drag and drop the files (from the DVD) or utilize the “Add Multiple Videos or Audios” button that you’ll see immediately at the top area of the screen.
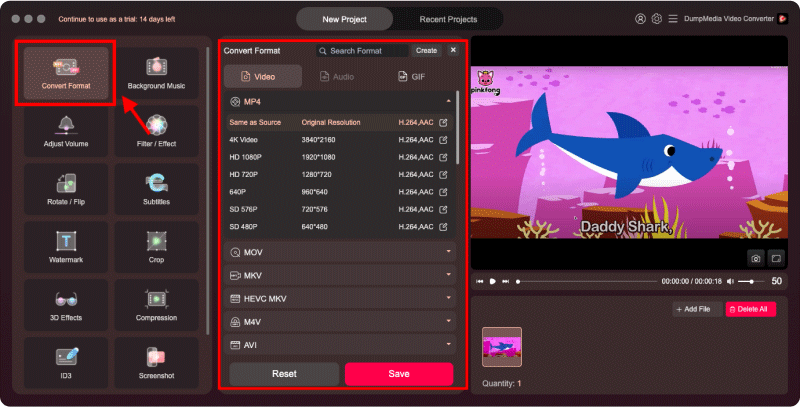
Step #3. In the upper-left portion, you can define what Convert format you wish to use. Make sure to choose a format that your Kindle Fire supports. Do some customization as well if you intend to do so – video enhancing, editing, and more. It’s also suggested to define an output path to easily see where the files are at after the conversion process.
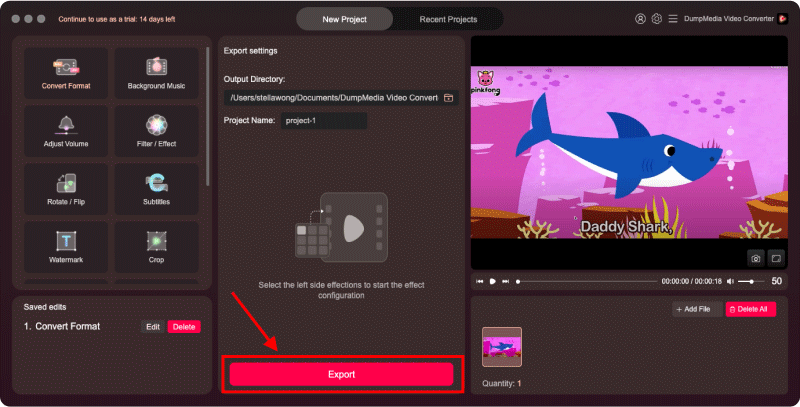
Step #4. Tick the “Convert” button and you shall see that the app will do the conversion right away. The app should process the transformation in just a few minutes.
So, now that you have the converted DVD files downloaded on your PC, how will you then put those into your Kindle Fire? Simple! You just need to copy the converted files into your Kindle Fire. Do this by connecting your Kindle Fire to your PC via a USB cable. To start playing the videos, just head to “Apps” and then select the “personal videos app”.
Part 2. How to Put DVDs on Kindle Fire?
Apart from using a professional converter, there are other methods of how to put DVDs on Kindle Fire that you can also check out in this section of the article.
HandBrake
HandBrake is a free app that has the ability to rip DVDs. However, since it’s free of use, you should know that you can only process homemade DVDs using it and that it only supports limited file formats. If you wish to process commercial DVDs, you can install plugins to proceed.

We have a guide here on how to put DVDs on Kindle Fire using HandBrake.
Step #1. Have the app ready on your PC. Make sure you put the DVD disc on your PC’s DVD drive as well. If you wish to process commercial DVDs, as mentioned, a plugin is needed like this “libdvdcss”.
Step #2. On the top area, there is a toolbar where you can find the button “Source”. There is a list, so you just have to choose your DVD drive. Under the section, select the titles or even chapters that you want to stream on your Kindle Fire.
Step #3. Head to the “Output Settings” button and choose a format under the “Container” list (like MP4 or MKV). You can do some adjustments to the video manually if you want to.
Step #4. There are also filters that you can use to customize the videos. It is also suggested to choose a “Destination” folder.
Step #5. The DVD ripping will start the moment you tap the “Start” button. It would take some time to process the ripping – about 30 minutes. Once ripping is done, you can just put the files on your Kindle Fire.
DVD Shrink
Apart from HandBrake, another tool to utilize is this DVD Shrink if you want to rip your DVD discs. We also have here the procedure of how to put DVDs on Kindle Fire using this app. This is a free tool so no need to worry about paying some fee to continue. Just take note that it might not work fine with Windows 8/8.1/10 since the last update done was way back in 2005.
Step #1. Launch DVD Shrink on your PC and make sure you put the DVD disc in the drive.
Step #2. There is an “Open Disc” icon and then choose your DVD drive. It should scan the DVD movies saved on the DVD.
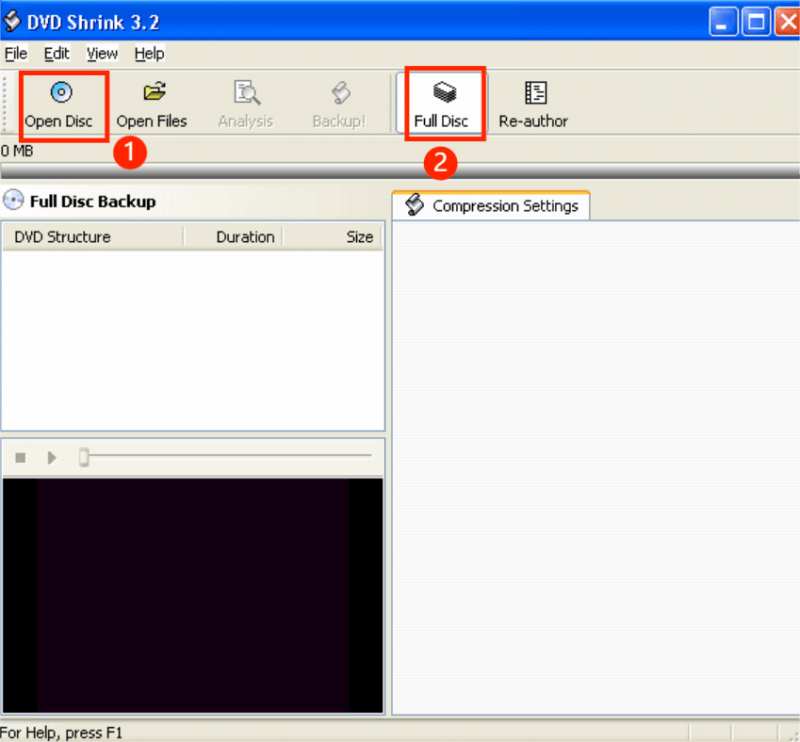
Step #3. When asked, you just have to choose the main movie to rip that you can find under the “Full Disc” tab.
Step #4. You also need to open the backup DVD dialog by pressing the “Backup” button. Of course, you have to input a target folder for the output files.
Step #5. Click the “OK” button to start the ripping process. The DVD movies will be compressed automatically by DVD Shrink. The output files are much smaller in size, but the quality might not be as good as you expect.
Part 3. Summary
To summarize, the procedure of how to put DVDs on Kindle Fire is so easy to perform as long as you have the best tools with you. There are free apps that you can utilize like the two mentioned in the second part. If you wish to perform DVD content conversion, apps like DumpMedia Video Converter would be the best tool for you.

30% Off >>>