


Spotify Hardware Acceleration And How to Enable it?
What is Spotify hardware acceleration ? Well, if you’re not sure about what it is, then read on to learn more about it. If you have been navigating into the deep settings of Spotify, you have probably seen this feature.
It’s not exactly Spotify hardware acceleration. It comes in as Enable hardware acceleration. If you want to know more about it, keep on reading.
Contents Guide Part 1. What Is Spotify Hardware AccelerationPart 2. Three Ways to Enable and Disable Spotify Hardware AccelerationPart 3. Conclusion
Part 1. What Is Spotify Hardware Acceleration
You have probably seen a hardware acceleration option when using various applications and devices. There are times when you may even have had to enable or disable it to boost performance or prevent bugs in one of your favorite applications.
If you have a strong CPU, it’s a good idea to utilize other components in your system. That is where hardware acceleration comes into play. Hardware acceleration can be utilized to allow higher quality playback.
In some cases, you might have to disable it because hardware acceleration doesn't always work as smoothly as it should. Even if your CPU is strong enough but other components aren’t, then you might have to disable hardware acceleration. Hardware acceleration may be ineffective.
The Spotify hardware acceleration is a feature that comes with both the free and paid versions of the said app.
How to Find the Spotify Hardware Acceleration Feature
As previously mentioned, the hardware acceleration feature is hidden deep in the Settings of Spotify. The steps below will show you how to find it.
Step 1. Launch Your Spotify App
Launch the Spotify App. Once it’s launched on your computer, take your cursor to the far top, right-hand corner of the screen. Click on your profile.
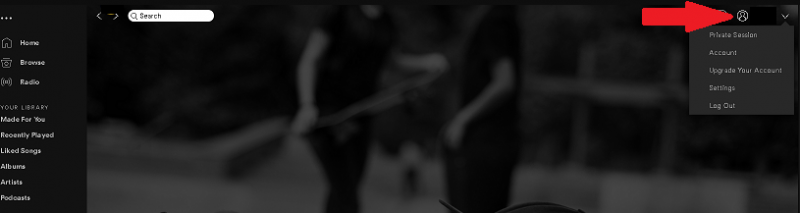
Step 2. Select Settings
Once you have clicked on your profile, a drop-down menu will appear Select Settings from the drop-down list.
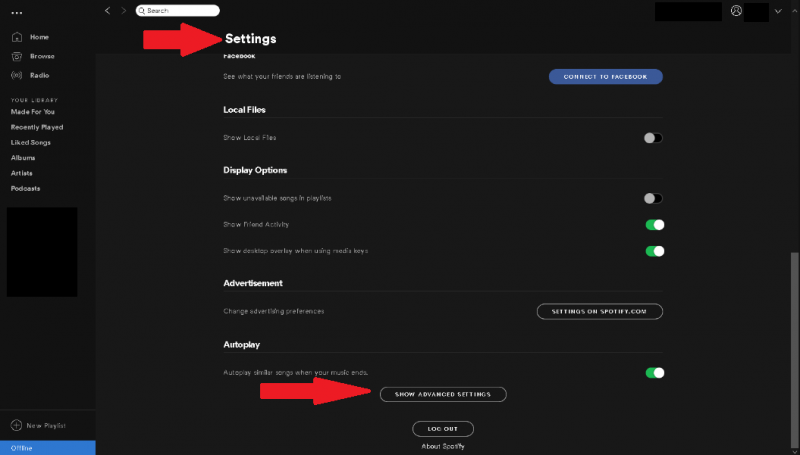
Step 3. Go to Advanced Settings
Scroll down the Settings page and look for Advanced Settings. Once you see it, click on it.
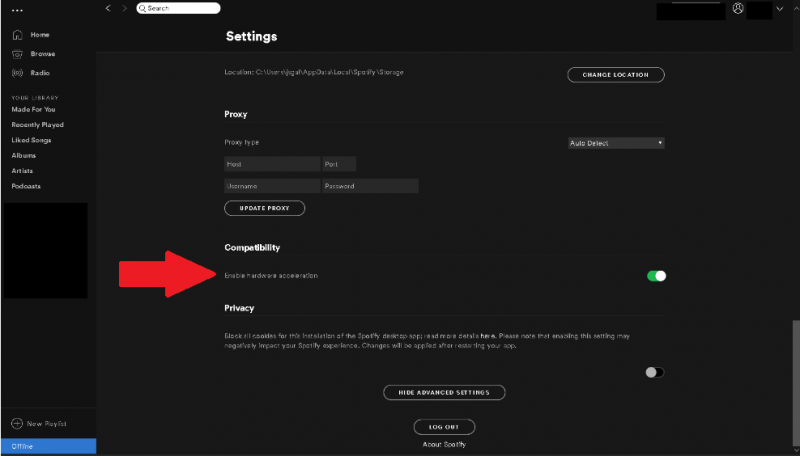
Step 4. Manage Enable Spotify Hardware Acceleration
Once you have expanded your Spotify Settings, scroll down the page until you see Enable hard acceleration. You will see it under Compatibility. Once you see it, you can manage it by either sliding the toggle to the left to disable it or sliding it to the right to enable it.
Part 2. Three Ways to Enable and Disable Spotify Hardware Acceleration
While it’s pretty easy to manage the Spotify hardware acceleration. To start with, you would have to make sure your hardware is up to it. If you’re not sure about your hardware and you want to play it safe, then you’re better off leaving the hardware acceleration feature of Spotify alone. Three ways to level up your Spotify experience without having to deal with the hardware acceleration feature of Spotify. Read on to learn more about them.
Option #1. Set Volume Normalization
Instead of dealing with the Spotify hardware acceleration, you can just set the Volume Normalization of Spotify.
Step 1. Go to Settings
Launch your Spotify app. Take your cursor to your profile and click on it. Then select Settings from the drop-down list.
Step 2. Click on Playback
Once you’re inside Settings, look for Playback and click on it. Once you do, you will be able to find something critical to your audio quality.
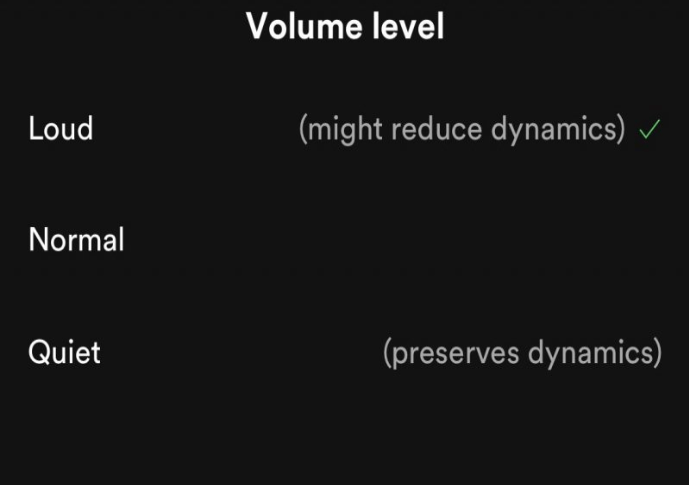
Step 3. Choose Volume Level
The one element that’s critical to your audio quality is the Volume level. You will find this once you click on Playback. There are three different kinds of volume levels, and they are loud, normal, and quiet. To have the best audio quality, choose quiet.
Option #2. Preset Unplayable Tracks
The availability of songs on Spotify depends on where you are in the world. You might find some songs greyed out in your Spotify account, which could be quite annoying. The steps below will show you how you could preset these unplayable tracks on your playlist. Check out the steps below to see how you can do it to level your Spotify experience.
Step 1. Launch your Spotify account
Launch your Spotify account and look for a song that’s greyed out. Right-click on the greyed-out song and copy the URL of the song.
Step 2. Search for the URL or URI
Enter the URL or the URI for the greyed-out t song into the Spotify search. Press enter and you will see the song greyed-out on the list.
Step 3. Right-Click on the Greyed-Out Song
Even if the song is greyed-out, Spotify will still allow you to left-click on it. Left-click on it and drag the greyed-out song to a playlist on the left panel. That way, you can preset that song on that playlist so that when it’s finally available, you get to hear it at once.
Option #3. Stream Spotify Music in High-Quality Format
You can stream Spotify music in the highest audio resolution without having to deal with the Spotify hardware acceleration. The steps below will show the simple steps to stream Spotify music in a high-quality format.
Step 1. Access to Settings
Launch your Spotify app. Take your cursor to your profile and click on it. A drop-down list will appear. Select Settings.
Step 2. Open Settings
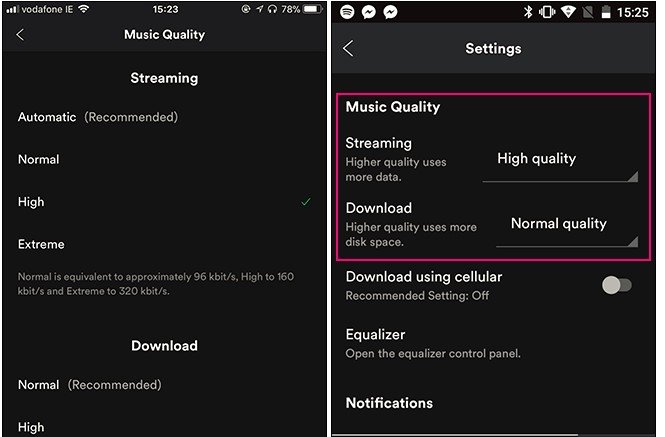
Open the Settings on Spotify. Scroll down until you see Music Quality. Click on it. Music quality is for streaming and for downloading.
Step 3. Select on Very High
Once you’re inside Music Quality, you will notice that your Streaming is on Automatic mode and your Download is on Normal mode. Both of these modes are recommended. If you want to level up your Spotify experience, choose very high for Streaming.
Part 3. Conclusion
In summation, if you enable the Spotify hardware acceleration, the said app would have to use the following pieces in your hardware, which are the motherboard, CPU, sound card. That could take a toll on your computer. You are better off leaving it alone, disabled. If you want to enhance your listening experience with Spotify, resolve to other ways that do not require you to deal with hardware acceleration. If you want to listen to Spotify songs without premium, you can try to download the DumpMedia Spotify Music Converter that removes DRM protection. You are free to listen to your favorite songs offline anywhere and anytime.
Have you ever had to deal with the Spotify hardware acceleration? Share your experience with our readers.

30% Off >>>