


How to Create A Collaborative Playlist on Spotify in 2026
Do you want to share your selection of Spotify songs to your friends and collaborate together to create an ultimate Spotify playlist that you will be using for an occasion or event? No worries as in this modern era, you can now easily create and share a collaborative playlist on Spotify. Once you share this playlist with other people, you can start to manage it together with them.
But how do you create a collaborative Spotify playlist? This article discusses how you can do this whether on your computer, iOS, or Android devices. So keep on reading to know more! But first, let us discuss what a Spotify collaborative playlist is, the things you can do with it, and what you should be aware of in the next section.
Contents GuidePart 1. What Is A Spotify Collaborative Playlist?Part 2. How to Create A Collaborative Playlist on SpotifyPart 3. How to Share Your Spotify Songs Without Spotify AppPart 4. In Conclusion
Part 1. What Is A Spotify Collaborative Playlist?
Spotify’s feature for playlist collaboration provides multiple users the ability to add tracks of their own choices to a single Spotify playlist. These collaborative playlist on Spotify in 2008 which instantly became popular with users. Recently, the collaboration feature even improved wherein users can view who added what song and when.
A collaborative playlist is similar to Wikipedia wherein anyone can virtually edit the contents in the encyclopedia. All you need to do is share the link of your collaborative playlist with your friends and depend on their wisdom to make sure that the decent quality of your playlist is maintained and is on topic.
Collaborative playlists also make it fun and easier to share and coordinate with your circle of friends regarding the best tracks that each of you thinks would be worth listening to.
Below are the things you are allowed and not allowed to do with your collaborative playlist.
- You, along with your collaborators, can delete or add tracks any time to the playlist by dragging tracks into it or by hitting Delete to erase a track. All of the changes will be visible on every collaborator’s copy of your playlist.
- You have the capability of turning the collaboration off if you are the owner of the collaborative Spotify playlist in case things get out of your hands.
- When a collaborator adds a track that is off from the theme of the playlist, the collaborator will be accountable since his/her username will be displayed on the playlist.
- At the current moment, you are not given the chance to restrict who can access your collaborative playlist. However, Spotify has created a means to prevent random strangers from accessing your playlist - Spotify does not allow you to publish a collaborative playlist on your profile.
- You will have control over who can access the web address of your playlist so you should be the one responsible to determine if you can trust your friends to keep your playlist’s address within your circle and not post it on public sites.
NOTE:
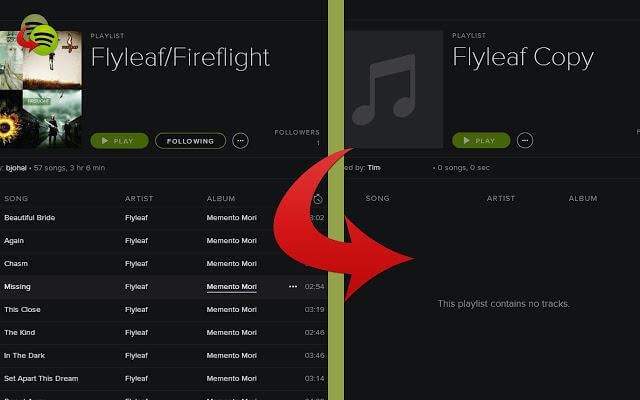
If in case your playlist’s web address gets out to the public, anyone with the link can edit your playlist. Someone can even delete all of your tracks saved on it. So the safest solution is to back up the content of your collaborative Spotify playlist. Just make a private copy of your playlist and then you are safe.
Tips : Maybe you want to share your Spotify playlist with your friends. But, the question is, how to add friends on Spotify? Read the post to get a detailed guide.
Part 2. How to Create A Collaborative Playlist on Spotify
Creating a Spotify collaborative playlist is an easy and straightforward task. The whole process only takes approximately 10 seconds, regardless if you are using a desktop computer or a mobile device.
But do note that the steps for each device slightly differ because, in computers, there are fewer clicks needed compared to mobile devices.
Also, for computers, users can use either a Spotify Free or Spotify Premium account. But for mobile devices, you would need a premium subscription. So below are the steps you need to do when creating and sharing a collaborative playlist on your computer, iOS, and Android devices.
#1: Creating A Collaborative Playlist on Computer
To create a collaborative playlist on your Windows or Mac computer, follow the steps below.
Step 1. Choose An Existing Spotify Playlist
Choose an existing Spotify playlist that you would like to share or create a new one on your computer.
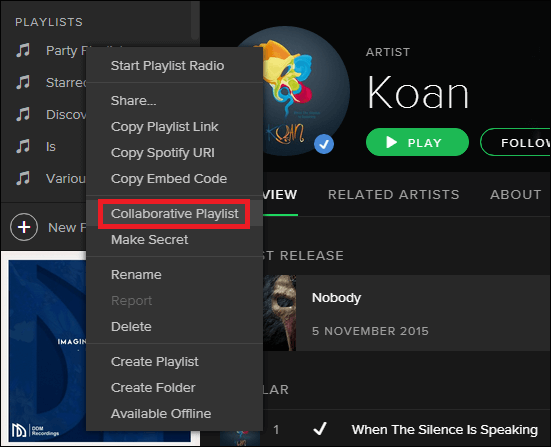
Step 2. Click on Collaborative Playlist
Right-click on your chosen playlist and click on the Collaborative Playlist when a pop-up menu appears. An icon will be added to your playlist.
Step 3. Right Click on Your Chosen Playlist to Share
Right-click on your chosen playlist again (the one you turned into a collaborative playlist in the previous step) and choose Share. Spotify gives you the option of whether you want to share it on Skype, Twitter, Facebook, and others.
Note that anyone who you gave your collaborative playlist’s link can edit, delete, or rearrange the tracks in the playlist.
#2: Creating A Collaborative Playlist on iOS Devices
Step 1. Launch the Spotify application on your device.
Step 2. Log in using your account for Spotify Premium.
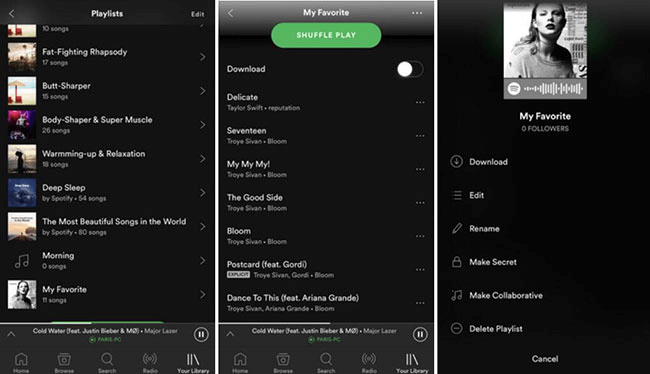
Step 3. Click Your Library and choose a playlist you would want to share with your friends.
Step 4. Tap on the horizontal dots located at the application interface’s top-right corner.
Step 5. Select Make Collaborative.
Step 6. To share your a collaborative playlist, tap on the horizontal dots again then choose Share.
#3: Creating A Collaborative Playlist on Android Devices
For Android users, the same steps are used above. The main difference is how the application looks like on the device. So no need to illustrate the steps again. Explore the app yourself if you are still confused about the steps and for sure you will be able to solve it on your own.
Part 3. How to Share Your Spotify Songs Without Spotify App
We recommend using DumpMedia Spotify Music Converter for downloading and converting any Spotify music, playlists, or albums to MP3, M4A, WAV, and FLAC.
This tool can keep the original quality of your Spotify files. It is a powerful and high-speed Spotify converter that allows you to enjoy your Spotify music without a premium subscription. Thus, giving you free Spotify for offline listening!
Features of DumpMedia Spotify Music Converter
- Easy Removal of Spotify DRM
- Quick Download and Conversion of Spotify Songs
- Support For Free Offline Playback of Spotify Music on Various Devices
- Preservation of Metadata Indo and ID3 Tags
- Available in three languages and counting.
- Allows customization of the quality of the output audio file according to your needs.
Now, to convert your multimedia files to your desired formats, follow the steps below:
Step 1: Download the DumpMedia application.
Step 2: Launch the DumpMedia application.
Step 3: Add your Spotify song to the application.
Step 4: Choose your desired output format and destination folder.
Step 5: Start the conversion process.
Below are the more detailed steps for converting your video files to your desired format using DumpMedia.
Download the DumpMedia Application
Before you can start using the application, of course you need to download the software first. The good news is, DumpMedia has a free Mac version for you to try the software first before you decide on whether it is the right tool for you or not but we assure you that you will not be disappointed with its features.
Launch the DumpMedia Application
After downloading the DumpMedia installer, launch the application by following the steps below for Windows and MacOS operating systems.
For Windows users:
Go to the Search icon (magnifying glass) beside the Windows icon in your computer’s Task Bar. Type DumpMedia on the text field. Click on the DumpMedia application on the search results.
For MacOS users:
Click on the Launchpad icon in your computer’s Dock. The launchpad icon is a gray circle with a darker gray rocket at the center. Type DumpMedia on the Search bar at the topmost part Hit the Return button on your keyboard to launch the application.
Add Your Spotify Song to the Application
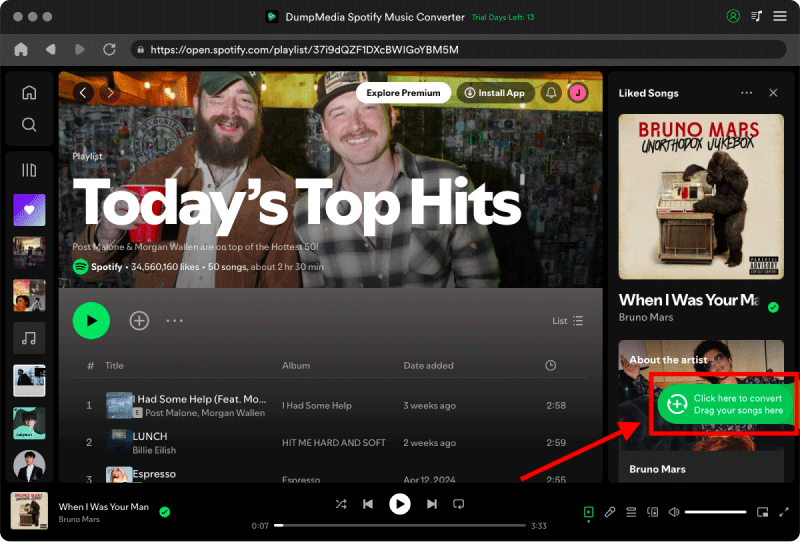
Add the URI of your Spotify song/playlist/album on the search bar or you can drag and drop your files to the application.
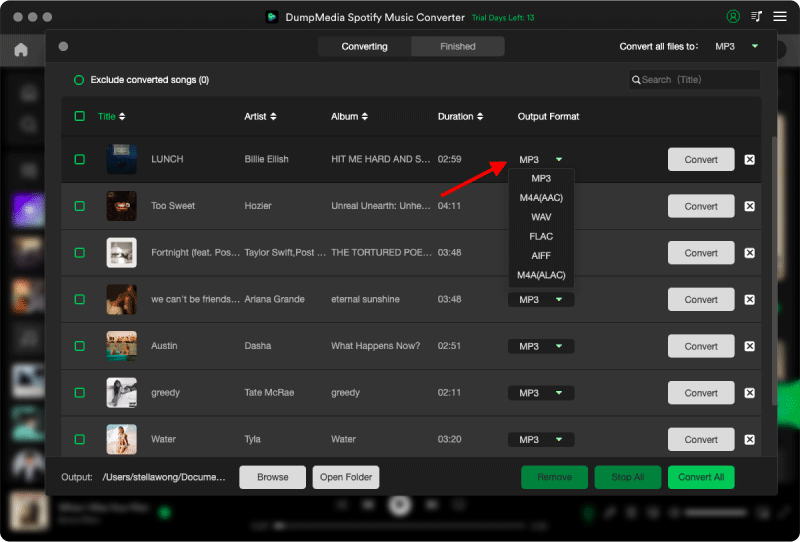
Choose Your Desired Output Format and Destination Folder
Look for the Convert all tasks to text at the top right corner of the interface. Select your desired output format (FLAC, WAV, M4A, or MP3). At the bottom of the interface, click on the Browse button and browse your computer to the desired destination folder of the converted files.
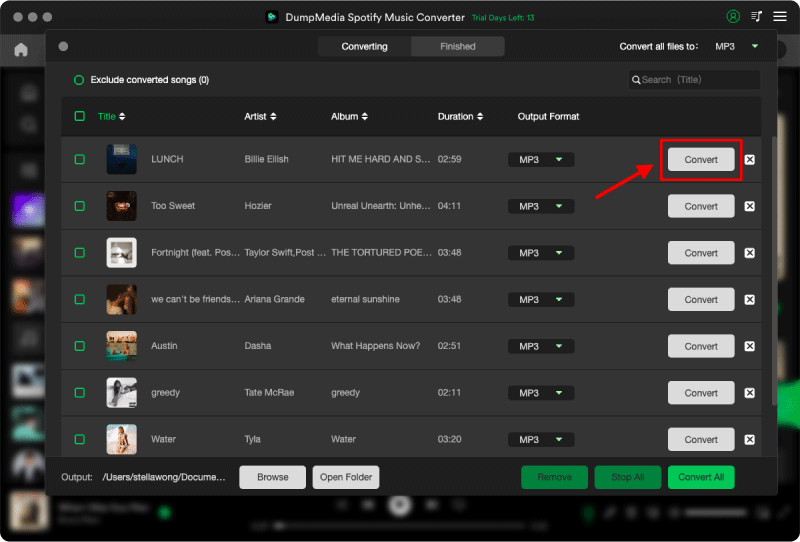
Start the Conversion Process
Click the Convert button to start the conversion of your video file. Wait for the conversion to complete.
Part 4. In Conclusion
To wrap up our discussion, below are the key topics we tackled in this article:
- Definition of collaborative playlist on Spotify.
- The things you can do and you should be aware of when managing a Spotify collaborative playlist.
- How to create and share a collaborative Spotify playlist on your computer, iOS, and Android devices.
- How you can share your Spotify tracks to other users for creating an offline collaborative playlist without a Spotify app.
Hopefully, you were able to find what you were looking for in this article.

30% Off >>>