


How to Embed Spotify Playlist on Your Website in 2026
Websites are very versatile. You can add photos, videos, and music. There’s a lot that you can do with a website. To make your personal website more awesome, you could embed Spotify playlist on it. Sounds like a cool idea, right?
If you’re a website administrator or owner, you’re most probably familiar with WordPress. WordPress is an amazing platform. You can do almost everything to create an awesome website on it. it offers a ton of plugins that can level up user-experience.
While you can easily add audio to your WordPress website, it’s also pretty easy to embed Spotify Playlist on it. Read on to see how you can embed Spotify playlist on your website.
Contents Guide Part 1. Why Embed Spotify PlaylistPart 2. How to Embed Spotify Playlist on Your Website Part 3. Ways to Upload DRM-free Songs to WordPressPart 4. Conclusion
Part 1. Why Embed Spotify Playlist
At this point, you might be wondering why you should embed Spotify playlist to your website. Well, if you’re an up and coming music artist and you have some new music to share, embedding your Spotify playlist is a great way to promote yourself or your band.
It’s one of the coolest ways to market your songs. Your followers not only get to see and hear your music but they get to know you more from your website. It’s a no-brainer that if you embed Spotify playlist to your website, your digital content levels up.
Of course, you don’t have to be an up and coming music artist to see the importance of embedding Spotify playlist to your website. If you just want more visitors on your websites, embedding your Spotify playlist to your website is a great way to increase your followers.
Part 2. How to Embed Spotify Playlist on Your Website
Check out the steps below to see how you can embed your Spotify playlist on your website.
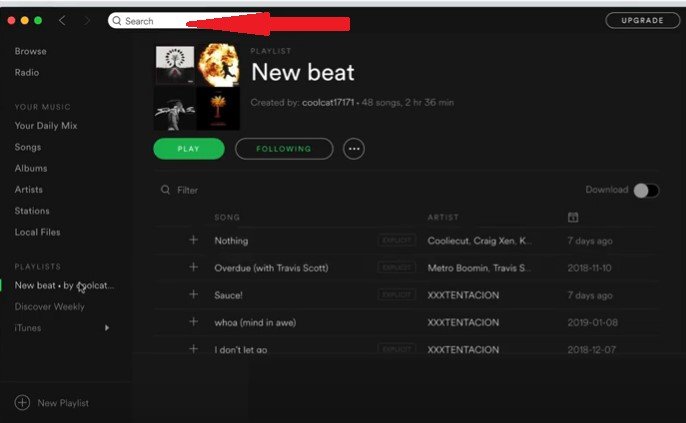
Step 1. Select a Playlist
First of all, you need to open your Spotify. When you get to the Home page on Spotify, just search for the playlist that you want to embed on your website.
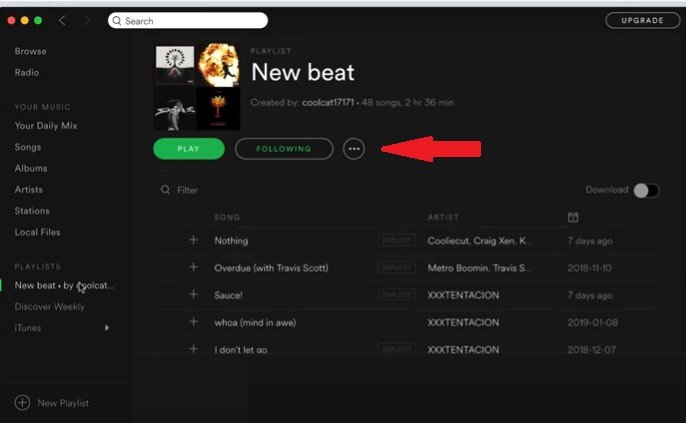
Step 2. Click on the Playlist You Want to Embed
Once you see the playlist that you want to embed, click on it for it to appear on the main screen. Then go to the circle with three dots inside it. Click on it.
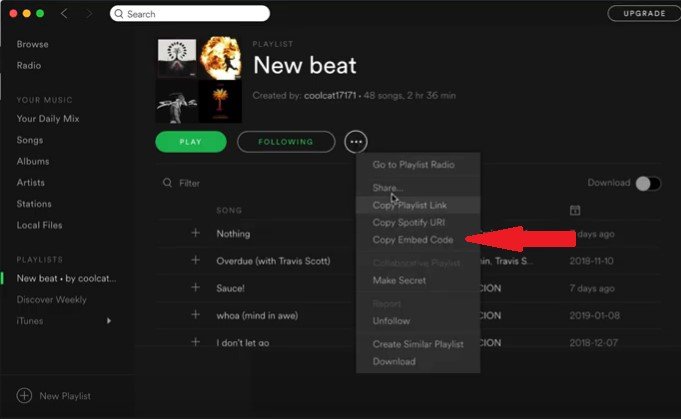
Step 3. Copy Embed Code
Once you click on the circle with three dots inside it, you will see a list of options from the drop-down menu. Select Copy Embed Code from the list of options you see on the drop-down menu.
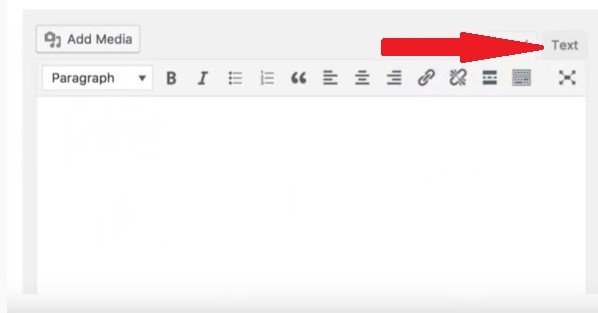
Step 4. Paste Embed Code to Website
Go to your WordPress website and log in. if you want to embed your Spotify playlist on a new post, click on Add a new post on your dashboard. Then click on Text to paste the code. It’s important to click on Text to embed Spotify playlist.
If you embed the code in the visual mode, it’s not going to work. You can also embed the same code on the widget of your website. Regardless of where you want to embed your Spotify playlist, you just pretty much need to paste it. That is how easy it is to embed your Spotify playlist on your website.
Part 3. Ways to Upload DRM-free Songs to WordPress
While it’s pretty easy to embed your Spotify playlist to your website, it’s not a good idea if you’re on a free user of this particular music streaming service. As a free user of Spotify, your playlist will include a lot of ads that could potentially annoy your website visitors.
If you want to share your Spotify playlist on your website without the annoying ads, you would have to convert the songs before uploading them to your website. Below is an amazing tool you can convert your Spotify songs.
With the DumpMedia Spotify Music Converter, you can download your favorite songs, convert, and upload them to your website. This is a pretty easy program to use. It’s all you need to be able to upload DRM-free songs to your website. Check out the steps below to see how you can use this particular program.
- Download the DumpMedia Spotify Music Converter
- Add your Spotify Songs
- Convert, Save, and Download Spotify Songs
- Upload to Website
The steps below are the detailed version of how you can use this particular music converter. Read on to learn more about it.
Step 1. Download the DumpMedia Spotify Music Converter
You can download this particular music converter software by clicking on this link. After the download is done, the installation will take place. Open the software once everything is done.
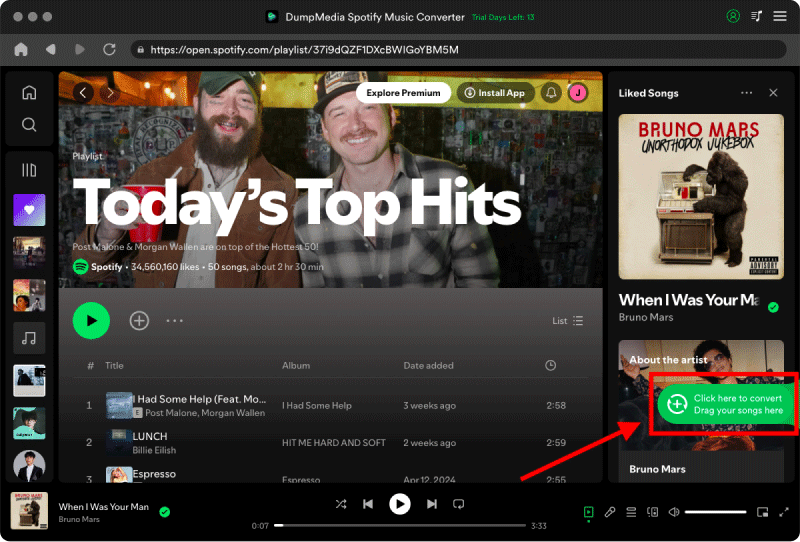
Step 2. Add your Spotify Songs
There are two easy ways to add your Spotify songs the DumpMedia Spotify Music Converter software. First, just copy the URL of the songs from Spotify and paste it on the DumpMedia Spotify Music Converter. You can also just drag the songs to the software than can convert your Spotify songs. Either way works well.
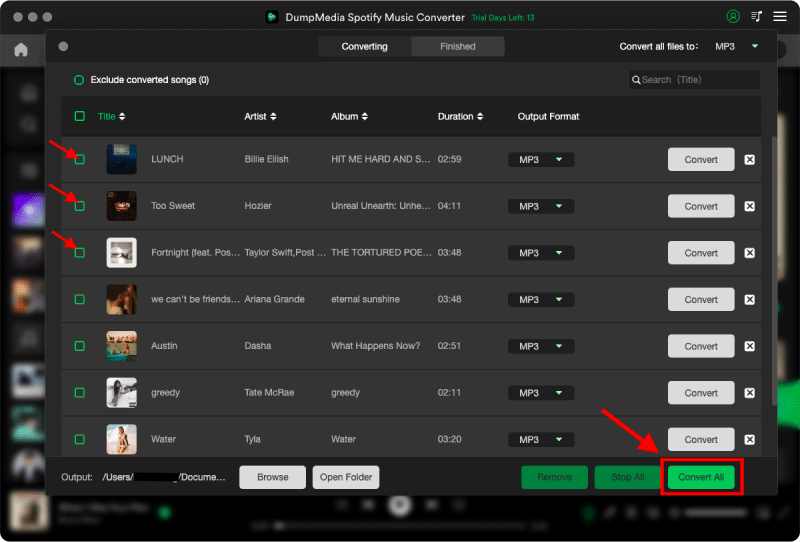
Step 3. Convert, Save, and Download Spotify Songs
Once all the songs have been added to the software, you can convert them by clicking on a file format on the top of the screen. You can also save your output by clicking on the Browse tab at the bottom part of the screen. When you’re all set, just click on the Convert button to download your Spotify songs.
Step 4. Upload to Website
Your favorite Spotify songs have now been converted and downloaded to your computer. Needless to say, DRM has also been removed in the process. With the DRM removed, you can now easily upload your DRM-free Spotify songs to your website. Log into your website admin account.
If you want to create a post where you want to feature all your favorite Spotify songs, you can just go to your dashboard and click on Add a new post. Instead of embedding a code, all you have to do is to click on the Media Library to upload your favorite Spotify songs. Once it’s uploaded in the media library of your website, you can easily insert it in your post.
Part 4. Conclusion
As you can see, it’s pretty easy to embed your Spotify playlist on your website. You just need to select the option to embed the code of your playlist on Spotify. The thing is, you would have to be careful in pasting embedding the code on your website.
For example, you can only embed code on a WordPress website on the text editor. If you embed it in the visual mode, it’s just not going to work.
Hence, it’s a lot easier to upload your DRM-free playlists by adding them to your media library. That way, you can easily add them to any of your posts. Since they’re already free of the DRM, you wouldn’t have to worry about copyright laws.
Do you own a website? Have you ever tried to embed Spotify playlist to your website? If yes, free to share your expertise with our readers.

30% Off >>>