


2025 How To Add Local Files To Spotify On Computer/Mobile?
The Spotify application has been outstanding and always rank up in the list if we are to talk about music streaming services. Everybody will agree that because the application has a lot of perks every individual can enjoy, it can supply the music needs of people.
What makes it more unique among others is that it has the ability to blend the usual tracks you can find in it and the user’s taste. Why? Because personalization is possible. One can actually add up songs if preferred. Wondering how to add local files to Spotify ?
Contents Guide Part 1: What Are Spotify Local Files?Part 2. How Do I Add Local Files To Spotify On Computer?Part 3. How Do I Add Local Files To Spotify On Mobile?Part 4. How To Downloading Spotify Songs From Playlist?Part 5. To Sum It All
Part 1: What Are Spotify Local Files?
Though Spotify application already has what it takes to be the top one – first off, by offering millions of tracks of several genres to people, it stands out more because it can accommodate the addition of local files.
So, if you got music stored in your personal computer’s library which happens to be not in Spotify application, you can actually have those synced onto it. Well, yes! You can supplement Spotify with tracks you own which are not actually in its database. That is so amazing, right?
The idea is that once Spotify application has been fully installed on your personal computer, it would search all folders and library to find available songs in your drive and then sync it into its database of songs.
However, the dilemma will occur in case you have a collection of songs spread throughout your personal computer folders (or even on external storage) making it hard for the application to look into it. This is why there is a need for one to manually add local files to Spotify.
And, the method on how to do it is actually simple and easy. You will find out more on the next part of the post.
Let us start with the discussion now.
Part 2. How Do I Add Local Files To Spotify On Computer?
Being one of the music enthusiasts, we always wanted to put some signature to the mix of songs and music we are listening to.
Rather than accepting the arrangement as what it is for now, adding some spice into the collection would always be a habit for all people who are crazy about music, particularly those from the Spotify application.
Because the application has the feature of accommodating and syncing local files into it, many had been so indulged.
But, how can you finally add local files to Spotify application? Here is how – simple and fast. You only need to complete two steps to proceed.
- Choose the tracks from your personal computer.
- Proceed with playlist creation.
Step #1. Choose The Tracks From Your Personal Computer
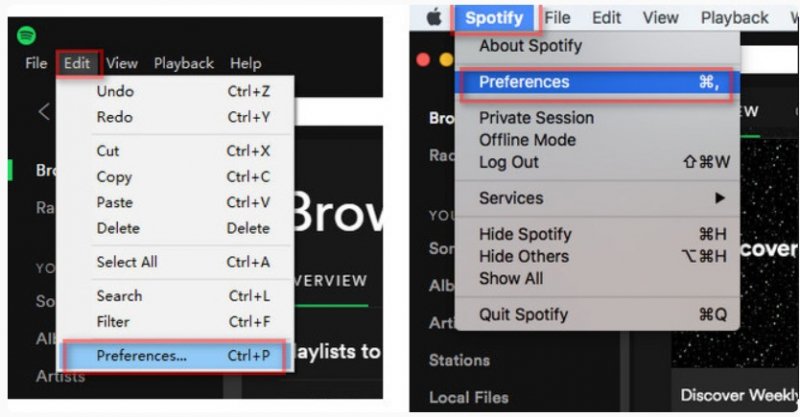
The first thing that is needed to be completed is to choose the local files you wanted to add to the Spotify application. You can do it by heading firstly to “Preferences” button which can be found under the “Edit” option at the top area of the page (in case you are using a Windows computer). In case you have a Mac computer, you can see the “Preferences” option by hitting the “Spotify” menu at the top left of the page.
After doing the above, you need to scroll down until you find the “Local Files” button. Hit it then select “Add a source”. By doing so, a new window will appear. From that window, you will see all the folders wherein you can choose from (the local files to be added).
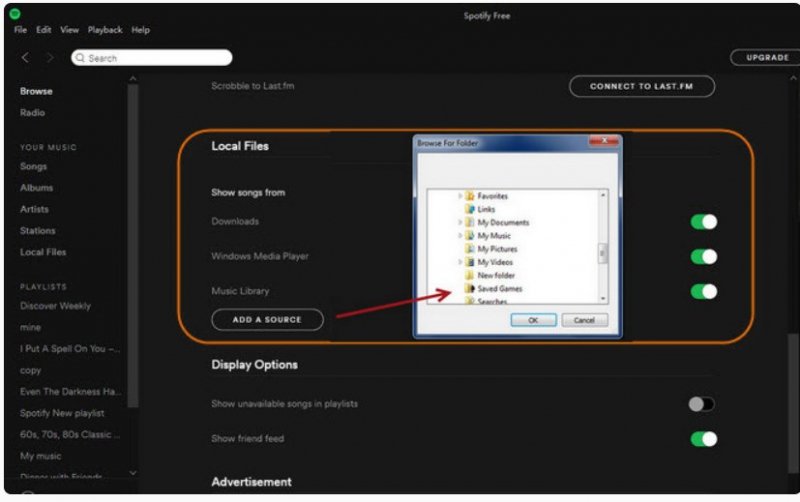
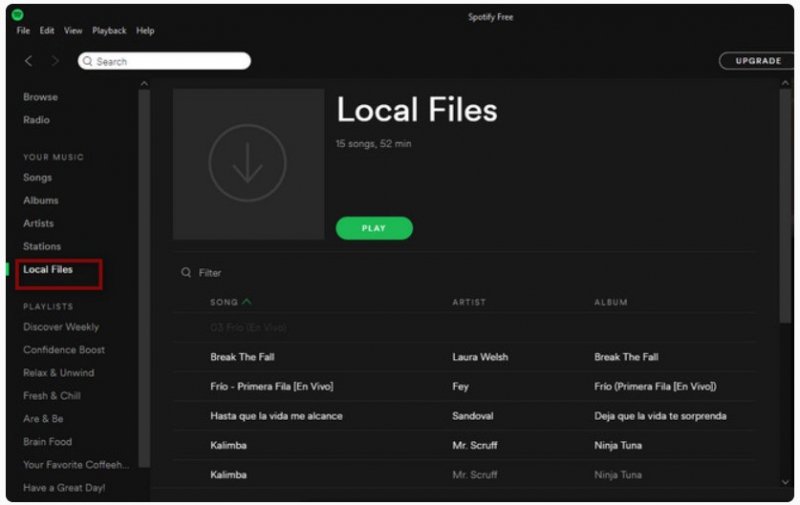
Choose the folder wherein the local files to be added are saved. All the music applicable to be synced will be synced into the application. Keep in mind that not all audio formats can be added to the application. You can add files in M4A, MP3, M4P, and even MP4 formats. After completion, all the songs or local files added will be seen under the “Local Files” menu in the left portion of the page.
Step #2. Proceed With Playlist Creation
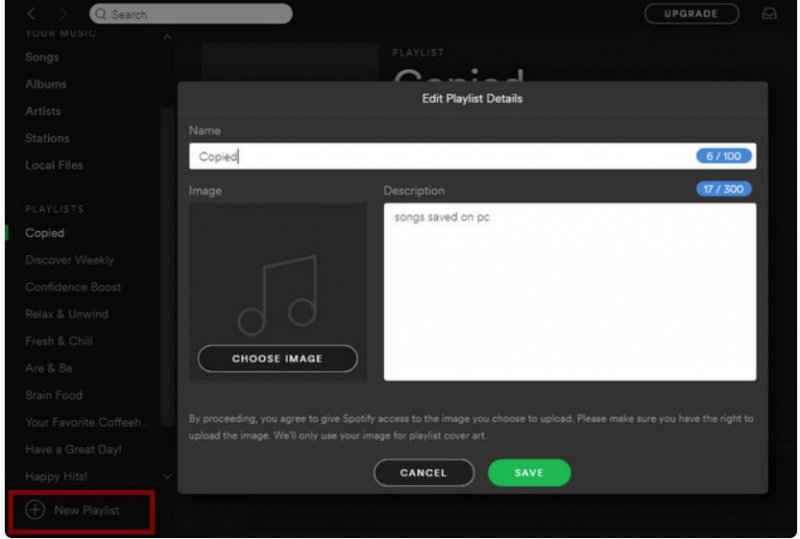
Now that you have completely added the local files to Spotify application, the next step that you need to do is to proceed with the creation of a new playlist. You can have it completed by hitting the “New Playlist” button which you can immediately notice at the bottom left corner of the interface.
You can indicate a name depending on your preference. You can also choose an image of your choice. Once done, you can just hit the “Save” button to finish.
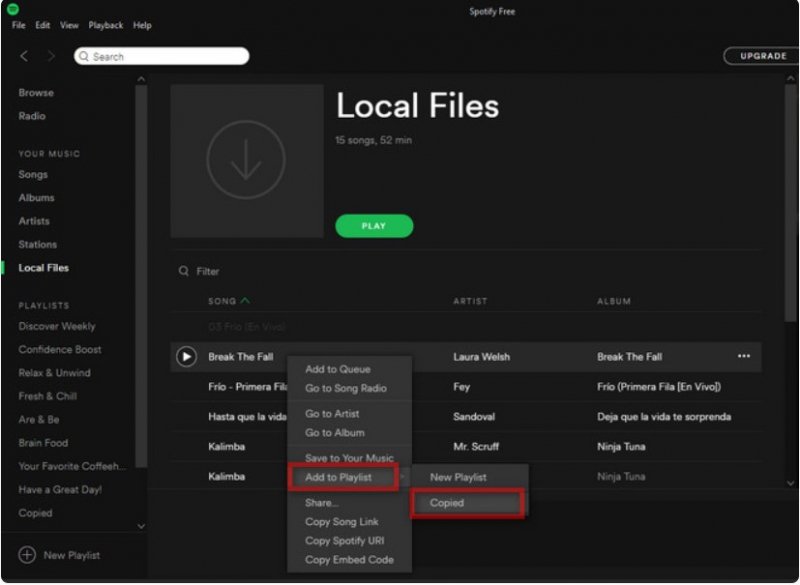
Once playlist has been successfully created, you can now head to the “Local Files” tab again to select which song/s you wanted to add to the playlist created. You can do it by hitting the song (right-click) and then choose the name of the playlist created.
After doing so, you can now freely enjoy all those local files you have added to Spotify. Listen to it anytime you want to. Also, you need to take note that this is only possible in case you are using the Spotify premium account. This won’t work if you are using a free Spotify account.
Finally, you now learn how to add local files to Spotify application. Just in case you are looking for a way (vice versa) on how you can have the songs from your Spotify playlists downloaded and saved on your personal computer, you must then be aware of the idea that would be tackled on the third part of this article.
Part 3. How Do I Add Local Files To Spotify On Mobile?
Add local files to spotify on Android
- Open the spotify application.
- Locate the new album with the local files.
- Download the entire album by clicking the arrow icon.
Add local files to spotify on iPhone
- Open the Spotify application.
- Click Settings in the upper right corner of the screen.
- Scroll down to find the local file.
- Click the local audio file switch.
- Find local songs and download playlists.
Part 4. How To Downloading Spotify Songs From Playlist?
Downloading of Spotify songs out of the application is a bit difficult. Why? This is because songs in Spotify are DRM (Digital Rights Management) protected. This means that you cannot have those files kept immediately on your device if you wished to because the mentioned protection hinders the user to do so.
As for premium users, downloading for offline streaming is possible. However, those songs downloaded will disappear after subscription has ended. Moreover, there are as well some other limitations that would make it hard for premium users to keep all songs downloaded. Still, a better way is to rely on one software application with the ability to do the downloading.
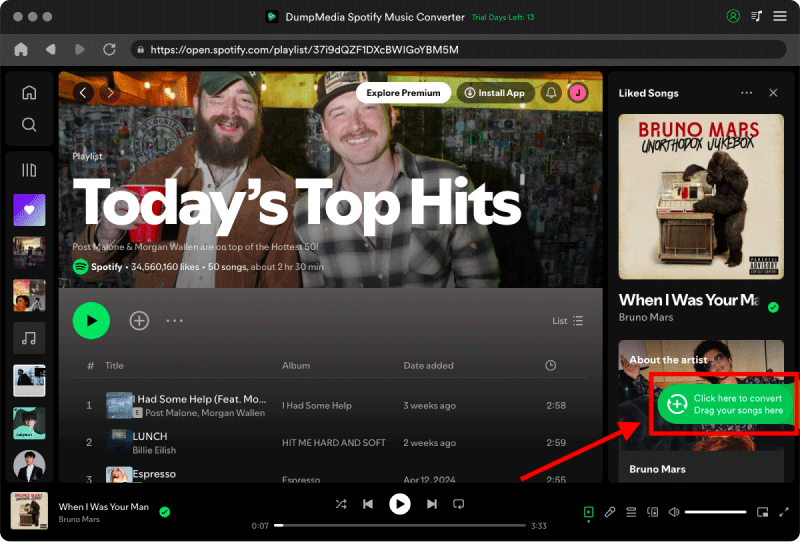
In this post, we introduce this DumpMedia Spotify Music Converter. This can help in the downloading of songs and even conversion of those in other formats as long as preferred by the user. Plus, the mentioned DRM protection will be removed in an instant.
How can you have it utilized? Below is a simple guide for your reference.
- Add the Spotify songs to be downloaded.
- Choose the output format desired.
- Hit the “Convert” button.
Additional details for mentioned are as follows.
Step #1. Add The Spotify Songs To Be Downloaded
Firstly, you need to have this DumpMedia Spotify Music Converter installed on your personal computer. Once done, have it launched and opened to proceed with the adding of the songs to be converted and downloaded. You can either manually add the songs on just do dragging and dropping. Take note that you can add a bunch if you intended to.
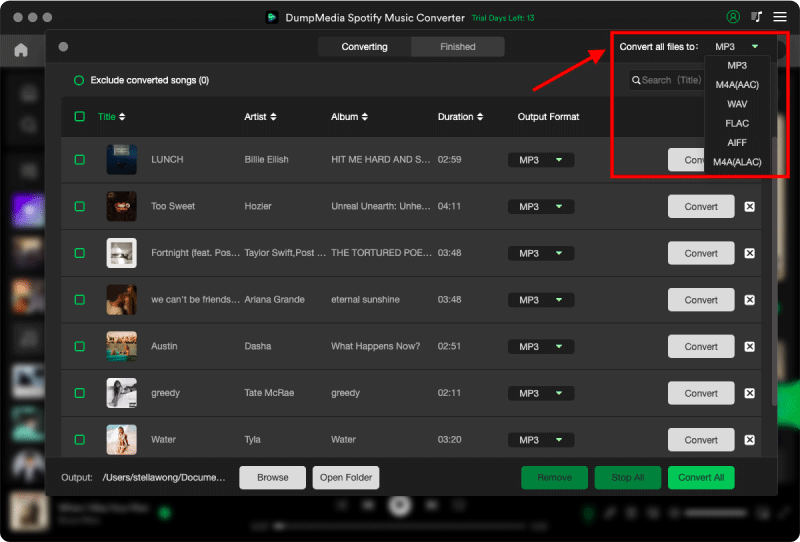
Step #2. Choose The Output Format Desired
Once songs are added, you now need to choose the output format wherein the songs are to be converted. You can choose one from the available by hitting the “Convert All Tasks to” button at the rightmost part of the page. You must indicate the output path as well by clicking the “Browse” button at the lower part of the screen.
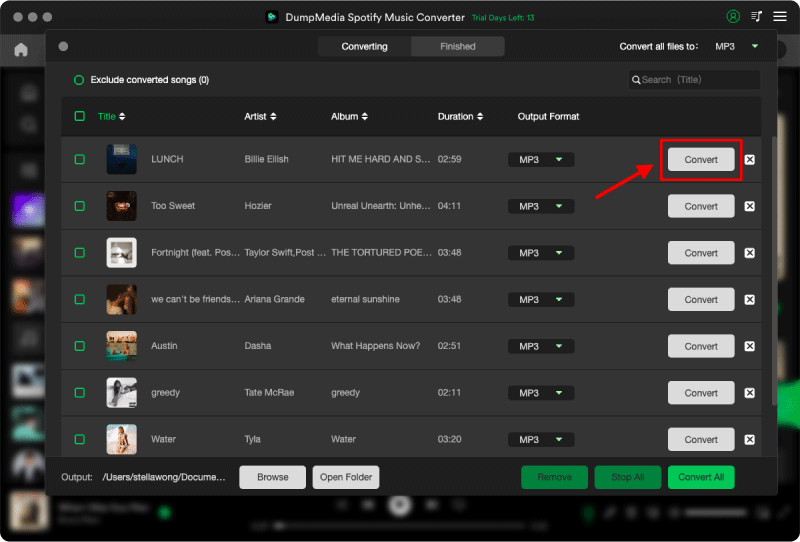
Step #3. Hit The “Convert” Button
Once you have finished the first two steps, finally, you can hit the “Convert” button which you can see at the lower right corner of the screen. This would complete the process.
After some minutes, you would expect that the converted song will be readily accessible in the folder you have specified in the second step. You would need to wait for only a few minutes since conversion and downloading process is too quick.
Part 5. To Sum It All
It is easy to Add local files to Spotify application is too easy, right? You can have it done by just following the guide presented in the second part of this article. You just need to follow each step to successfully add all local files intended onto the application.
Added to the above, you were also able to learn about a tool which can convert and download the Spotify songs you love in jus a snap. With the use of this DumpMedia Spotify Music Converter, you can process as many Spotify songs you want. Have those converted to another format and then finally downloaded for offline streaming not worrying about any subscription fees and internet connection.
Apart from the above presented, do you have any thoughts in mind relating to the topic of discussion. You can have all those written in the comment section below.

30% Off >>>