


Transfer iTunes Purchases to Another Account (2025 Guide)
Having much purchase of iTunes songs stocked in your hard drive is not that fun if you cannot share it. So have you tried to transfer iTunes purchases to another account ? If you have no idea about what we’re talking about then this article is meant for you.
Having an Apple account is very convenient. They’ve devised many ways to integrate or share accounts and items with other people. It’s not only Apple that does this but other media streaming companies as well. Take a look at Spotify Music and Amazon Music. Their family sharing features are very much like Apple Music too.
In the following sections, we’ll get the detailed steps on how to share purchases with iTunes or Apple Music. There are ways recommended by Apple. There are also ways where we can devise this and make it more accessible.
Contents Guide Part 1. How to Transfer iTunes Purchases to Another Account? Part 2. How to Transfer Your iTunes Purchased Music to Any Device? Part 3. Summary
Part 1. How to Transfer iTunes Purchases to Another Account?
Apple does not have a direct transfer iTunes purchase to another account function. We can make a way though that it looks like this. We’ll do some iTunes folder area modifications to accomplish this. See the steps below:
- Move your iTunes Media folder to a public location. – This will effectively share your iTunes media with other users in the network. It’s a small hack that’s very effective. Select your iTunes Media folder in /Music/iTunes or \Users\(username)\My Music\iTunes in a Mac or Windows PC respectively. Remember to select only the iTunes Media folder. Now drag that location to a public storage or shared location (you can even use a NAS storage for easy access). Users should be able to access it from the network.
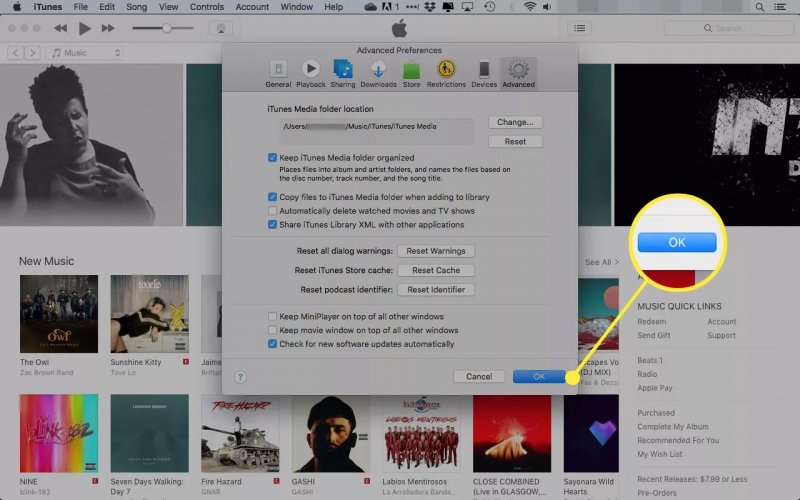
- Now open iTunes and we’ll select the new media folder. Go to Edit -> Preferences. Go to the Advanced tab. Under the iTunes Media Folder location click Change. Input the iTunes Media folder on the public location in the previous step. Once you are done don’t forget to press OK.
Your iTunes music is now ready to be shared with others. We’ll now set up other users’ iTunes Music accounts so they can use this too.
- Open your iTunes program. Click Edit->Preferences. Go to the Advanced tab. Under the iTunes Media Folder location uncheck the “Copy files to iTunes Media folder when adding to library file”. This will ensure you won’t edit the source iTunes Media folder.
- Now go to File->Add File or Folder to Library. Go to the location of the iTunes public Media folder in the previous step. You can now choose which song or library you want to listen to from the previous iTunes account. Click Open to continue.
The process to transfer iTunes purchases to another account is now complete. All you have to do is to repeat the last two steps for other users to follow.
Part 2. How to Transfer Your iTunes Purchased Music to Any Device?
A simpler and more flexible way to transfer iTunes purchases to another account is to use a third-party tool. This versatile tool is called the DumpMedia Apple Music Converter.
DumpMedia Apple Music Converter is a converter and DRM removal tool-in-one. By removing DRM, you can effectively share your iTunes-purchased music in an unlimited way. It has a simple and genuinely friendly user interface. All you have to do is download it at the links below:
It is available as a free trial download. Once you have evaluated it, purchase some time-limited or perpetual license keys. With this, you’ll get the privilege of timely software updates that are needed to go with every new release of iTunes or Apple Music software. You’ll also get a guaranteed 24-hour reply to customer support.
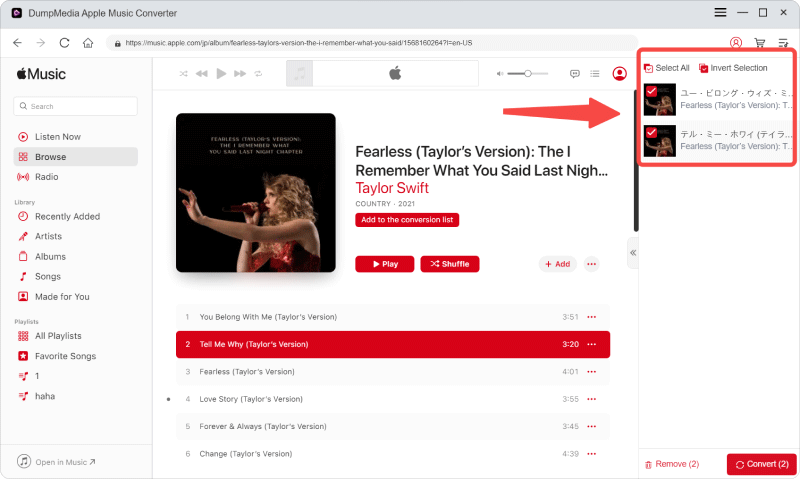
To start using DumpMedia Apple Music Converter, open the app and then go to the Library tab. You should see your iTunes or Apple Music library already synced with DumpMedia. Choose the media you want to be converted or shared by clicking on the checkboxes. You can select all media by clicking the topmost checkbox.
You can optionally change the output music format or folder below. The music format is available as MP3, AC3, M4A, M4R, FLAC, MKA, AU, and more.
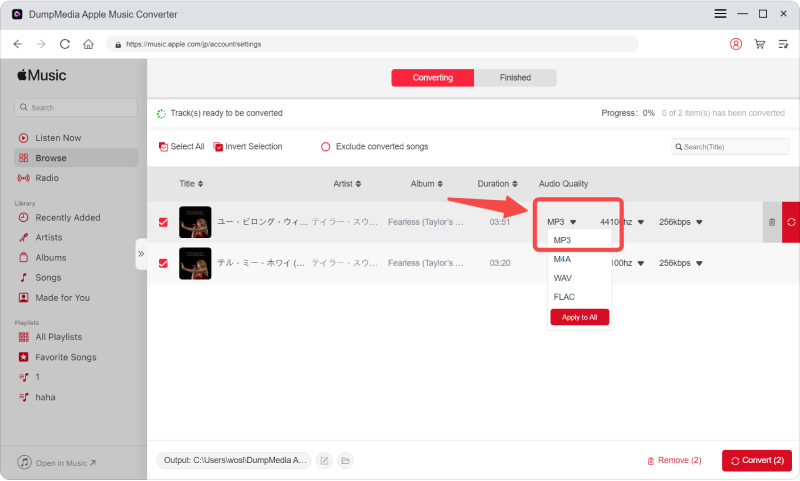
Click Convert to start converting. When finished go to the Finished tab. Click View Output File to go to the output directory.

You are now ready to share these files with anyone. It’s very much like a transfer of iTunes purchases to another account. It’s much more flexible because it removed DRM already.
When you share these files with your friends they can use them with any media player or device. It’s their choice. They can even use them on unbranded SD card-based speakers. The sky is the limit by using this powerful converter tool – the DumpMedia Apple Music Converter.
Part 3. Summary
In summary, we’ve discussed how to transfer iTunes purchases to another account. We made this through some file system manipulation techniques using iTunes (or Apple Music). By moving the iTunes Media folder to a public or shared location we effectively made the transfer.
The users on the other end simply have to point to this location to add files or folders to their library. We also introduced a more versatile way to transfer purchases and this is through a third-party tool.
This versatile third-party tool is the DumpMedia Apple Music Converter. This can effectively convert and remove DRM from all your Apple Music songs. Because of this, you can share your Apple Music with your friends unlimitedly. We suggest that you download the free trial of DumpMedia Apple Music Converter.
When you have thoroughly evaluated it, purchase a license key for full access to all the features of this wonderful product. We hope this helped you with your iTunes-related queries. Transferring iTunes purchases has looked this easy.

30% Off >>>