


M4P to M4A Conversion: Convert Apple Music Files Easily
If you are trying to convert M4P to M4A, you are not alone. Many Apple users eventually discover that M4P files are DRM-protected, which means you cannot freely play them on non-Apple devices, edit them in audio software, or even transfer them to media players. Because of this, converting M4P to a non-protected audio format, such as M4A, becomes essential.
In this comprehensive guide, you will learn what M4P and M4A formats really are and the fastest and most reliable way to convert M4P files to M4A.
Contents Guide Part 1. What Are M4P and M4A?Part 2. The Best Way to Convert M4P Files to M4APart 3. Frequently Asked QuestionsPart 4. Conclusion
Part 1. What Are M4P and M4A?
Before getting into conversion methods, it is important to understand the file format you are dealing with.
What Is an M4P File?
M4P files are protected audio tracks locked within Apple’s ecosystem, primarily characterized by Apple’s proprietary DRM encryption which restricts playback to authenticated devices and prevents them from being edited, transferred, or converted. These restrictions mean they cannot be used in third-party editors like Audacity or Adobe Audition and suffer from limited compatibility with non-Apple hardware such as MP3 players, car stereos, smart TVs, and Android devices.
What Is an M4A File?
M4A stands for MPEG-4 Audio and is essentially the same audio container as M4P without DRM, making them much more flexible for general use. It was popularized by Apple as the high-quality successor to the MP3, offering better sound quality at smaller file sizes.
Why Convert M4P Files to M4A?
This is why users search for a guide on converting M4P to M4A. Converting M4P files to M4A is essentially an act of "liberating" your music, providing several practical benefits:
- Device Freedom: M4A files work everywhere. Once converted, you can play your music on Android phones, car stereos, smart TVs, and gaming consoles (like PlayStation or Xbox).
- Software Compatibility: M4A is a standard industry format. You can use these files as background music for home videos, ringtones, or audio projects in any professional or hobbyist editor.
- Future-Proofing Your Library: If you ever cancel your Apple Music subscription or lose access to your Apple ID, those M4P files become useless paperweights. Even if the files are sitting on your hard drive, they won't play. Once you have the M4A version, you own that copy forever. It doesn't need to verify your subscription status.
Can You Convert M4P to M4A?
It is important to note that you cannot simply "rename" the file extension from .m4p to .m4a. Because the internal data is encrypted, the file will remain unreadable. iTunes also does not provide any method to remove DRM or convert M4P files. To successfully convert them, a third-party DRM removal and audio conversion tool is required.
Part 2. The Best Way to Convert M4P Files to M4A
When it comes to converting M4P to M4A audio, most tools fail because they cannot bypass the FairPlay DRM that protects Apple Music tracks. DumpMedia Any Music Converter, however, is specifically engineered to process Apple’s encrypted media while ensuring users obtain a clean, DRM-free output.
Below is a clear breakdown of its core capabilities, followed by the practical benefits that set it apart.
- DRM Removal: You can download DRM-free songs from Apple Music, Spotify, Line Music, and others, giving users full control over their downloaded audio files.
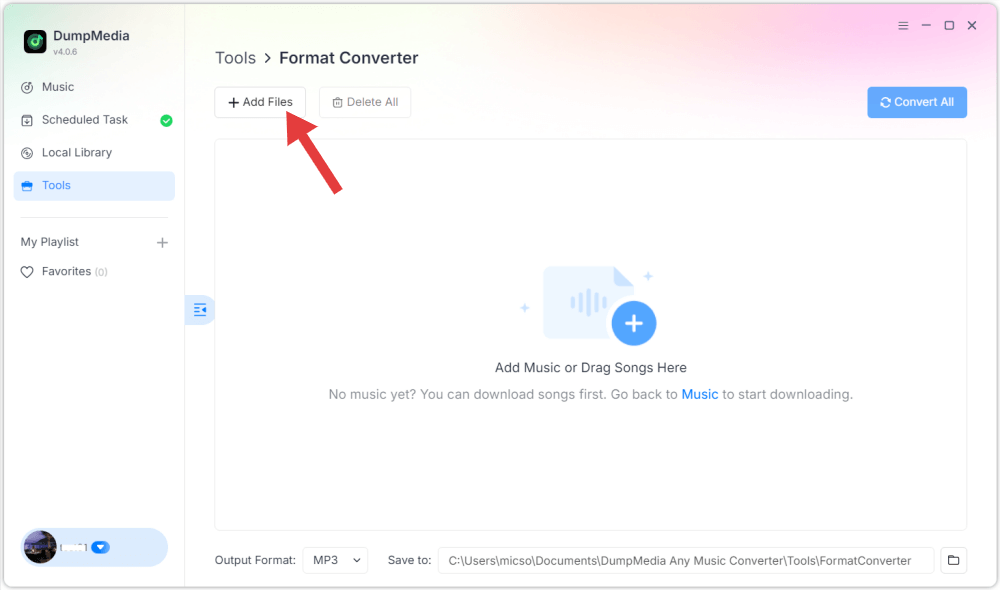
- Direct Conversion from M4P to M4A: Processes protected M4P audio and outputs high-quality, unencrypted M4A files that retain original fidelity. (Tools > Format Converter)
- Multi-Format Conversion (MP3, FLAC, WAV, AAC, etc.): Supports conversion beyond M4A, allowing users to export in the exact format required for their device or workflow.
- Full Metadata Preservation: Retains ID3 tags, including title, artist, album, genre, track number, and artwork.
- High-Speed Batch Processing: Converts entire playlists or full Apple Music libraries simultaneously, significantly reducing manual work.
Note: Conversion success may vary depending on the specific DRM condition and accessibility of the original file within your Apple Music or iTunes environment.
How to Convert M4P to M4A Using DumpMedia
Although powerful, DumpMedia Any Music Converter is very straightforward to use. Here’s how to convert M4P files into DRM-free M4A audio:
Step 1: Download DumpMedia Any Music Converter from the official website and install it on your computer.
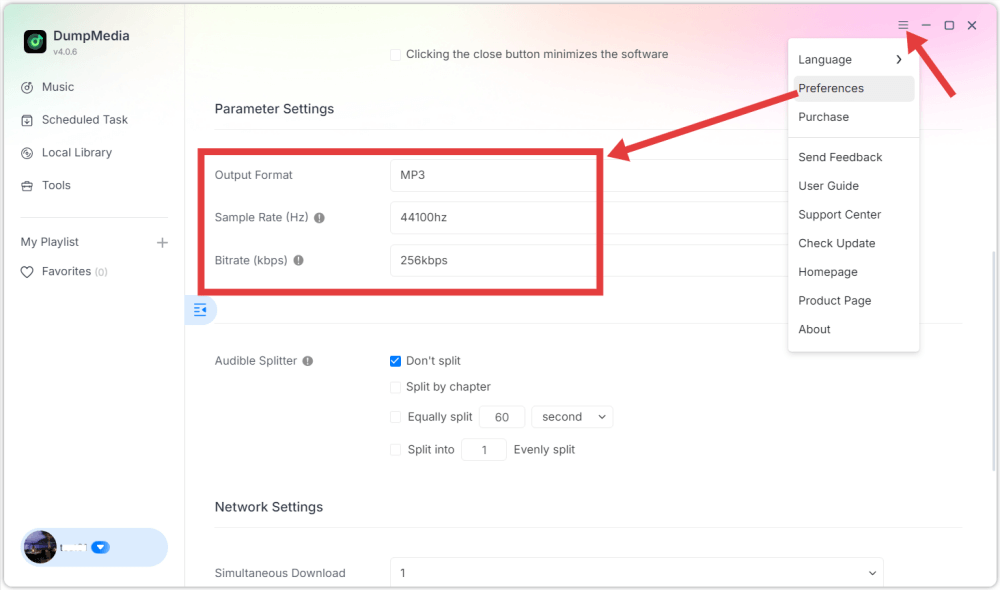
Step 2: Select "M4A" as the Output Format:
- Format: M4A
- Quality: High or Lossless
- Bitrate: 256 kbps or 320 kbps
- Sample Rate: 44.1 kHz
Step 3: Go to Tools > Format Converter. Then add M4P files to DumpMedia.
Step 4: After doing all those simple steps, simply just click on the Convert button.
Part 3. Frequently Asked Questions
Q1: Is converting M4P to M4A legal?
Personal backup, device compatibility, or offline listening is generally acceptable. Commercial redistribution is not permitted.
Q2: Will audio quality be reduced?
No. DumpMedia preserves original AAC quality or allows custom high-quality output.
Q3: Can I convert Apple Music tracks after canceling my subscription?
Yes, once tracks are converted and DRM-free, you keep them permanently.
Q4: Can metadata be preserved?
Yes. ID3 tags are retained for all converted files.
Part 4. Conclusion
Converting M4P to M4A is essential for anyone who wants unrestricted control over Apple Music or older iTunes purchases. Because Apple blocks direct conversion through iTunes, third-party software is necessary.
DumpMedia Any Music Converter stands out because it provides reliable DRM removal, M4P files to M4A conversion, and high-speed batch processing. If you want a fast, safe, and efficient way to unlock your M4P files, DumpMedia is the most complete solution currently available.

30% Off >>>