


What is the Ondesoft iTunes Converter and How to Use it?
Ondesoft iTunes Converter is a converter for DRM-protected iTunes music. You can easily remove the DRM protection from the following with this tool:
- M4P songs
- Apple Music songs
- M4P and M4B audiobooks
- Audible AA/AAX Audiobooks
It supports output file formats like MP3, AC3, AAC, AIFF, FLAC, AU, M4R, MKA, and M4A. It retains the original quality of your converted files.
So, how do I use Ondesoft iTunes Converter? In this article, we will give you a detailed discussion of the features of the Ondesoft iTunes Converter and how to use it. Then, we will give you another similar alternative that you can try.
Contents Guide Part 1. Features of Ondesoft iTunes ConverterPart 2. How Do I Use Ondesoft iTunes Converter?Part 3. Alternative to Ondesoft iTunes ConverterPart 4. Wrapping It Up
Part 1. Features of Ondesoft iTunes Converter
#1 Apple Music & M4P Converter
- Convert Apple Music and iTunes songs to DRM-free ones.
- Convert DRM-protected M4P files to MP3, AC3, AAC, AU, AIFF, FLAC, MKA, M4R, and M4A.
#2 16X Conversion Speed
- Convert the supported files under a 16X conversion speed.
- The tool’s intuitive interface displays your entire iTunes catalog as well as the conversion options in one window.
- Advanced options of the iTunes M4P converter include changing the sample rate, number of channels, bitrate, and codec.
- You can choose to do batch conversion.
#3 100% Original Quality
- The tool retains all of the data from your original files.
- It does not save temporary files so you can save space.
- It does not require additional hardware requirements.
Part 2. How Do I Use Ondesoft iTunes Converter?
Below is a step-by-step guide on how to use the Ondesoft iTunes Converter.
Step 1. Setting up the Conversion Speed
You can convert your audio or video files up to 16 times faster with Ondesoft iTunes Converter. But, you can change the tool’s conversion speed if you want to start from 1X. To do this, just click on Options on the tool’s main interface. Another way is by opening Preferences as shown below.
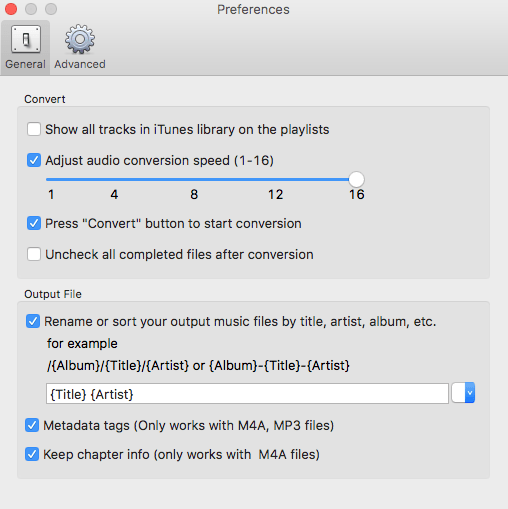
Step 2. Save Metadata Information
You are free to choose if you want to save the metadata information as well as the ID tags of your converted M4A or MP3 files or retain the Chapter information of your M4A audiobooks.
Step 3. Set the Output Filename
Select a format for the resulting filename of your converted files. The filename may contain the album, title, and artist. You can even change the order and amount to freely combine them such as in the example in the image below.
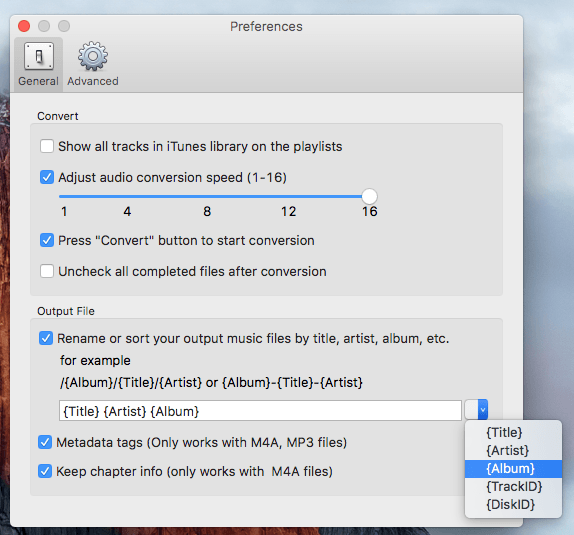
The resulting output filename of the format in the above image looks like the one below:
Outfile: Love Game Lady Gaga The Fame.m4r
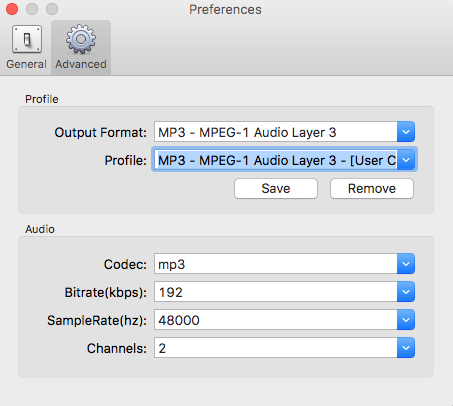
Step 4. Customize & Save a Profile
Do you have a profile you use very often? You can save it on the platform. Just go to Options, choose Advance, customize the parameters, and save your profile.
Part 3. Alternative to Ondesoft iTunes Converter
We recommend using DumpMedia Apple Music Converter for downloading and converting any Apple Music songs, albums, and playlists to MP3, M4A, FLAC, and more for enhancing your listening experience. Even if the Apple Music app is not working on your device, you can play them on another music player immediately.
Key Features
- Convert Apple Music to MP3, WAV, AAC, and more
- Maintain lossless audio quality
- Batch conversion for playlists and albums
- Save songs permanently on devices
- Transfer files to any device
To clarify, this tool does not convert iTunes songs to DRM-free ones. Instead, it works with Apple Music content and converts it into playable audio files. This makes it a useful solution for users who want more flexibility beyond standard limitations on how to download songs from iTunes.
Now, onto the step-by-step guide on how to use DumpMedia Apple Music Converter.
- Download, install then register the app.
- Open the software.
- Select the files you want to convert.
- Choose your desired output format & destination folder.
- Start the conversion process.
Below are the detailed steps of the process.
Step 1. Download, Install then Register the App
Of course, you need to download the app first before you can use it. Whether you want to try the software first or purchase it, you can find the links here. Then install the app and proceed to the registration page to activate it. You should have received an Activation Code which you need to type in the registration window.
Step 2. Open the Software
Once activated, launch the software. After this, all of your downloaded iTunes music, Apple music, podcast files, and videos will be automatically uploaded to the Converter. Thus, you have to ensure that you have already downloaded your desired songs to your computer. If you want to check your uploaded files, you can find them in the app’s Playlists section.
Step 3. Select the Files You Want to Convert
You will find the video or audio types of your uploaded files on the app interface’s left portion. If you want, you can select one category first. This allows you to see your desired files in the app’s right column. Choose your files by checking the box in front or you can also search your desired songs directly on the app’s search box found on the upper portion before ticking them.

Step 4. Choose Your Desired Output Format & Destination Folder
Next, proceed to the app’s Output Settings then select your desired output format on the drop-down list. The default parameters are already set for you but you can also customize them yourself including the output file’s Channels, Sample Rate, Bit Rate, and Codec.
Tip:
If you are converting audiobooks, you will be provided the following formats: AIFF, M4R, MKA, AU, AC3, FLAC, M4A, and MP3.
After you are satisfied with your settings, select a destination folder for your converted files.
Step 5. Start the Conversion Process
Click the Convert button to start the conversion process. Wait for the conversion to finish. The length of the conversion will depend on the number of songs you converted.

Part 4. Wrapping It Up
Ondesoft iTunes Converter is a great tool for removing the DRM protection from your desired iTunes songs. Here, we gave you its notable features and how to use the tool.
But just in case you want a similar alternative, we recommend using DumpMedia Apple Music Converter which is another excellent music converter for DRM-protected Apple songs. Feel free to try this software anytime.
*DumpMedia works by decrypting and downloading Apple Music songs into DRM-free files, allowing you to obtain a clean, unrestricted copy of your library for any device. Its functionality does not include the DRM removal of local audio files.

30% Off >>>