


How to Make Apple Music Account Public or Private [2026 Guide]
In the ever-evolving world of music streaming, Apple Music has established itself as a prominent platform that caters to the diverse musical tastes of millions of users worldwide.
One of the standout features of Apple Music is the ability to personalize your music-sharing preferences, allowing you to make your Apple Music account public or private. By doing so, you can control who sees your playlists, music activity, and overall presence on the platform.
In this article, we will delve into the intricacies of managing your Apple Music account's visibility, providing you with step-by-step instructions on how to make your account public or private. Whether you're looking to showcase your musical expertise or maintain a more private listening experience, we've got you covered. Let's explore the versatility of Apple Music and learn how to tailor your account to suit your preferences.

Contents Guide Part 1. How to Make Apple Music Account Public or PrivatePart 2. Alternative Solution: DumpMedia Apple Music ConverterPart 3. Conclusion
Part 1. How to Make Apple Music Account Public or Private
Apple Music offers users the flexibility to choose whether they want to make their account public or keep it private. By adjusting these settings, you can control who can see your playlists, music activity, and profile information. Let's explore how to make your Apple Music account public or private on different platforms.
On the Web:
Below are the steps you should follow to make your Apple Music account public or private using a web app on the browser:
Step 1: Open your preferred web browser and visit the Apple Music website (music.apple.com).
Step 2: Log in to your Apple Music account using your Apple ID and password.
Step 3: Once you’re logged in, click on your profile picture or initials in the top-right corner of the screen to access your account settings.
Step 4: In the dropdown menu, select “Account” to navigate to your account settings page.
Step 5: Scroll down to the “Profile” section and locate the “Privacy” option.
Step 6: To make your account public, toggle the switch to the “On” position. Your profile and playlists will now be visible to other Apple Music users.
Step 7: To make your account private, toggle the switch to the “Off” position. This will restrict the visibility of your profile and playlists to only yourself.
On Mobile Devices (iOS and Android):
Here are the steps to make Apple Music public or private on mobile devices such as iOS or Android operating systems:
Step 1: Launch the Apple Music app on your mobile device and sign in to your account.
Step 2: Tap on the “For You” tab at the bottom of the screen to go to the main Apple Music interface.
Step 3: Tap on the profile icon in the top-left corner of the screen to access your account settings.
Step 4: On the Account page, scroll down and select “Privacy” under the “Profile” section.
Step 5: To make your account public, toggle the switch to the “On” position. This will allow others to see your profile and playlists.
Step 6: To make your account private, toggle the switch to the “Off” position. This will limit the visibility of your profile and playlists to only yourself.
On the Desktop App:
Here are the steps to make Apple Music public or private on desktop applications of your macOS computer:
Step 1: Launch the Apple Music app on your Mac and sign in to your account.
Step 2: Click on the “Music” menu in the top-left corner of the screen and select “Preferences” from the dropdown menu.
Step 3: In the Preferences window, click on the “General” tab.
Step 4: Under the “Profile” section, you will find the “Privacy” option.
Step 5: To make your account public, check the box next to “Make My Profile Public.” This will enable others to view your profile and playlists.
Step 6: To make your account private, uncheck the box next to “Make My Profile Public.” This will keep your profile and playlists visible only to yourself.
By following these steps on the web, mobile devices, or the desktop app, you can easily adjust the visibility settings of your Apple Music account, allowing you to personalize your music-sharing experience according to your preferences.
Part 2. Alternative Solution: DumpMedia Apple Music Converter
DumpMedia Apple Music Converter is a powerful and user-friendly software designed to help you convert and save your Apple Music tracks, albums, and playlists to various audio formats. This tool allows you to enjoy your favorite Apple Music content on any device or media player without any limitations.
Here are the steps to use DumpMedia Apple Music Converter:
Step 1: Download and Install DumpMedia Apple Music Converter
Visit the DumpMedia official website and download the Apple Music Converter. Follow the installation instructions to install it on your computer.
Step 2: Launch DumpMedia Apple Music Converter
Once the installation is complete, launch the DumpMedia Apple Music Converter on your computer.
Step 3: Add Apple Music Tracks
Click on the "Add" button, and a new window will appear. Browse and select the Apple Music tracks, albums, or playlists you want to convert. Then click "Add" to import them into the software.

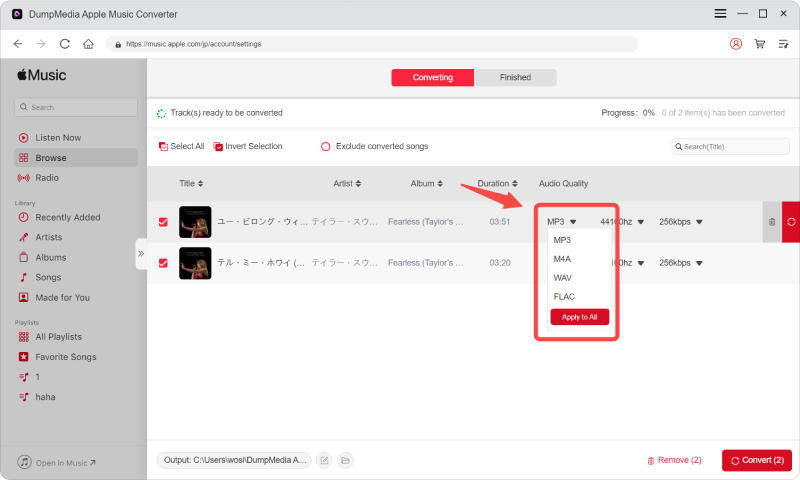
Step 4: Select Output Format and Settings
DumpMedia Apple Music Converter offers a wide range of output formats such as MP3, M4A, AAC, FLAC, and more. Choose the desired output format from the "Output Format" dropdown menu. You can also customize the output settings like bitrate, sample rate, and codec according to your preferences.
Step 5: Choose the Output Folder
Click the "Browse" button to select the destination folder where you want to save the converted Apple Music files.
Step 6: Start Conversion
After customizing the settings, click the "Convert" button to start the conversion process. DumpMedia Apple Music Converter will convert your Apple Music tracks to the selected format while preserving the original audio quality.

Step 7: Access the Converted Files
Once the conversion is completed, you can find the converted Apple Music files by clicking on the "Converted" tab. From there, you can locate the output folder and access your converted music files.
DumpMedia Apple Music Converter simplifies the process of converting Apple Music to popular audio formats, allowing you to enjoy your favorite tracks on any device or media player. With its intuitive interface and powerful conversion capabilities, DumpMedia Apple Music Converter provides a convenient solution for Apple Music users who want to have more control over their music library.
Part 3. Conclusion
In conclusion, you can easily make your Apple Music Account Public or Private through the above steps. In addition, there is a tool called DumpMedia Apple Music Converter that could help you enjoy your favorite Apple Music content on any device or media player without any limitations.

30% Off >>>