


How to Transfer iTunes Playlist to Android (2026 Guide)
iTunes is indeed a good platform to listen to tracks and playlists. Apart from being an app that can provide a good music streaming service to users, it is also a great application for managing your media files. If you happen to wonder how you can move those songs that you have on your iTunes playlist to an Android device that you are currently using, consider this dilemma solved!
As you continue reading this post, we are sure that you will be learning how to transfer iTunes playlists to Android easily.
If you ever tried the transfer before and failed a lot of times, that is a given. It might surprise you but know that the transferring of the iTunes playlists to your Android device just won’t work, unlike the way it works on Apple devices such as iPhones, iPads, or iPod touch.
iTunes was created and developed by Apple Inc. and so it is so compatible with iOS devices. But, if you are using an Android device, you shouldn’t lose hope. We are here to explain in detail the whole process of how to transfer an iTunes playlist to Android. Several methods will be highlighted especially in the second part of this post. If you want to jump right into the section, it’s your choice.
Let’s start with the discussion then!
Contents Guide Part 1. Can You Transfer iTunes Playlist to AndroidPart 2. How Do You Transfer iTunes Playlists To Android?Part 3. The Best Way To Transfer iTunes Playlist To AndroidPart 4. Conclusion
Part 1. Can You Transfer iTunes Playlist to Android
Initially, as we keep on mentioning in the introduction part of this post that the transferring of those iTunes playlists that you love to Android devices won’t work the same as how it works on any iOS device.
The movement or syncing of iTunes playlists works easily if the receiver is an iOS or Apple device. However, it’s a different case if you are using an Android gadget. A direct method of syncing isn’t available for Android users but still, we have ways to do it.
You will surely be learning how to transfer iTunes playlist to Android as we move on to the second part of this article. We’ve got several methods that you can apply and try.
Part 2. How Do You Transfer iTunes Playlists To Android?
As stated, in this section, we will be dealing more with the steps and methods that you can follow particularly how to transfer iTunes playlist to Android.
If you want to transfer your favorite iTunes playlists to the Android gadget that you are currently using but keep on wondering how this can be possible, the answer is right next to this paragraph to hop on.
Method #1. Droid Transfer
There is this tool or application that can be of great help to you – the Droid Transfer. This is regarded by many as an all-in-one tool that can cover almost all of your needs when it comes to Android device management. With Droid Transfer, you can even copy a bunch of media files (music, photos) and even messages and contact details from your Android device to your personal computer.
The good thing with this app is that yes, it allows the syncing of iTunes playlists to your Android gadget. Another advantage that this app can offer to its users is that it has a feature that lets you know if a certain track is already on your Android device. Thus, having duplicated songs won’t be a problem at all.
If you wish to try using this Droid Transfer as a solution to this - how-to-transfer the iTunes playlist to the Android dilemma, we have here the steps that you can follow to use this app during the movement.
Step #1. Make sure you have the app – Droid Transfer, on your PC. Once installed, just simply launch it.
Step #2. Now, on your Android device, open this app – the free Transfer Companion.
Step #3. Make sure you successfully connected your Android device to Droid Transfer (either via WiFi or USB).
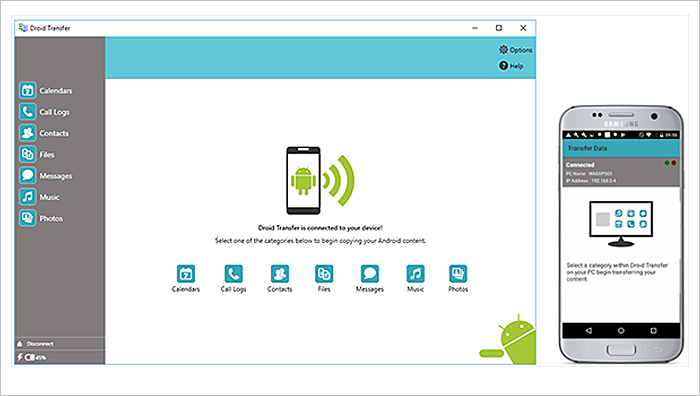
Step #4. In Droid Transfer, you have to tick the section corresponding to “Music”.
Step #5. From there, you will see the button for “Sync iTunes”. Tick on it.
Step #6. Now, you just have to tap on the “Copy Tracks to Android” menu.
Just take note that you can use Droid Transfer for free. However, you are only limited to transferring 100 iTunes tracks.
After hitting the “Sync iTunes” button, Droid Transfer will immediately do the scanning of your iTunes library. This will help you identify which songs are already on your Android device and which are not yet there. In this way, you have the information to which you only need to transfer.
If you want to enjoy more control over the saving of the iTunes tracks on your Android device, you can fully utilize the “Advanced Mode” feature of Droid Transfer. You can tick each track that you wish to copy and decide where to save it.
Method #2. The Manual Method
Now, here is another answer to the “how to transfer iTunes playlist to Android” question.
You can do the transferring of your iTunes playlists to your Android device by doing the “manual method”. The good thing about doing it manually is that there is no need for you to install any other applications to proceed. You just have to roll up your sleeves a bit and then make sure you have your Windows File Explorer ready. Now, here is how to transfer the iTunes playlist to Android manually.
Step #1. You need to have your Android device connected to your PC using a USB cable.
Step #2. A pop window will appear on your Android device. You will be asked, “Use USB for”. From the options displayed, choose the “Transfer Files (MTP)” option.
Step #3. Now, on your PC, head to File Explorer and look for your device on the left pane of the page. Tick on it and then hover your mouse over the “Music” folder.
Step #4. You now need to open another File Explorer but this time, it’s for your iTunes music.
Step #5. Just drag and drop the playlists or tracks from the iTunes folder going to your Android device’s “Music” folder.
If you do not know, by default, those iTunes files that you have are located under – your username, then “Music”, “iTunes”, “iTunes Media”, and then “Music”. You can do the dragging and dropping of selected files manually or copy them all first and then paste them on the “Android’s Music Folder” tab.
Method #3. Transfer iTunes Playlist To Android Via Google Play Music
Apart from the first two, here is another method of how to transfer the iTunes playlist to Android.
If you aim to access the iTunes playlists on any device – other than the Android device that you are using, there is also a way to do it. You just have to save the iTunes tracks on online storage clouds such as Google Play Music.
In this way, you are making them visible on any device (as long as you have access to your Google Play Music account), and at the same time, saving some space on your Android device. If you don’t know, Google Play Music can store up to 50,000 tracks for free! Once iTunes playlists and tracks are uploaded, you can access them once you logged in.
To help you further how to transfer iTunes playlists to Android via storing them on Google Play Music, we have here the whole procedure for your reference.
Step #1. On your web browser, you just have to head to the “Google Play Store”.
Step #2. Tick the “Music” button, then “My Music”, then “Add Your Music”.
Step #3. A browser extension is needed. If your PC does not have it yet, you will be prompted to have it installed first.
Step #4. Now, you just need to head back to your Google Play Music and then just tick on the “Add My Music” option.
Step #5. There is an option that says, “Select from your Computer”. Tap on this and then head to your PC’s iTunes media folder.
Step #6. It is now your job to choose which iTunes song to upload to your Google Play Music account. To upload, just tick “Open”. You can also do the dragging and dropping of iTunes songs from your iTunes folder to the Google Play Music window.
Method #4. Transfer iTunes Playlists To Android Via iSync For iTunes

Another solution to this how-to transfer iTunes playlist to the Android problem is to try using this “iSyncr for iTunes”. With the help of WiFi or USB, you can do the syncing with ease.
Here is what you need to follow.
Step #1. Head to Google Play Store and install this iSyncr for iTunes.
Step #2. An iSyncr desktop will be needed to install it on your PC. You just have to type in your email address, and you will then get the link to download the app.
Step #3. After downloading, an “S” icon will be seen. You have to right-click on it to interact with the iSyncr desktop.
Step #4. You now need to connect the Android device that you are using to your PC.
Step #5. Right-click on the “S” icon again and from the options displayed, choose “Android device”. By doing so, you will now be allowed to choose any music or playlists and just tick on the “Sync” menu to begin transferring those to your Android gadget.
Once the syncing has been finished, those iTunes songs selected will now be seen on your Android device.
Part 3. The Best Way To Transfer iTunes Playlist To Android
At first, it might be too hard to think about how to transfer the iTunes playlist to Android right away. Apart from having those methods presented in the second part of this post, there is still a much better way of transferring those iTunes songs that you love to the Android device that you are using. And you can do it with the help of great applications like this DumpMedia Apple Music Converter.
With this DumpMedia Apple Music Converter, you can easily download and save iTunes tracks and even have them converted to a format you prefer. It supports converting the tracks to formats like MP3, FLAC, AC3, M4R, and more. The app can remove the DRM protection of the tracks allowing you to access the songs on any device or media player.
Apart from being able to save Apple Music, this also can convert and download audiobooks! So, if you happened to be an audiobook fan, you can also have this utilized further.
The conversion and downloading should only take a while since the app can do its job 10x faster than the other apps. The quality of the outputs is as well maintained at a 100% level!
Plus, this DumpMedia Apple Music Converter is also easy to use. You only need to accomplish three steps and you should be good! Here’s a preview.
Step #1. Once you installed the app on your PC, you just need to select the Apple Music / iTunes songs that you which to convert and download.

Step #2. After the selection, you can now set what output format you want and even edit some settings if you prefer. The output folder can also be defined during this step.
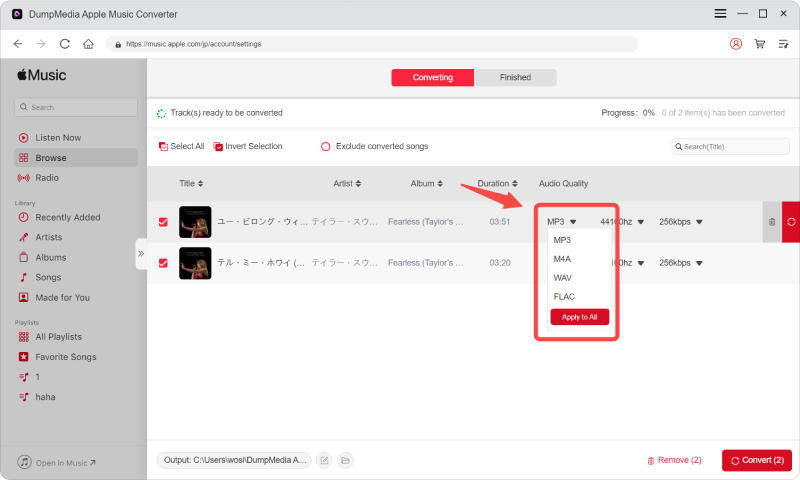
Step #3. You will immediately see the “Convert” button at the lower-right corner of the page. Tick on it and the app will begin converting the Apple Music / iTunes songs selected into the desired output format as well as the removal of the DRM protection.

After a while, you now have the iTunes songs on your PC! Just have them transferred to your Android device either via wireless transfer or with the help of a USB cable.
Part 4. Conclusion
Finally, the “how to transfer iTunes playlist to Android” has been solved already! You got a lot of ways to do the transfer as initially stated in the previous parts of this post. Make sure to try the one you prefer and then let us know what your experience was!

30% Off >>>