


Apple Music iPod Nano: Can You Play Apple Music on iPod Nano?
If you’re trying to use Apple Music on iPod Nano together, you’ve probably realized something frustrating: your favorite Apple Music songs won’t play on your iPod Nano. So, is it actually possible to use Apple Music on your iPod Nano? The short answer is: not directly. In this guide, we’ll explain why Apple Music doesn’t work with iPod Nano and provide step-by-step instructions to transfer music successfully.
Contents Guide Part 1: Why Apple Music Doesn’t Work on iPod NanoPart 2: The Only Way to Play Apple Music on iPod NanoPart 3: How to Transfer Apple Music to iPod NanoPart 4: FAQsPart 5: Final Thoughts
Part 1: Why Apple Music Doesn’t Work on iPod Nano
Before learning any method, you need to understand the core issue behind Apple Music iPod Nano incompatibility.
1. DRM Protection
Apple Music tracks are protected by DRM (Digital Rights Management). This means songs are encrypted, and files are not standard MP3. Playback is restricted to authorized devices. iPod Nano cannot recognize or play these protected files.
2. iPod Nano Is Not a Streaming Device
Unlike modern iPhones, the iPod Nano does not support streaming services. Also, you cannot install Apple Music on an iPod Nano. iPod Nano only plays locally stored audio files.
Part 2: The Only Way to Play Apple Music on iPod Nano
To make Apple Music iPod Nano work, you must remove DRM and convert Apple Music songs into a compatible format, such as MP3. This is not optional, it’s the only working solution. Once converted, your music becomes playable on most media devices. To solve the Apple Music iPod Nano problem, you’ll need a reliable converter. DumpMedia Apple Music Converter is designed specifically for this purpose.
With DumpMedia, you can convert Apple Music songs to MP3, WAV, or FLAC. After that, you can keep your music permanently and transfer files to any device.
More Feature of DumpMedia Apple Music Converter
- Keep music permanently
- Download entire playlists in batches
- Preserve ID3 tags (artist, album, title)
- Enjoy high-quality audio output
How to Get MP3 Apple Music Easily (Step-by-Step)
Step 1. Download and install the software on your computer. It works with both Windows and Mac. The interface is user-friendly, making it easy for beginners.
Step 2. Open the built‑in Apple Music web player inside DumpMedia and log in with your Apple Music account. Browse Apple Music and drag the songs, albums, or playlists you want to download into the converter.

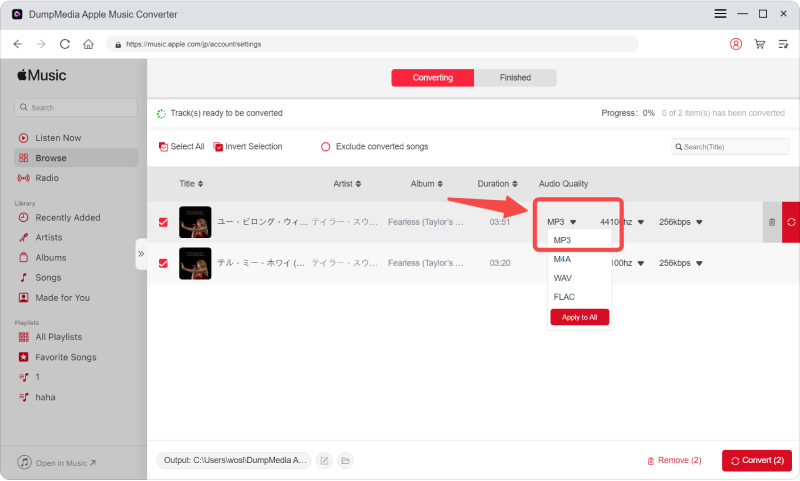
Step 3. In the settings panel, select MP3 as the output format to enable a MP3 download of your selected tracks.
Step 4. Click Convert and download songs directly as MP3 files.

After this process, your files are ready for Apple Music iPod Nano transfer.
Part 3: How to Transfer Apple Music to iPod Nano
Once your files are converted, you can now complete the Apple Music iPod Nano setup.
Step 1. Open iTunes on your computer. Add converted MP3 files to your library.
Step 2. Connect your iPod Nano via USB. Select your device in iTunes.
Step 3. Sync music to your iPod Nano.
After syncing, your songs will be playable on your device without restrictions.
Part 4: FAQs
1. Can I play Apple Music directly on iPod Nano?
No. Apple Music is not compatible with iPod Nano due to DRM protection and lack of streaming support.
2. Why doesn’t Apple Music work on iPod Nano?
Because Apple Music files are encrypted and iPod Nano only supports unprotected audio formats like MP3.
3. What format does iPod Nano support?
iPod Nano supports MP3, AAC, and other standard audio formats without DRM.
4. What is the best tool for Apple Music iPod Nano conversion?
Tools like DumpMedia Apple Music Converter provide a simple and effective way to convert and transfer music.
Part 5: Final Thoughts
Using Apple Music iPod Nano together may seem impossible at first, but it becomes simple once you understand the limitations. Without converting Apple Music, iPod Nano playback is not possible. With the right tool, you can easily bridge the gap between modern streaming and classic devices.

30% Off >>>