


How to Rip And Upload DVD Videos to YouTube
Brought about by the advancement of technology, the era was seen to have been modernized and improved. Indeed, lots of networking sites have opened their doors to the public. People nowadays ought to share everything in their social media accounts. And these sites almost served as their way of communicating with several other people around the globe. Famous ones are Facebook, Twitter, Instagram, Pinterest, and of course YouTube. Photos and videos are in the trend. With regards to this, have you ever tried sharing some videos from DVD to your YouTube account?
If you haven’t and you wanted to, we are here to show you some tools and methods about how to rip and upload DVD videos to YouTube.
Contents GuideWhat Do You Need If You Want to Upload DVD to YouTube?How to Rip DVD Videos to Formats Supported by YouTubeHow to Convert A Ripped Video File to Other Formats?
What Do You Need If You Want to Upload DVD to YouTube?
- Of course, you would need to have a registered YouTube account wherein the video will be uploaded and saved.
- A decent and secured internet connection.
- An amazing DVD video ripper and converter.
But before delving with the previously mentioned, you must first know the several limitations of uploading DVD videos to YouTube.
- Always remember that uploading any content which you do not actually own is prohibited. If you intend to do so, you must seek the owner’s permission to proceed.
- YouTube only accepts and supports some popular formats including MP4, MOV, MPEG4, WMV, WebM, and quite more. Usually, DVD videos cannot be uploaded directly to YouTube. This is why a ripper and converter will be needed in the process.
Upon knowing above, let us now dig in with the application software you can use to rip the DVD videos.
Tip: If you want to know when is illegal to rip DVD, you can check this link to learn more about the situation.

How to Rip DVD Videos to Formats Supported by YouTube
#1: VideoSolo BD-DVD Ripper
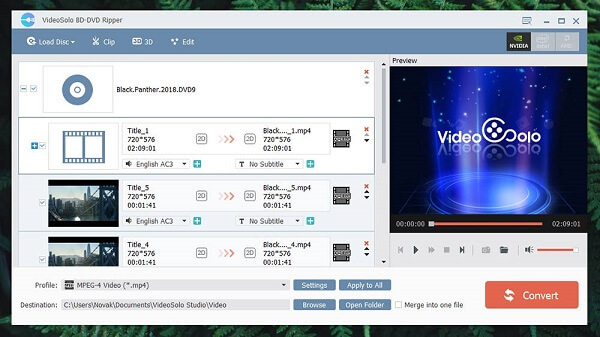
One good DVD ripper is VideoSolo BD-DVD Ripper. This is actually a trusted application and is mainly used to rip DVDs or Blu-ray into numerous formats including those mentioned above. Aside from giving you the opportunity to rip DVD videos, this as well as editing features that would help you enhance your videos before uploading. Settings could be adjusted freely depending of course on your preference and taste.
Here is the tutorial on how to use the tool.
Step 1: Make sure that you have this VideoSolo BD-DVD Ripper installed on your Windows and Mac computer. Once installed, have the program launched and opened.
Step 2: Load the DVD disc onto your computer’s drive. Once you have seen the software’s main interface, head to the “Load Disc ” button located at the top leftmost part of the screen to begin importing the DVD content.
Step 3: Once done, go to the “Profile” option and tick its drop-down icon to see the list of the output formats. In this list, you got to see those supported by YouTube. The most used one is MP4. Therefore, if this is your first time to do this, using MP4 as the output format would possibly be the best.
Step 4: You have the choice to edit the video or add some background music or subtitle to enhance it more. Just click the “+” button to do this.
Step 5: Upon doing the above, click the “Convert” button situated at the bottom right corner of the screen to begin the conversion process. Progress bars would be seen on the screen wherein you can monitor the status of the process.
Step 6: Upon having completed the ripping procedure, you will then continue with uploading the video to your YouTube account.
- Make sure to go to YouTube’s site.
- Ensure that all settings related to privacy and more have been correctly setup.
- Tick on the “Upload” button visible at the top area of the screen.
- Browse and choose the ripped video to be uploaded.
- Finally, click the “Publish” button to share your video with the public.
#2: DVDxDV Pro
Another popular application for ripping your DVD video is this DVDxDV Pro. Same with VideoSolo BD-DVD Ripper, the main feature of this tool is to perform as a ripper. If you decided to use this one, great to inform you that this as well as a trial version which you can enjoy. The only drawback of using the trial version is that there would be watermarks on your video. Subscribing to DVDxDV Pro will remove those watermarks and you can get to enjoy all the amazing features of the application. In addition, another good thing about this tool is that you can directly upload your ripped video by extracting it and ticking YouTube as the export preset. You will just need to provide your account name and password to continue.
#3: EaseFab DVD Ripper
Aside from the first two mentioned, we still got this EaseFab DVD Ripper. Using this, you can get to convert even an hour of DVD video within just a few minutes. This is offering amazing and fast DVD to YouTube conversion speed and ensures that original quality will be maintained after the process. Numerous formats are as well supported. In addition, you also have the opportunity to improve all the videos since this got editing features such as cropping, trimming, and adding subtitles and watermarks.
#4: FERR SOFTWARE
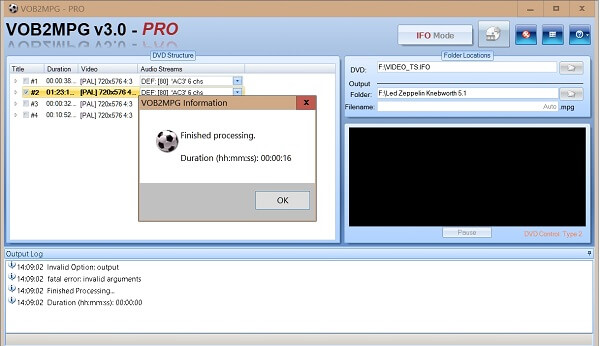
Yes! Aside from paid rippers which are highlighted in the first part of this article, we as well got some free software which of course supports ripping your DVD videos to formats supported by YouTube. You can resort to using either VOB2MPG and Mpg2Cut. The only drawback of using these is that you will be facing a bit old program’s interface. You just need to ensure to correctly deal with this guide to successfully rip your DVD videos and finally upload those.
In using VOB2MPG and Mpg2Cut, below must be followed.
Step 1: Ensure that you have these installed on your personal computer. Make sure as well that the disc is correctly loaded onto your computer’s drive.
Step 2: Open VOB2MPG and when you have seen the main screen, the first thing that must be done is to select the DVD source. This can be done by hovering the mouse to the folder icon below “DVD” located on the right part of the screen.
Step 3: Next would be selecting the folder wherein the file will be saved. The button is just right below the “Output Folder ” located below the “DVD” word.
Step 4: Choose the title of the video to rip. Sadly, since this one is a free tool, you must rip the whole video even though you only aim to get a few parts. Upon choosing, tick the “Extract” icon (DVD disc) located at the top right corner of the screen. Wait until this is done. Close it and open Mpg2Cut.
Step 5: Once you have opened Mpg2Cut, load the file completed at VOB2MPG. This is where you can cut and choose the area you only need. The program is capable of showing a preview while you are doing the process.
Step 6: If you have completed above, select the “File” button and tick the “Save this Clip” option.
The resulting video file would be in MPEG format. Upon getting the video, you can finally upload it to your YouTube account.
People Also See: How to Burn A YouTube Video to DVD on Windows and Mac
How to Convert A Ripped Video File to Other Formats?
If you decided to use the second option, a free of charge application, the output file would be in MPEG format. Although this as well is supported by YouTube, some of you would still want to have this converted to MP4, a more used format. Well, the best way to do the above is to have your ripped video converted using this DumpMedia Video Converter.
DumpMedia Video Converter is one tool that is capable of performing a lot of functions most especially the conversion function you desire.
The main feature of this tool is video conversion to different desired formats without quality loss, even maintaining the original look. This supports numerous formats such as the popular MP4, AVI, WMA, WAV, FLAC, and a lot more! In addition, you can easily convert DVD and videos to GIF, video or audio. This as well as editing and enhancing functions wherein you can perform adjusting of brightness, contrast, saturation, and volume control. Even adding subtitles is possible! Aside from its main function, this one is software with a user-friendly interface and offers easy steps to perform the desired processes.
Downloading and even the installation of this program could be done in just a few minutes and would require only a few clicks. You got to have your converted video by just following a few and simple steps. To proceed with video conversion, you must do this simple step by step guide.
Step 1 : Of course, you are required to ensure that this DumpMedia Video Converter would be downloaded and installed on your Windows of Mac computers.
Step 2 : Launch the program and click the “Add files” button to select the ripped video file to convert. You can as well drag and drop the files directly from the location to the main interface of the application.
Step 3 : Select the desired output format by ticking the “Convert All Tasks to: ”. You got a lot of options you can choose from such as MP4, MOV, WMV, AVI and many more. In this case, you can immediately tick the MP4 format.
Step 4 : Once done, choose the destination folder wherein the output or converted file would be saved by clicking the “Browse” button.

Step 5 : Click the “Convert ” button to begin with the conversion process.
Once you are done with these steps, you can preview the video and check the converted file by tapping the “Open Folder” option. By performing just these five simple steps, you go to have your converted video in just a few minutes.
In Conclusion
Ripping your DVD videos and having those uploaded to your YouTube account is indeed too easy and efficient. A lot of amazing ways have been presented above including the step by step guides. In addition, you got to know the best video converter in town – DumpMedia Video Converter! Do you plan to use any of the above? Or, have you tried one? Share your thoughts by leaving your comments below!

30% Off >>>