


Latest 10 Fixes for Spotify Premium Not Working Offline
Enjoy the features of Spotify Premium. You pay for it so it’s worth it. You get to download and you’re your songs offline. Hence, you don’t have to rely on an internet connection all the time. Nonetheless, you aren’t exempted from issues. Don’t think for one second that you won’t be able to experience Spotify Premium not working offline because you will. There’s just no guarantee that it’s not going to happen to you.
To prepare yourself, it’s best to understand why Spotify Premium does not work offline. Continue reading until the end to learn about the solutions on how to make it work.
Contents Guide Part 1. Why Is Spotify Premium Not Working Offline? Part 2. 10 Fixes to Get Spotify Premium to Work Offline Part 3. Extra Trick: Play Music Offline Without Spotify PremiumPart 4. Conclusion
Part 1. Why Is Spotify Premium Not Working Offline?
Why is Spotify Premium not working offline? If Spotify Premium isn't working offline for you, you’ll need to investigate the cause first. Some common causes include:
- A problem with Spotify’s servers
- Offline Mode isn't enabled
- Your Premium subscription has expired
- Your Premium account has been hacked
- You have reached the device limit
- The Spotify app is old and outdated
- VPNs or ad blockers may interfere with Spotify
- .......
Encountering problems like this can be frustrating, especially if you need some good music to kill time while flying a plane or traveling in areas with poor network coverage. Whatever the problem, there are some common fixes below that you can try.
Part 2. 10 Fixes to Get Spotify Premium to Work Offline
If you're having trouble playing music offline with your Spotify Premium account, don't worry! We've got some simple steps you can follow to get back to enjoying your favorite tunes in no time:
Solution 1. Check the Spotify Server Status
Before marching headlong into the maze of reasons that can plague Spotify Premium not working offline, it’s imperative to establish whether the problem is a global hiccup or an isolated incident. When Spotify Premium is not working offline, chances are, you’re not alone in this conundrum.
In such cases, service outage platforms like downdetector.com become your go-to reconnaissance tools. For real-time updates, the @SpotifyStatus Twitter account serves as an official mouthpiece that keeps users in the loop during downtimes. If the problem is indeed a widespread outage, sitting tight and waiting for the Spotify technical team to swing into action is the logical course of action.
Solution 2. Turn on Offline Mode on Spotify
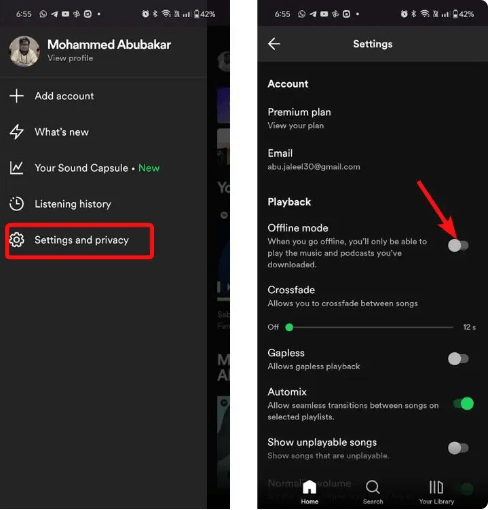
To listen to music offline with Spotify Premium, you must turn on offline mode. After your desired content has been downloaded, you can subsequently turn on Offline Mode. This mode makes it so that you can only listen to the content you have downloaded to your device, however, you can listen even if you cannot connect to the internet. Here’s where to turn on the Offline Mode on Spotify if you need it on your mobile or computer:
On the mobile app, tap your profile picture at the top left. Now, navigate to Settings and privacy > Playback. Turn on the Offline mode toggle.
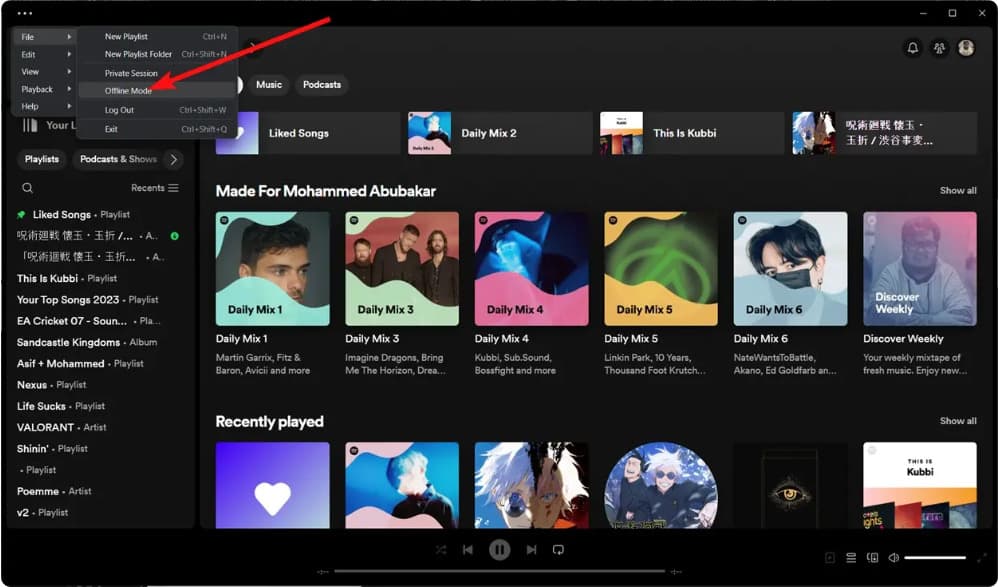
On Windows, open the Spotify deskto app, and click the ᐧᐧᐧ button in the upper-left corner. Move your cursor over File. Click Offline Mode to turn on offline mode.
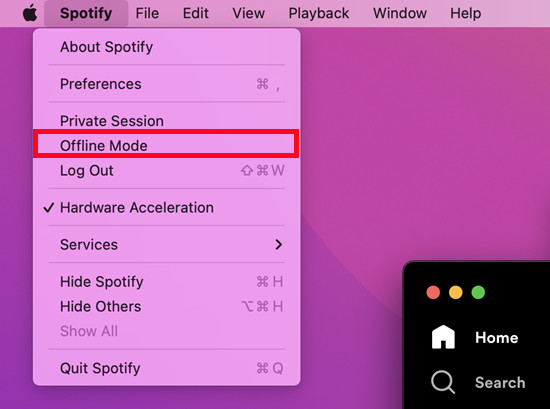
On Mac, select "Spotify" from the menu bar. Click "Offline Mode" to make Spotify go offline.
Solution 3. Check Your Subscription Status
To listen to Spotify offline, you must be an active Spotify Premium subscriber. The Offline Mode option is also only available to Spotify Premium users. If your subscription expires or is canceled, you’ll lose access to downloaded content, which could be why your Spotify Premium not working offline. If your subscription is not active, renew your subscription to enjoy Premium features again, such as offline playback, ad-free listening, and more playback options.

- 📝 In July 2024, Spotify increased the price of its Individual offering to $11.99. It also increased the prices of its Duo plan and Family plan offerings to $16.99 and $19.99, respectively. What if you don't want to pay so much for it? Find the latest Spotify discount or deal in our guide: How to Get a Discount on Spotify Premium >>>
Solution 4. Secure Your Hacked Spotify Premium Account
Spotify is the most popular streaming service in the world, with hundreds of millions of monthly active users. So it’s no surprise that Spotify is a target for hackers. As a service with a premium subscription option, hackers may target accounts with Spotify Premium to use the features without paying. Or, hackers may change the password and upgrade the subscription tier, blocking the owner out of the account. Sometimes, account credentials can even be sold.
If you notice any of the following, your account may have been breached:
- Playlists changing or not showing up
- Your "Recently Played" list shows unfamiliar songs
- Notifications about suspicious activity
- Unknown social accounts connecting to your account
- Unauthorized subscription changes
- You've been logged out on all your devices
- Your Premium login details aren’t working
If two or more signs are true for you, then there’s a high chance that a hacker has taken over your account, so you can't play music offline using your own account. This is how you can secure your account, and get it back if it gets hacked. To stop strangers from accessing your Spotify account, make sure to not log in to your Spotify account from other devices, or connect your account with shady services. Also, try to use a strong password that one cannot guess easily. You can also remove access from third-party services to your account.
Solution 5. Sign out of Your Account on Specific Devices
Spotify allows you to log in to your account on up to five devices, and you can play music on one device at a time. This means that you can use your Premium account to play music on your computer, phone, tablet, or any other supported device, as long as you don't exceed the device limit. If your Spotify Premium not working offline, try to sign out of your Premium account from uncommonly used devices.
Solution 6. Clear Spotify Cache
The app cache is a temporary storage space that Spotify uses to store data that it temporarily needs. If you run into trouble with Spotify not working, however, you may want to clear the app cache. It could stop you from loading the latest features or, if the cache is too large, it could be causing the app to malfunction, such as the Premium account not working offline.
Clearing the app cache will not delete any of your personal data, downloaded music or settings, but it can help to restore the app’s functionality as if it were freshly installed. To clear the app cache for Spotify, follow these general steps.
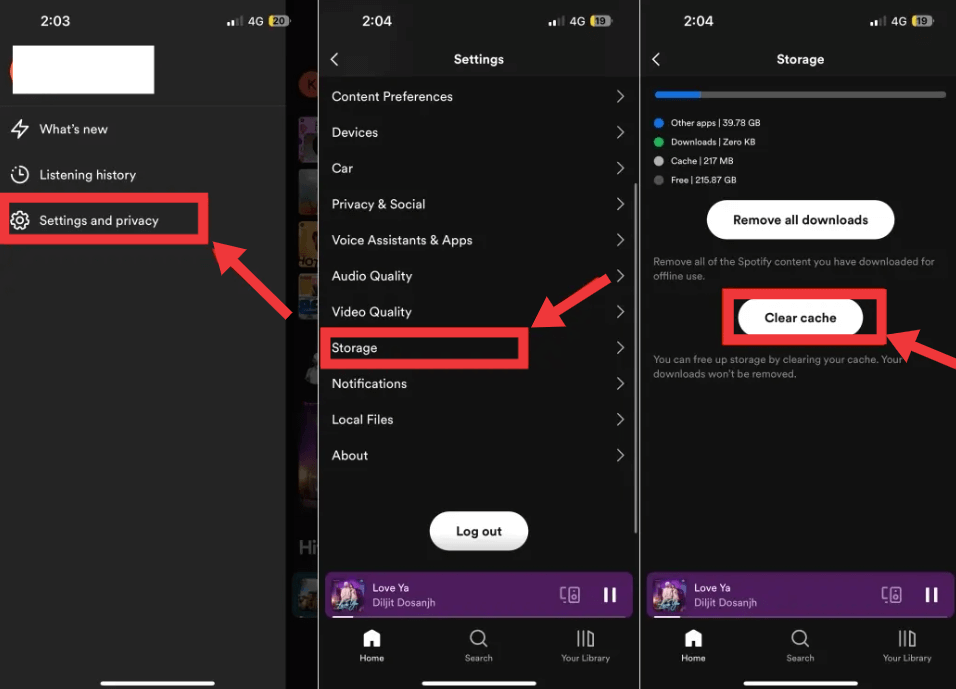
On the mobile app, tap on your profile icon at the top left. Go to Settings and privacy. Scroll down to the Storage category. Here, tap on the Clear cache option.
On the desktop, click your account name in the top right corner. Click Settings from the dropdown menu. Scroll to the Storage section. Click Clear cache.
Solution 7. Update the Spotify App
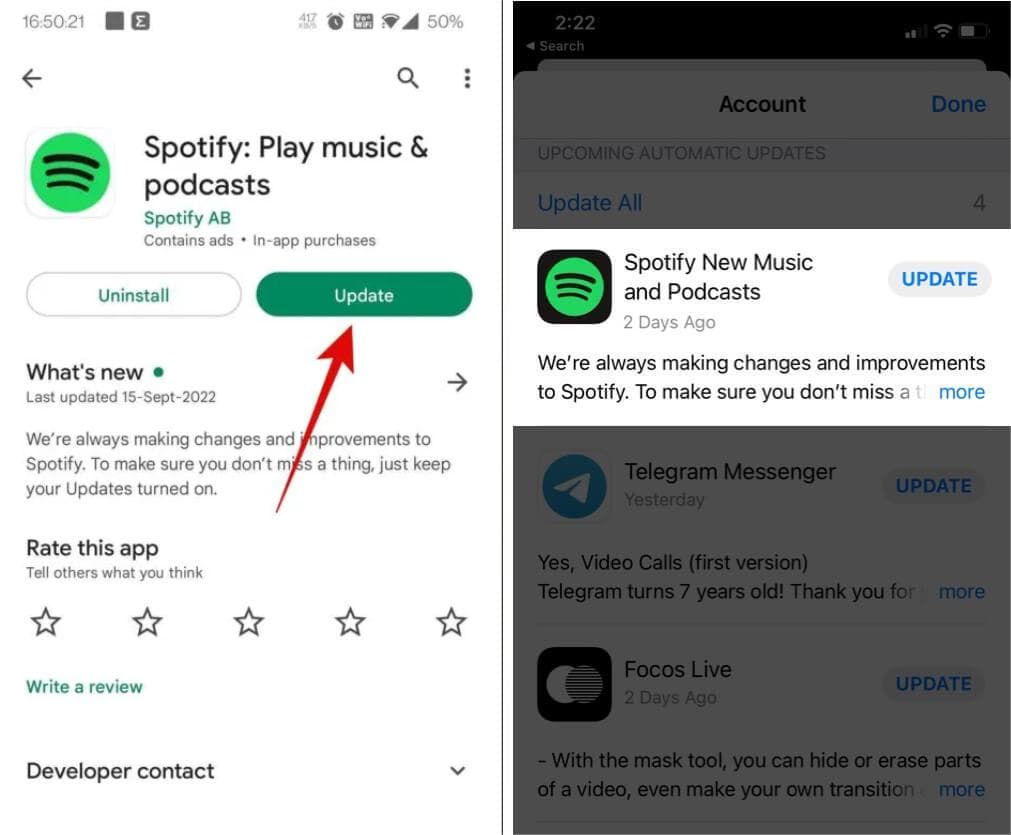
Why is Spotify Premium not working offline? If you haven’t updated your Spotify app in a while, it may have lost some of its functionality. Spotify may introduce new features or bug fixes for existing features that require the latest version of the app or browser to work properly. If you’re using an older version, you may encounter errors or compatibility issues. You’ll need to update it to resolve the problem.
To update your app, go to the Google Play Store or the Apple App Store and search for Spotify. If there’s an update available, press Update to install it.
If you’re accessing Spotify on your desktop, you may need to click on the three dots located in the top left corner of the app interface. Then, select Help > About Spotify. You will see a dialog box showing your current version using. If your app requires an update, a button with a download link will appear just below the app version number. Click on the link to download the update.
Solution 8. Disable VPNs and Ad Blockers
You might use VPNs (virtual private networks) or ad blockers to help maintain your privacy online or remove annoying ads. However, these tools may also interfere with Spotify and other online subscription services. Services like Spotify can actively detect and block both VPNs and ad blockers to prevent their services from being abused.
To fix this, try disabling your VPN or ad blocker temporarily and see if Spotify starts working again. If it does, you’ll need to make sure you disable these tools whenever you want to listen to your music offline.
Solution 9. Allow Background Data for Spotify
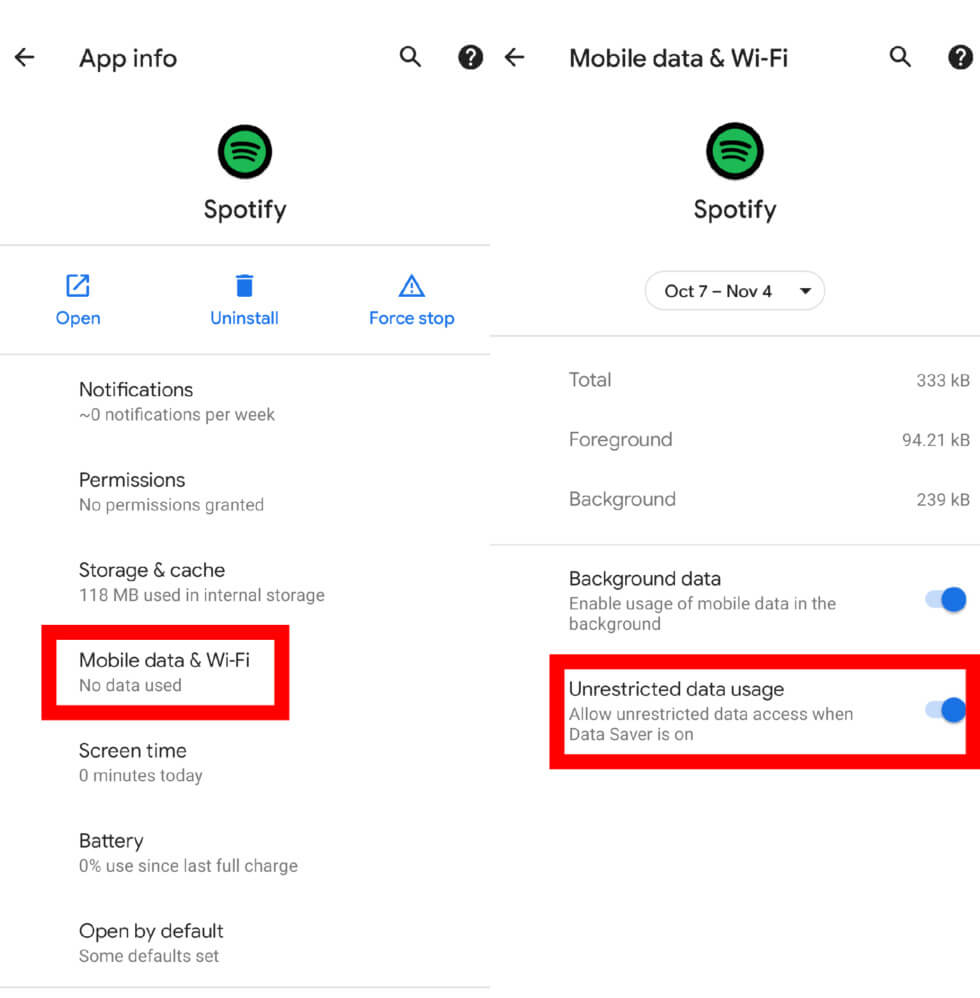
If Spotify Premium stops working offline on your phone when you run it in the background, missing background data permissions are the underlying culprit. So you need to ensure that the Spotify app has all the necessary permissions on your phone and retry playing your favorite track offline.
On Android, open the Spotify app info > select Mobile data and Wi-Fi > turn on Unrestricted data usage. Or, go to Permissions. Go through each permission one by one and set it Allow. Then return to the App info page and tap on Battery. Then, select Unrestricted from the following menu.
On iOS, go to Settings, scroll down, and select Spotify. Toggle on Background App Refresh to enable it.
Solution 10. Disconnect Bluetooth Devices
While this tip may seem obvious to many, please double-check that no Bluetooth headphones or AirPods are connected when playing a song from Spotify. You might think you’re listening on your phone’s speaker when the music is actually playing through your headphones or Bluetooth speaker. This could lead to the misunderstanding that your Spotify Premium account is not working offline.
Part 3. Extra Trick: Play Music Offline Without Spotify Premium
Why is Spotify Premium not working offline yet by following the above? Here we will introduce a universal solution. Use DumpMedia Spotify Music Converter to download your favorite tracks, albums, or playlists to your local computer, free from the constraints of the platform. You can then play them offline using any device you like. In this way, you will still access your downloaded songs when your Spotify Premium membership expires and you do not renew it.
DumpMedia Spotify Music Converter is a one-stop, safe, simple, and efficient Spotify to MP3 Converter that supports converting and downloading Spotify tracks, albums, podcasts or playlists to common audio formats, such as MP3, M4A, WAV, AIFF, etc. Better yet, DumpMedia doesn't require a Spotify Premium account, which means that any users can enjoy music downloading.
🤩More Amazing Features of DumpMedia Spotify Converter:
- 👍Download Music/Podcast Without Premium
- 👍Integration with Spotify Web Player
- 👍35x Faster Batch Conversion Speed
- 👍Music ID3 Metadata Retained
- 👍Original Sound Quality Preserved
- 👍100% Clean. No Risk in Using
- 👍Free Updates & Technical Support
🌟How to Use DumpMedia Spotify Converter:
DumpMedia Spotify Music Converter provides the flexibility to enjoy your favorite tunes without relying on an active internet connection and the Spotify app. Here we'll show you how to play music offline without Spotify Premium step by step.
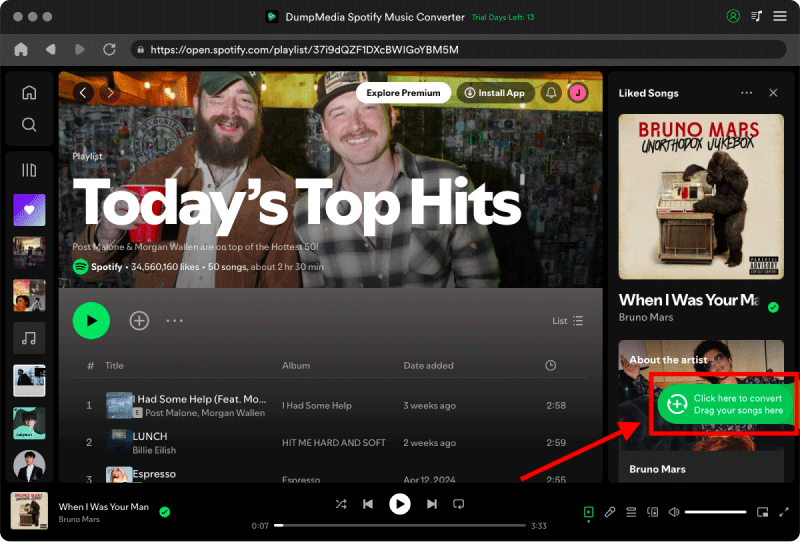
Step 1. Download and install DumpMedia Spotify Music Converter to your Mac/PC. Launch it and you will see the interface. Use your Spotify Premium/Free account to log in.
Step 2. After you enter the built-in Spotify web player on DumpMedia, you can directly search for the songs you like, drag and drop them to the "+" button, and add them to the converting list.
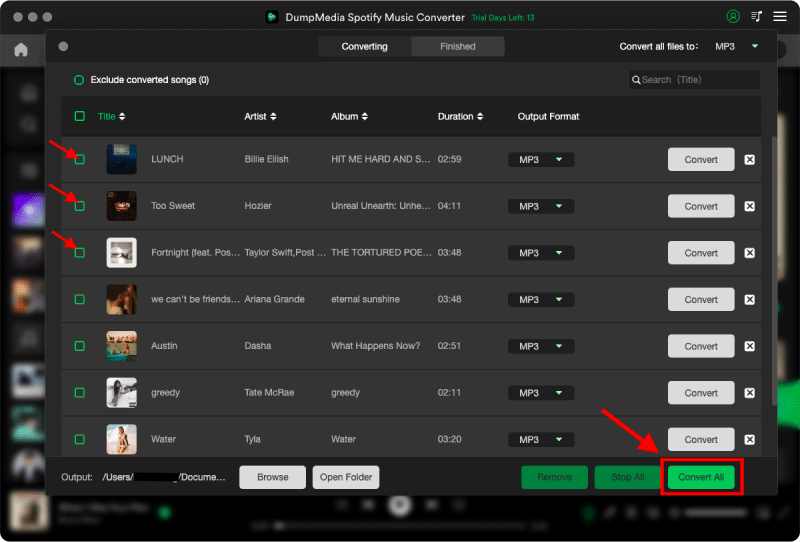
Step 3. Once you have added the songs, take some time to adjust the output settings. Go to the Convert all tasks to and choose a file format for your songs. Then click on the Browse button on the lower part of the DumpMedia Spotify Music Converter screen to select a folder for your songs.
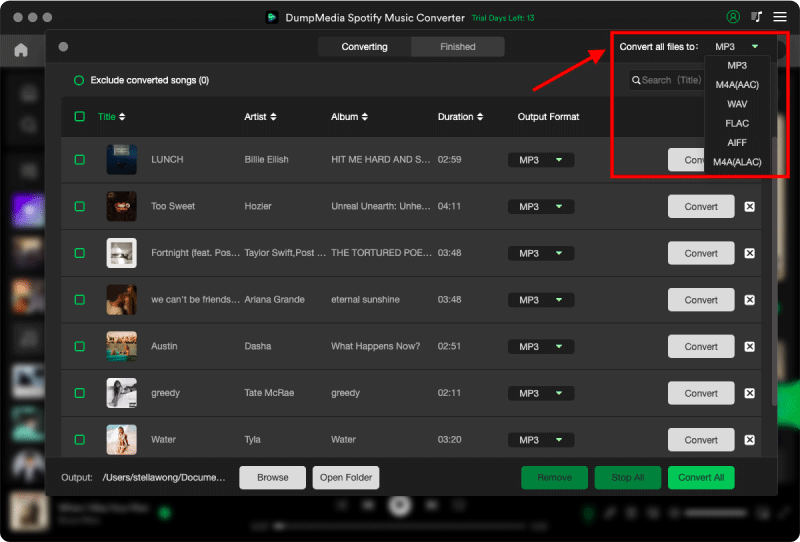
Step 4. Now, you can just click on the "Convert All" button and the program will start converting Spotify songs or playlists or songs to DRM-free files. When the whole conversion is finished, you can directly play the converted songs inside this program, or transfer the songs to any compatible device you like.
Part 4. Conclusion
With the above contents, you have learned why your Spotify Premium not working offline and the common methods of troubleshooting. But also, as we said above, there may still be situations that cannot be solved. Or if you think it's too much trouble to try the solutions one by one, you can try switching to DumpMedia Spotify Music Converter. DumpMedia Spotify Music Converter can help you keep Spotify songs in DRM-free formats like MP3 without Spotify Premium. Click the button below to download a free trial version!

30% Off >>>