


How to Record Your Mac Screen 2026 Guide
There are many reasons why you might need to record your Mac screen. Either you want to:
- Create a video tutorial so that you can show a colleague or friend a step-by-step guide on how to do a certain task, or
- Make another video that you want to share on your social media account that involves doing something in your Mac.
Whatever your reason is, you can basically record your screen without the need for any third-party software. Luckily, Mac provides simple methods on how to record Mac Screen. So to start our discussion, we will give you ways on how to record your Mac screen in macOS Mojave and in the older versions of macOS. Then we will give you four software you can use to not only record your Mac screen but also enhance and edit your recorded videos. Lastly, we give you our most recommended video converter software in case you want to convert your recorded video which is DumpMedia Video Converter software. Interested? Keep on reading!
Contents GuidePart 1. Recording Your Mac Screen In macOS MojavePart 2. Recording Your Mac Screen Using QuickTimePart 3. Screen Recording Software For MacPart 4. Best Video Converter to Convert Your Recorded Videos
Part 1. Recording Your Mac Screen In macOS Mojave
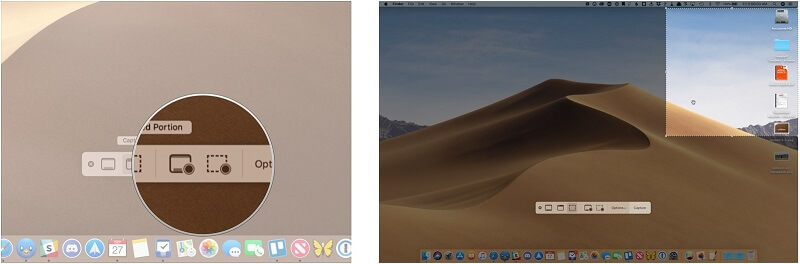
The first thing you have to do is press Shift+Command+5 on your keyboard. This command will display all of the controls that you will need to record a video or capture still videos on your screen. You can use the on-screen controls that will appear to select what you want to do on your Mac screen:
- Record your entire screen,
- Record a specific portion, or
- Capture still images on your screen.
In the following subsections, we will be discussing how you can do these along with the steps on how to change the settings and trim, save, and share your recorded video. Also, if you have not installed Mojave yet, you can use QuickTime Player to record your Mac screen.
#1: Record Your Entire Screen
Step 1. Click on the solid square icon with a bullet dot at its bottom-right corner from the onscreen controls. The icon is at the right of the square icon with a dotted outline. Your pointer will change into a camera.
Step 2. Click on any part of your screen to begin recording or you can click on the Record button from the onscreen controls.
#2: Record A Specific Portion Of Your Screen
Step 1. Click on the dotted square icon with a bullet dot at its bottom-right corner (just left of the Options drop-down menu).
Step 2. Drag the corner of the default selection to select a specific area on your screen that you want to record. If you want to move your entire selection, just drag it from within.
Step 3. Click on the Record button from the onscreen controls to start recording your screen.
Step 4. Click on the round black stop button with a white square inside from the menu bar if you want to stop the recording process or you can press Command-Control-Escape on your keyboard.

#3: Trim, Save, And Share
After you have stopped the recording process, a thumbnai l of your recorded video will appear at a short moment at the bottom-right part of your Mac screen. Do the following steps:
- Don’t take any action or you can swipe the video thumbnail to the right. Your screen recording will be automatically saved.
- To open your recording, click on the video thumbnail.
- To trim your recording, click on the icon that looks like an elevator door. It has two arrowheads pointed inwards on both of its sides.
- To share your recording, click on the square icon with an arrow pointing upwards.
- You can move your recording to a different location by dragging the video thumbnail such as:
- A Finder window,
- An email,
- A document, or
- The trash.
- Control-click on the video thumbnail to see more options such as:
- Changing the location where the recording will be saved,
- Opening the recording in another application, or
- Deleting the recording and not saving it.
#4: Change the settings
Click on the Options button from the onscreen controls if you want to change the following settings:
- Save to
Select where your screen recordings will be automatically saved:
- Clipboard,
- Documents, or
- Timer
Select when to start your recording:
- Immediately,
- 5 seconds after you click on the Record button, or
- 10 seconds after you click on the Record button.
- Microphone
If you want to record other audio such as your voice along with your screen recording, select a microphone.
- Show Floating Thumbnail
Set whether you want the recording thumbnail to show or not.
- Remember Last Selection
Choose if you want to set the current video recording settings to your last settings.
- Show Mouse Clicks
Set if you want a black circle to appear around your pointer upon starting the recording.
Part 2. Recording Your Mac Screen Using QuickTime
If you don’t want to install Mojave or are not able to run it, you’re lucky that you can still record your Mac screen easily using QuickTime Player which is a free built-in tool in your Mac. To do this, follow the steps below.
Step 1. Launch QuickTime Player.
Press on the Command button and the Space bar on your keyboard. The Spotlight search bar will appear.
Step 2. Type QuickTime on the search box.
Step 3. Choose New Screen Recording
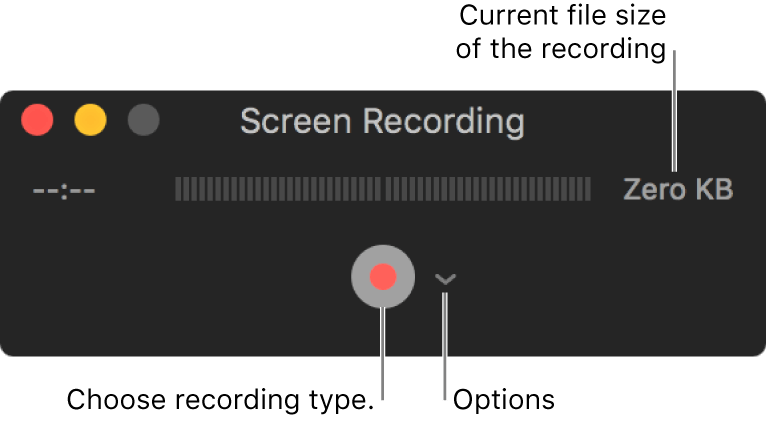
To do this, right-click on the QuickTime Player icon located in your Mac’s Dock. Then select the New Screen Recording option from the menu that will appear. A box for Screen Recording will appear on your Mac screen.
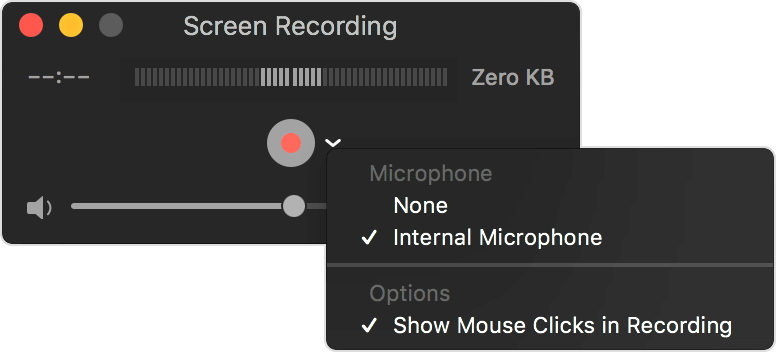
Step 4. To show other options, click on the down arrow beside the Stop Recording icon at the bottom of the Screen Recording window. Here, you can use an external or built-in microphone for the audio in the Microphone section:
- Built-in Input: Line In, or
- Built-in Microphone: Internal Microphone.
Step 5. In case you want to make use of your iPhone's headphones in recording yourself while you speak to create voice-over audio, just plug in your iPhone headphones then select External Microphone from the other options menu.
Step 6. You should remember that you cannot record audio of videos that are playing on your Mac screen using the previous method.
Step 7. You can also choose whether you want your mouse clicks to show up in the recording process using Step 5. Just click on the Show Mouseclicks in Recording option in the Options section. This is turned off by default.
Step 8. Once you have set your desired recording settings, you can either record your entire Mac screen of just a portion of your screen.
To record a specific portion of your screen:
Step 8a. If you only want to record a portion of your Mac screen, click on the red record icon. A message will appear asking you to drag your mouse to start recording a portion of your screen.
Step 8b. Drag a marque across the part of your screen that you want to record.
Step 8c. After you are done selecting your desired area, click on the Record icon again.
To record your entire screen:
Step 8a. If you want to record your entire Mac screen, just click on the red record button.
Step 8b. Click anywhere on your screen to start the recording process.
Step 9. If you are done recording, just right click on the QuickTime application icon in your Mac’s Dock.
Step 10. From the choices that will appear, select Stop Recording.
Step 11. Save your QuickTime recording. You can use your screen footage in Final Cut Pro and iMovie and can even share it directly to YouTube.
Part 3. Screen Recording Software For Mac
There are many applications that can help you record everything you do on your Mac screen. These tools have varying offered functionalities and price but you can expect that they will do more compared to QuickTime Player. Furthermore, these tools allow editing of your recorded videos along with the addition of other media such as sound and images.
#1 Camtasia
Camtasia is probably the most popular screen recording tool for both Windows and Mac operating systems. This software allows you to record the whole part of your screen or just a portion of it. It can also record sound from a microphone and system audios. Furthermore, you are able to edit your recordings and add images, transitions, effects, and titles to it. There’s even a feature allowing you to highlight your mouse pointer automatically which is very useful in creating tutorial videos. Camtasia 2018 version has new functionality that allows the application of themes to recordings enabling you to brand them with your own company identity.
#2 ScreenFlow
Screenflow has similarities with Camtasia. Just like Camtasia, the tool allows you to record what you’re doing on your iPad, iPhone, and Mac screens. Both software allows trimming clips, panning and zooming into sections, and editing the recorded audio separate from the video track. After you are done editing, the resulting video can be saved on your Mac and you can even share it on your social media accounts. Some people consider the usage of ScreenFlow easier compared to Camtasia but none of these two are particularly difficult after you’ve really gotten familiar with how they function.
#3 Capto
Capto has more basic functionalities compared to ScreenFlow and Camtasia but is not necessarily bad if it contains all of the features that you need. The tool still allows you to record your Mac screen and even the video your taking from your FaceTime’s camera along with your microphone audio. Furthermore, you are able to edit your recorded video for sharing later on. Capto also allows hiding of your Desktop before the screen recording starts which is a good thing for those who have messy Desktops.
Part 4. Best Video Converter to Convert Your Recorded Videos
DumpMedia Video Converter is a powerful and high-speed all-in-one audio and video converter, downloader, editor, and player to help you put your videos into the next level. Enjoy the convenience of a friendly interface equipped with a lot of features to meet all of your video needs. The software supports many formats including MPEG, 3GP, FLV, MKV, AVI, WMV, MOV, MP4 along with other regular video formats. To convert your recorded videos into any format, download the software first and follow the steps below.
Step 1. Launch the DumpMedia application.
For Windows users:
Step 1a. Go to the Search icon (magnifying glass) beside the Windows icon in your computer’s Task Bar.
Step 1b. Type DumpMedia on the text field.
Step 1c. Click on the DumpMedia application on the search results.
For macOS users:
Step 1a. Click on the Launchpad icon in your computer’s Dock. The launchpad icon is a gray circle with a darker gray rocket at the center.
Step 1b. Type DumpMedia on the Search bar at the topmost part
Step 1c. Hit the Return button on your keyboard to launch the application.
Step 2. Click the Add Files button located at the top-left section of the interface to import your files or you can drag-and-drop them directly into the main interface.
Step 3. Look for the Convert all tasks to text at the top right corner of the interface. Select your desired output format.
Step 4. At the bottom of the interface, click on the Browse button and browse your computer to the desired destination folder of the converted files.
Step 5. Click on the Convert button to start the conversion of your audio file.
Step 6. Wait for the conversion to complete.

Conclusion
Recording your Mac screen is very easy as long as you know the right software that you should be using. For Mojave users, you can just press Shift+Command+5 on your keyboard to do this. For older macOS versions, you can use the QuickTime Player application. These two methods allow you to record your whole screen or just a part of it and can even do basic video editing such as trimming. You can also share your recorded video directly to YouTube.
But if you want more advanced features, you can use our 3 recommended tools: Camtasia, ScreenFlow, and Capto. And in case you want to convert your recorded video, you can use DumpMedia Video Converter Software.

30% Off >>>