


How to Backup iTunes Library [2026 Ultimate Guide]
You’ve spent years collecting music. From vinyl to CDs, your music collection goes way back. Now that you have tediously digitized your music collection, you want to take good care of it. Hence, it is the reason why you need to know how to back up the iTunes library.
Ask yourself, do you want to lose your iTunes collection? No! You need to back it up. You can experience data loss anytime and your iTunes is not spared from it. It may seem remote at the moment but you can never tell. You should know how to back up the iTunes library as early as now.
Contents GuidePart 1. Why Back Up Your iTunes Library?Part 2. Options to Back Up iTunes LibraryPart 3. In Conclusion
Part 1. Why Back Up Your iTunes Library?
You’re probably thinking why you need to back up your iTunes library. Well, you probably don’t see the need to do it right now but you may have to do it sometime soon. Who knows what can happen? You might just experience a glitch in iTunes and all of a sudden, you won’t be able to access your library.
To avoid something like that, back up your iTunes library now. Here are some options for you on how to back up the iTunes library.
Bonus Tips : Do you know how to listen to Apple Music without iTunes? How to do? Just reading the post to get a detailed guide.
Part 2. Options to Back Up iTunes Library
There are some options for you to consider so that you could back up your iTunes library now. Keep on reading to learn more about these options.
Option #1. Use DumpMedia Apple Music Converter
An easy way on how to backup iTunes library is by making use of DumpMedia Apple Music Converter. This option is not just easy to do but it also retains the quality of your music. By using the DumpMedia Apple Music Converter, you can convert your iTunes songs to another format and remove the DRM as well. That makes it easy for you to save your songs on other devices as backups.
Here are the steps on how to use it to back up the iTunes library.
- Download DumpMedia Apple Music Converter.
- Select the Songs.
- Choose an Output Format for the Songs.
- Convert and Save the Songs.
Here are the detailed steps on how to use the DumpMedia Apple Music Converter to back up the iTunes library.
Step 1. Download DumpMedia Apple Music Converter
Download the DumpMedia Apple Music Converter. Then install and open the program on your computer.
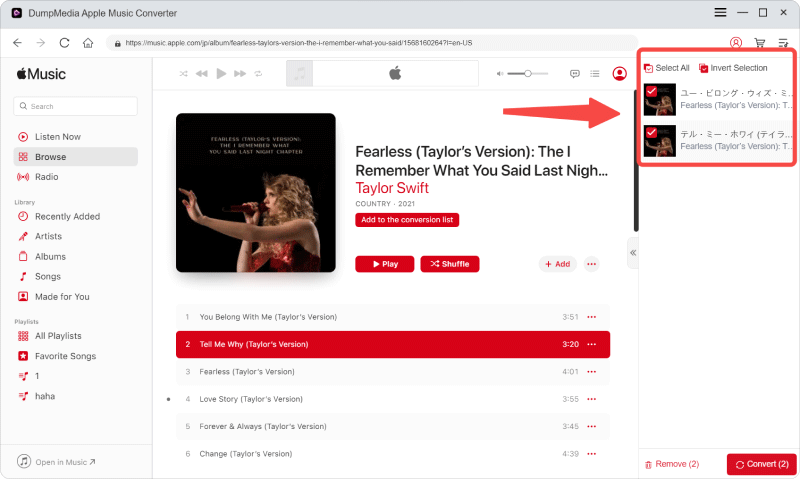
Step 2. Select the Songs
Once you have the DumpMedia Apple Music Converter on your computer, it automatically connects to your iTunes. So, if you click on the Library on the left side of the DumpMedia Apple Music Converter, you will see your iTunes songs on the main screen. Soon as you see your iTunes songs on the main screen, start selecting the songs you want to convert by checking each one of them.
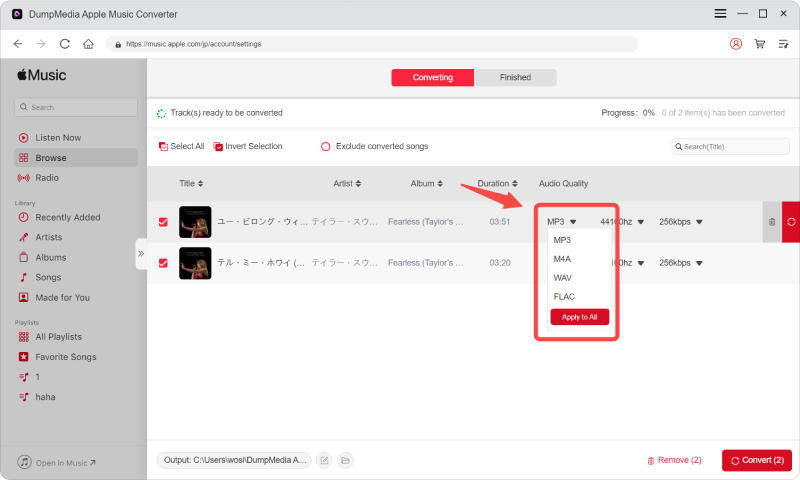
Step 3. Choose an Output Format for the Songs
Choose an output format for all the songs you want to convert. Click on the Browse tab to locate a folder where you can save and back up your songs. Once your songs are saved and backed up here, it won’t be hard for you to transfer them to another device.
Step 4. Convert and Save the Songs
You can now convert the songs. They will all be saved in the folder that you created in Step 3. This is how easy it is to use the DumpMedia Apple Music Converter to back up your iTunes library.

Note: DumpMedia Apple Music Converter no longer supports working with iTunes. However, you can drag and drop locally stored iTunes songs into "Tools > Format Converter" to convert their format.
Option #2. Use iTunes Match
This is a paid music service from Apple. It allows you to save your music to the cloud by scanning your library. It then finds all of your songs and the songs that match in the iTunes Store. iTunes Match makes those songs available for you to download to your devices. Check out the steps on how to use it to back up your iTunes Library.
Step 1. Pull up iTunes
You need to be upgraded to the most current version of iTunes. Take a look at the left-hand side of the iTunes window. Under Store, you will find the iTunes Match. Click on it.
Step 2. Take a Look at the Overview of iTunes Match on the Main Screen
You will see iTunes Match on the main screen. There are two buttons on the lower part of the screen. One button says No thanks and the other button says Subscribe for $24.99 Per Year.
Step 3. To Start Backing up, Click the Subscribe Button
A pop-up window will appear. You will need your Apple ID and your password to sign up. Click on the Subscribe button. Soon as you have clicked on it, it starts the purchase of the iTunes Match. It also starts to access the iTunes Music Store to begin the matching process. Depending on how big your library is, you might have to wait.
Step 4. Wait until iTunes Match has Done its Job
iTunes Match has to accomplish three things. First, should gather information about your iTunes library. Second, it should match your music with songs in the iTunes Store. Third, it should upload artwork and remaining songs. These three things take time to finish.
Step 5. View the Final Screen of iTunes Match
Once your iTunes Match is done, you will see a summary on the main screen. Click on the Done button.
Option #3. Export Library
This is another option that you can consider. You just have to navigate through your iTunes to be able to export the library. Follow the steps below.
Step 1. Take Your Cursor to the iTunes Menu
Click on File. Scroll down to Library and click on the Export Library from the drop-down list. Once you’ve done all that, you’re going to end up creating a specific XML file.
Step 2. Save the XML file Anywhere on Your Computer
For example, you can save it on your Desktop if you like. If you want to expand the window where you want to save your iTunes to, just click on the button beside the Save As field. You will get a full view of the locations on where you want to save your iTunes.
Step 3. You Can also Rename the File if You Like
Click on the Save button. Check your desktop for the file. A library file will appear on your desktop What this does is it enables iTunes to repopulate your list based on anything you purchased online. It’s just a way to access your entire iTunes library and repopulate it if, in case, it was deleted or you are on another computer.
Option #4. Back-Up iTunes to External Hard Drive
Nothing beats backing up to an external drive. Here are the steps on how to back up the iTunes library to an external drive.
Step 1. Check the Location of Your iTunes Backup
The location of your iTunes backup on your Mac is ~/Library/Application Support/MobileSync/Backup. You can paste the path in the Spotlight search to find your backup.
Step 2. Copy the Folder to An External Drive
There is no need to change the name of the folder even if it’s just a bunch of letters and numbers. Just copy the name of the folder and paste it on your external hard drive.
Step 3. Create a New Folder in Your External Drive
Label this new folder with the date so that you know which is the latest folder. Then transfer the backup to the newly named folder.
Step 4. Back-Up Regularly
If you choose to back up the iTunes library to an external drive, make sure to do it regularly. That is the only way you can update your backups on an external drive.
Part 3. In Conclusion
It’s important to back up your iTunes library. If you don’t, you might regret it. There are various ways for you on how to do it. So, there is no reason why you should not back up your iTunes library.
Do you know how to back up the iTunes library? Feel free to share some of your tips and tricks on how to back up the iTunes library.

30% Off >>>