


How To Import Music From Spotify to Windows Media Player
Windows Media Player is an application found only on Windows-supported devices. In addition to being an application that lets you listen to your music selections, you can also utilize it to view some images or photos as well as videos. Since the app is free, you can always use all its features.
The main advantage of playing tracks on the Windows Media Player app compared to music streaming sites like Spotify, Apple Music or Pandora is that you can manage all your saved tracks and organize them into multiple libraries, whereas on the aforementioned Music, This cannot be easily done on streaming applications.
For users who are keen on both the Spotify app and the Windows Media Player app, how to import music from Spotify to Windows Media Player may be a problem. It would be great if there was a way to enjoy streaming Spotify tracks using the most comfortable player or tool.
If you have been thinking about how to import music from Spotify to Windows Media Player, then you are in luck because that will be the main discussion in this article.
Contents Guide Part 1. Can You Transfer Music from Spotify to Windows Media Player?Part 2. How to Import Music from Spotify to Windows Media Player?Part 3. How to Transfer the Converted Spotify Music on Windows Media Player?Part 4. Bonus: How to Burn Spotify Music to CDs with Windows Media PlayerPart 5. Summary
Part 1. Can You Transfer Music from Spotify to Windows Media Player?
Before knowing how to import music from Spotify to Windows Media Player, you must know the answer to this question first – “can you transfer music from Spotify to Windows Media Player?”.
Technically, the answer to the above is a “YES”. But, to do the transfer, there must be the presence of the right tools to use. If you have been using the Spotify application for quite some time now (whether you are a free or a Premium account owner), you might already be aware that there is no direct way that you can download or save a Spotify track and have it accessed on any other devices due to the “DRM restriction” on the tracks.
It is true that if you are a Premium Spotify account user (as you are paying the monthly subscription fee), one of the benefits that you can enjoy is to be able to download any Spotify track or playlist and then have them played offline. However, that ends there.
If you wish to stream them outside of the app, there is no way (via Spotify) that you can use them unless, as mentioned, you rely on third-party software applications that can do the downloading process.
If you find the above statement a bit confusing, the simplest way to put it is that you need to have an app that has these three important features – the ability to remove the DRM encryption, to convert the Spotify tracks to supported Windows Media Player supported formats, and to download the songs.
If you still find the above a bit hard, that is when the next section of this article would be beneficial. Why? As you continue to the next portion, you will be learning about a tool that can do all the things we mentioned initially. Thus, answering even this “how to import music from Spotify to Windows Media Player” question. Let’s find out more about it in the second part.
Part 2. How to Import Music from Spotify to Windows Media Player?
After finding out that the transfer is a bit complicated (as you cannot do it directly via the Spotify application), we’ll now head to discussing how to import music from Spotify to Windows Media Player. Of course, with the help of the best tool we recommend – the DumpMedia Spotify Music Converter.
If you just read the first part thoroughly, you already know the major features of the DumpMedia Spotify Music Converter. It has this feature that would aid in the removal of the DRM protection of the Spotify tracks. It can convert those Spotify tracks into several output formats that it supports, and finally, have them downloaded in just a few minutes.
But apart from those three, there are still a lot of things that you can enjoy from using the DumpMedia Spotify Music Converter. Even if you just processed some tracks via the app, you can still be sure that the output would be of high quality. The ID3 tags and the metadata information will also be kept.
Added to this, there are also some other advanced features that you can further utilize. The app is multi-language, has customizable settings, supports the batch processing of tracks, and easy to import files. This is also so easy to use and handle.
For reference, we have here the method to guide you during the conversion and downloading process. We need to have the Spotify tracks downloaded first before knowing how to import music from Spotify to Windows Media Player.
Here is the procedure. It’s just a three-step process so this should be so easy for you.
Step #1. Installation Requirements’ Completion And Launch Of The App
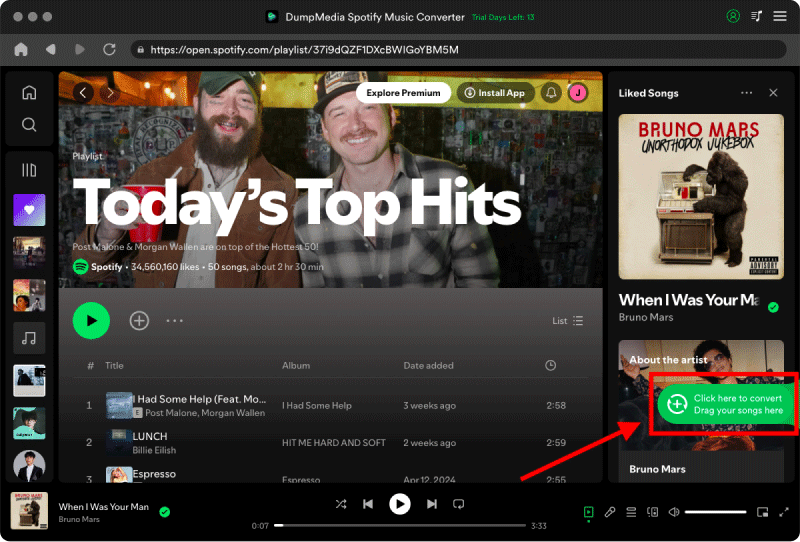
It is suggested you visit the main website of the app to further know what the installation requirements are. Once those are completed and satisfied, you can now launch the app and begin with the addition of the Spotify tracks that you wish to stream on your Windows Media Player. The dragging and dropping mechanisms are supported and so uploading of tracks would be so easy.
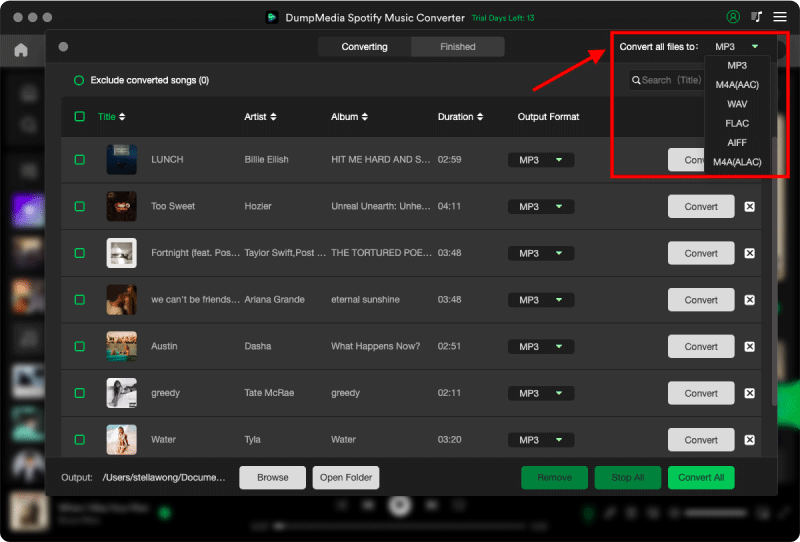
Step #2. Choose A Supported Output Format
Under the “Convert All tasks to:” section (at the top-right area of the screen), you can choose which output format you want the tracks to be transformed to. Be sure to select a format supported by Windows Media Player. Selecting MP3 would be the safest.
In the future, if you want some other tracks to be converted to other formats, you can utilize the other available formats. It is also recommended that you put an output path to easily locate the transform files once the conversion is over.
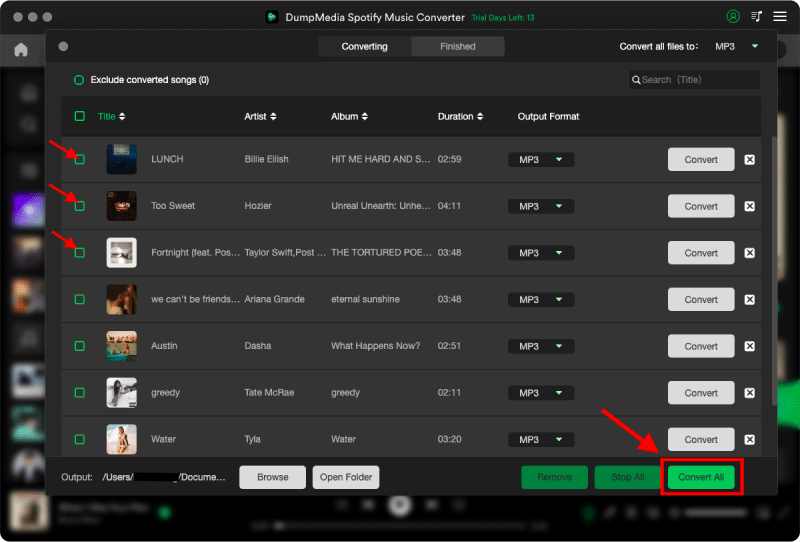
Step #3. Wait Until Spotify Tracks Are Converted
The tracks should be converted after a few minutes once the “Convert” button is ticked. Simultaneously, the DRM protection will also be removed.
Now, after having the files converted, you can see the downloaded Spotify songs under the new format saved in the location you specified in the second step. The next thing to know now is how to import music from Spotify to Windows Media Player which we will also be highlighted in this section.
Part 3. How to Transfer the Converted Spotify Music on Windows Media Player?
Now that you have the converted Spotify tracks, you just have to learn how to import music from Spotify to Windows Media Player. By following the procedure we’ll share here, you’ll be able to do it fine. So, here it is.
Step #1. Open the Windows Media Player on your PC.
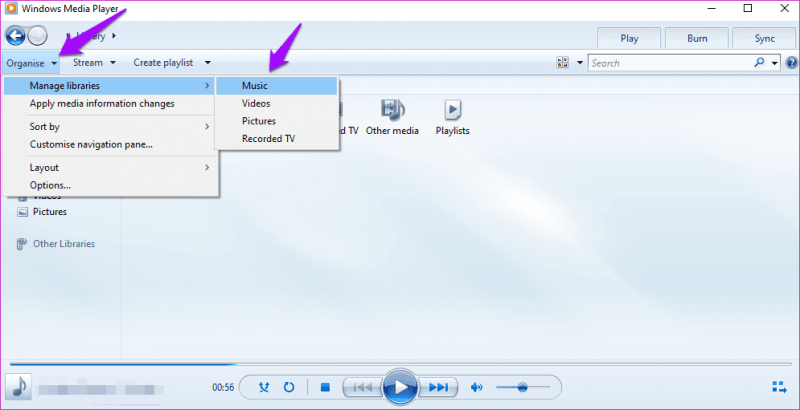
Step #2. There is this “Organize” button that you will see at the top area of your screen. Click on it and then choose the “Manage Libraries” button followed by selecting the “Music” menu. Now, just click the “Add” button and just look for the converted Spotify songs.
Step #3. Now, tick the “Include Folder” button and then click “OK” afterward.
As simple as the above, you can have those transformed Spotify files streamed on your Windows Media Player.
Part 4. Bonus: How to Burn Spotify Music to CDs with Windows Media Player
Furthermore, as a multimedia platform, Windows Media Player offers a diverse range of functions. These include the ability to extract music from CDs, duplicate music onto compact discs, and synchronize content with a digital audio player, such as the Spotify Walkman. Should you decide to download a Spotify playlist as MP3 files and import them into your Windows Media Player library, you also have the option to create a CD using Windows Media Player.
This allows you to enjoy a tangible copy of your beloved Spotify playlist on alternative devices, like your car stereo. Now, let's see how to burn Spotify Music to CDs with Windows Media Player.
- Open Windows Media Player on your computer and locate your music files.
- Insert a blank CD-R or CD-RW disc into your computer's CD/DVD drive.
- Within Windows Media Player, navigate to the "Burn" tab.
- Drag and drop your music files onto the "Burn List" in Windows Media Player.
- Arrange the tracks in your preferred order by moving them up or down in the Burn List.
- Click the "Start burn" button to initiate the burning process.
- Windows Media Player will then proceed to burn the music files onto the CD. If your music files are in a format that isn't compatible with standard CD audio, such as MP3, Windows Media Player will automatically convert them during the burning process.
Part 5. Summary
Learning how to import music from Spotify to Windows Media Player would surely be beneficial to you. It is of course good to have a Premium Spotify subscription as it can give you asses to any type of music you want.
However, keep in mind that even after having them downloaded under your account, those would still vanish after canceling your subscription (or ending it). Keeping the tracks you love on your Windows Media Player will give you forever access even if you are not connected to any WiFi or internet providers.

30% Off >>>