


How to Use Apple Music on Both iPhone and Mac (2026)
The new Apple Music is pretty neat. It’s a game-changer. Signing up for it is optional but who can resist it? There are so many cool things you can do with it. You can follow artists who are within your music library.
That’s one of the cool things about Apple Music. Any artist who has an Apple Connect account will appear in the Follow area. You can follow or unfollow anytime you want. If all that sounds pretty exciting to you, you would want to know how to sign up for Apple Music.
Look no further, this article will show you how to sign up for Apple Music. It will also give you an in-depth look at Apple Music.
Contents Guide Part 1. A Close Look at the New Apple MusicPart 2. How to Sign up for Apple MusicPart 3. How to Listen to Apple Music without JoiningPart 4. Conclusion
Part 1. A Close Look at the New Apple Music
If you take a look at the new Apple Music app, you will notice that the interface is completely changed. Once you sign up for Apple Music, you get a few new features that aren’t included in the standard music app.
On the bottom of the screen, you will see the following tabs, For You, New, Radio, Connect, and My Music. Each of these tabs has its own features. For example, the For You tab tailors your music to your specific taste. The New tab shows you a page of new artists and music. You can see music that has been highlighted or promoted.
You can also see hot tracks and hot albums. The Radio tab includes the popular music radio station, Beats 1. The Connect tab does exactly what it says. It acts as a social platform for artists within the Apple environment. My Music tab shows your existing music library. Given all those features, you would want to learn how to sign up for Apple Music, right?

Part 2. How to Sign up for Apple Music
Now, for the exciting part. Read on to see how to sign up for Apple Music on various devices such as your iPhone and Mac.
Option #1. Sign up on iPhone
If you want to sign up for Apple Music on your iPhone, just follow the steps below.
Step 1. Launch the Apple Music App on your iPhone
Go to the Apple Music app on your iPhone. Look for the Join Apple Music. You will see this right below the Following section on your screen.
Step 2. Choose a Plan
Once you click on the Join Apple Music link, you will be taken to another screen where you would have to choose a plan. There are two plans to pick from. These are the Individual and Family plans. The Individual plan is $9.99 a month after the trial ends. The Family plan is good for up to six individuals that are using family sharing. That goes for $14.99 a month.
Step 3. Sign with iTunes Account
Start the sign-up process by using your iTunes account. Type in your credentials to start. Select your preferred genre by tapping on one of the circles you see on the screen. Tap again to increase its prominence. If you like alternative music that will be more prominent.
If you don’t like a specific category of music, you can eliminate it entirely by tapping and holding on it. That removes it completely. Then click on the Next button you see on the top, right-hand side of the screen.
Step 4. Choose An Artist
You will get the same interface but this time, the circles with have names of artists. Choose your preferred artist by tapping on the circles. You can go to More Artists if you want to see more. Click on the Done button on the top, right-hand side of the screen.
Option #2. Sign up on Mac
If you want to sign up using Mac, then just follow the steps below.
Step 1. Launch iTunes on Your Mac
You will see a For You button on the top of the page. This is because the Apple Music Features are checked on the General Preferences of your iTunes. Click on the For You button.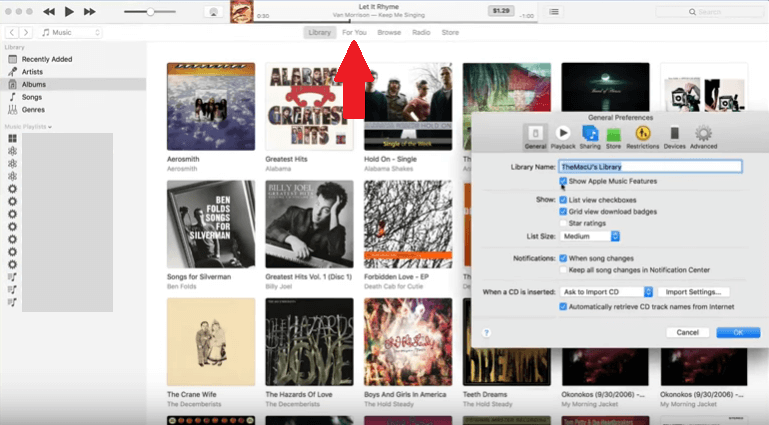
Step 2. Choose Your Plan
You will be taken to another page where you would have to choose your plan. Simply click on the Choose Your Plan button to see the plans. Click on the Join Apple Music button once you’re done.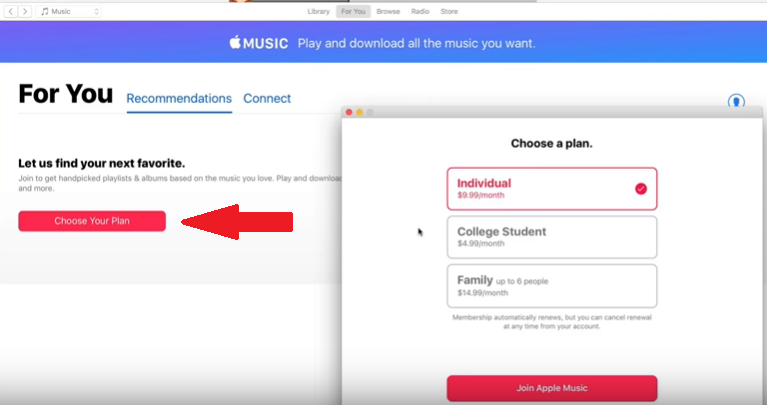
Step 3. Choose Preferred Genres
You will be taken to another page where you would have to choose your preferred genres. Just tap on the circles you see on the screen. The genres in the largest red circles are your favorites. The genres in the white circles are the ones you hardly listen to. If you don’t like a certain genre, just click on the x that appears as you mouseover. Click on the Next button when done.
Step 4. Select Artists
Do the same thing when you get to the next page where you would have to choose your preferred artists. To see more artists, click on the Show More tab on the bottom of the screen. When done, click on the Done button.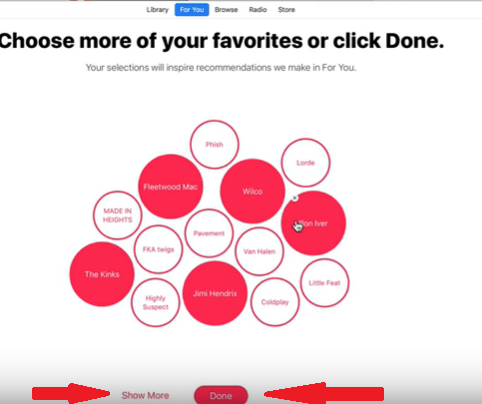
Part 3. How to Listen to Apple Music without Joining
There is no doubt about how great Apple Music is. With the three-month trial, you would definitely want to sign up after. You can’t be on the free trial forever. Their student discount only applies to students. If you’re on a tight budget, you might find it hard to avail of a plan after your free trial is up.
You have another option and that is to use the DumpMedia Apple Music Converter to download your favorite tracks from the app. That way, you could listen to them anytime. If you think this is a good option for you, check out the steps below on how to use the DumpMedia Apple Music Converter.
- Click on the Mac Version Link
- Choose Songs to Convert and Download
- Select Location on Mac and Output Format
- Convert Songs
Below are the detailed steps that can help you understand how the DumpMedia Apple Music Converter works.
Step 1. Click on the Mac Version Link
Click this link and you will immediately be on the DumpMedia Apple Music Converter page. Take your cursor to the link that says I need a Mac version. Click on that link to start downloading. Once you’re done downloading, run and open the DumpMedia Apple Music Converter on your Mac. You will see a simple interface that is very easy to use.
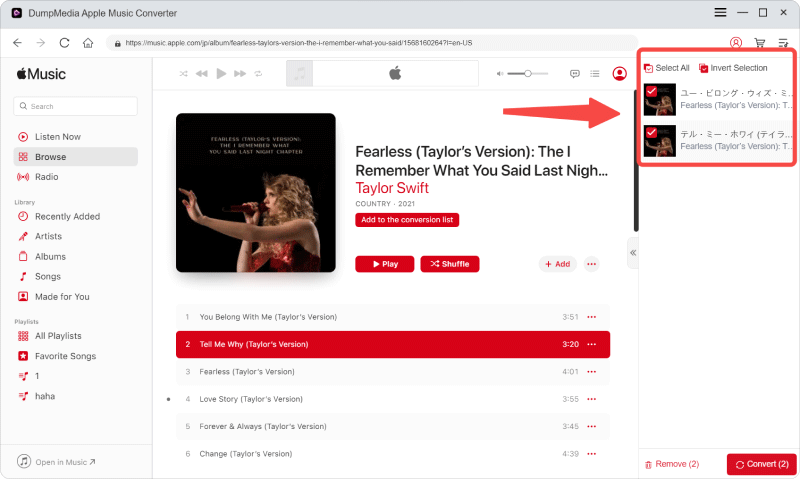
Step 2. Choose Songs to Convert and Download
The DumpMedia Apple Music Converter automatically connects to your music app. That means all you have to do is to click on the Library you see on the left-hand side of the screen to access the music. Once you click on Library, the main screen will load all your songs. Check the songs you want to convert and download with the DumpMedia Apple Music Converter.
Step 3. Select Location on Mac and Output Format
Once you have selected the songs, go to the bottom of the page to select a location where you can save your songs on your Mac. In this area, you can also choose the file format of your songs. The DumpMedia Apple Music Converter offers a lot of file formats to choose from. It also strips off the DRM so that you could transfer the songs from your Mac to other devices.
Step 4. Convert Songs
Take a look at the screen and make sure you have everything in place. Check out the file format you have chosen. Once everything looks good, you can finally click on the Convert button on the right bottom part of the screen. All your songs will start to convert. The button on the top page that says Converting will be in red. When it’s done, the Converted button will turn red.

That is how easy it is to use the DumpMedia Apple Music Converter.
Part 4. Conclusion
Apple Music is amazing. You gain access to a lot of songs. With just a click, you can listen to any song you want. It’s no wonder why a lot of folks want to know how to sign up for Apple Music. In fairness to Apple, signing up is pretty easy. Whether you sign up on the iPhone on Mac, it just takes a couple of clicks to get it done.
The only thing that could possibly restrict you from signing up is the price. So, while you’re on the free trial, consider using the DumpMedia Apple Music Converter. That way, you can convert and download all the songs you like and save them to your Mac. That will save a lot of money.
Have you signed up with Apple Music? Are you on a free trial or paid plan? Share with our readers your thoughts and ideas on using Apple Music. They would love to hear from you.

30% Off >>>