


How to Record Zoom Meetings
Online and video conference calls had been made possible because of several communication platforms. An application such as Skype, Webex, and even Zoom has been popularized. If you got to work with people located around the globe, meeting and discussing topics with them is now at the tip of your finger and device! However, if you desired to take the meeting events and play it from time to time even if it has ended, the best way is to record those as videos.
The topic of this article will be more about how to record zoom meetings. If you are also fond of using a zoom application on your meeting with colleagues, this will definitely help you.

In this post, we are to present to you those ways you can use to record your meetings efficiently.
Contents GuidePart 1: Several Ways on How to Record Your Zoom MeetingPart 2: How to Convert Your Recorded Zoom VideoPart 3: In Conclusion
Part 1: Several Ways on How to Record Your Zoom Meeting
Option 1: Zoom Local Recorder To Record Your Zoom meeting
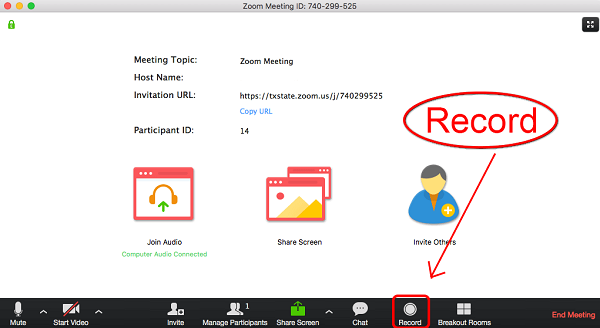
One option you can choose to record your zoom meeting is by using its Local Recorder. This local recorder is a built-in application once you got Zoom downloaded on your device. However, this could only be utilized if you are the host of the meeting. There would be a need for the participants to get your approval from the host to use the feature.
Note that if you record the meeting using this Local Recorder, the recorded video will be saved on your local storage device. Let us then get to know the steps to perform the recording.
Step 1: Open your Zoom application and head to the “Settings ” button which you will see in the main interface. This will allow you to navigate and change the settings based on your preference.
Step 2: From the “Setting” tab, you will then see the “Recording ” tab. Once you tick on this, a new window will be shown on the screen. This is where you got the option to adjust the recording setting.
Step 3: Once you are done with the changes, locate the menu bar and look for the “Record” button. Click this and the recording process will start.
Step 4: The next step will be setting the sharing area. This could be done by heading to the “Share ” button, followed by ticking “Advanced”, and finally “Portion of Screen ”. You then have the chance to choose and set the area to be recorded. If you wanted to have the meeting recorded with sound, you can just tick the “Share computer sound” before clicking the “Share” button on the bottom right corner of the screen.
Step 5: You got the option to either stop or pause the recording by ticking the tab in the “Pause/Stop Recording ”. Once done, the recorded video will automatically be saved in the path you initially set.
Option 2: Some Third-Party Application Softwares to Record Your Zoom Meeting
#1: VideoSolo Screen Recorder
Since using the Zoom Local Recorder will only give you an output which is in a certain format (mp4 for video and m4a for audio), a more powerful and better way of recording Zoom meetings is by using third-party application software such as VideoSolo Screen Recorder since you got the opportunity to record videos in several formats. Moreover, if you are a participant and intends to have the meeting recorded, this will be the best answer to your problem. You can also take snapshots and images during the meeting if you might need them. This of course if very compatible with both Mac and Windows computers.
To be able to use this application, below would be the procedures needed to be performed.
Step 1: Of course, there would be a need to download and install this VideoSolo Screen Recorder on your personal computer. Have this installed and launched as well.
Step 2: Head to the “Video Recorder ” button which you can immediately see on the screen and hit it.
Step 3: Once ticked, you must click the drop-down list of the setting wherein you can perform the modification of the screen area and even the sound.
Step 4: Next would be heading to the “Output” tab wherein you will be selecting the output format you prefer. As initially mentioned, you got to have numerous choices other than MP4. In this button, you can also specify the location wherein the output will be saved as well as the desired frame rate and quality.
Step 5: Finally, once all the above have been performed, you can click the “REC” button in the Video Setting interface to start the recording of your Zoom meeting.
#2: Callnote Video Recorder
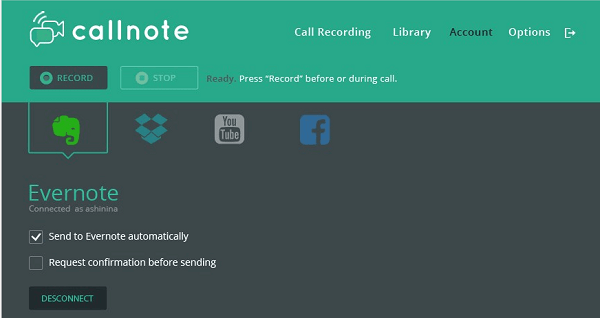
Aside from VideoSolo Screen Recorder, you can also make use of a Callnote video recorder, another screen recorder application software. Same with VideoSolo Screen Recorder, this as well as this feature of recording your Zoom meeting. The advantage is the this only requires a few steps before you got to record your meeting.
Check this out.
Step 1: Ensure that you have this tool installed on your device. Once done, launch and open the application.
Step 2: Go to the “Recording Options ” on the left side of the interface and tick the “Zoom” icon which you will see in the top area of the screen.
Step 3: Make sure you check the “Always start recording when the call starts” and the “Record video” button. Once you joined a meeting and wanted to record it, just tick the “Record” button to begin the process. Of course, you also have the pause and stop button once the meeting started. Automatically, once a meeting has ended, the output video will be saved on Callnote Video Recorder’s library.
Without much setup, you can have your Zoom meeting recorded by using this “Callnote Video Recorder”.
Option 3: iPhone Mobile Device to Record Your Zoom Meeting
If you happened to join the meeting using your iPhone mobile device, you need not worry about the recording as well. Since the Apple company introduced iOS 11, apple mobile users can easily record their screens because of the gadget’s built-in recording application. You can easily be accessed this option by swiping the screen up and tick the “Screen Recording ” function among the options. The only drawback is that by using this way, you cannot perform any other things aside from recording.
Part 2: How to Convert Your Recorded Zoom Video
Since a recorded Zoom meeting video will be saved having a certain format (whether you used any ways presented above), you can have those converted to another if you decided you wanted to. Are you interested to know how?
If yes, there is this one tool that is capable of performing a lot of functions most especially the conversion function you desire. If you are one in need, you might want to check this DumpMedia Video Converter which has been used and trusted by a lot of users in the modern era.
The main feature of this tool is video conversion to different desired formats without quality loss, even maintaining the original look. This supports numerous formats such as the popular MP4, AVI, WMA, WAV, FLAC, and a lot more! In addition, you can easily convert DVD and videos to GIF, video or audio. This as well as editing and enhancing functions wherein you can perform adjusting of brightness, contrast, saturation, and volume control. Even adding subtitles is possible! Aside from its main function, this one is a software with a user-friendly interface and offers easy steps to perform the desired processes.
Downloading and even the installation of this program could be done in just a few minutes and would require only a few clicks. You got to have your converted video by just following a few and simple steps.
To proceed with video conversion, you must do this simple step by step guide.
Step 1: Of course, you are required to ensure that this DumpMedia Video Converter would be downloaded and installed on your Windows of Mac computers.
Step 2: Launch the program and click the “Add files” button to select the recorded Zoom video file to convert. You can as well drag and drop the files directly from the location to the main interface of the application.
Step 3: Select the desired output format by ticking the “Convert All Tasks to: ”. You got a lot of options you can choose from such as MP4, MOV, WMV, AVI and many more.
Step 4: Once done, choose the destination folder wherein the output or converted file would be saved by clicking the “Browse ” button.
Step 5: Click the “Convert ” button to begin with the conversion process.

Once you are done with these steps, you can preview the video and check the converted file by tapping the “Open Folder ” option. By performing just these five simple steps, you go to have your converted video in just a few minutes.
Part 3: In Conclusion
Highlighted above are only some of the ways you can do to have your Zoom meeting recorded. You got the option to either record using local recorder or download and install third-party application software which is readily available on the web. If you joined the meeting using your apple mobile device, we have recommended a way to record as well. Moreover, since the output video formats are quite limited, you can use this DumpMedia Video Converter in case you wanted to perform format conversion. Step by step by the guide is as well shown above. Do you have any other suggestions aside from those mentioned above? Leave your comments below!

30% Off >>>