


How to Convert MP3 File to M4R Format with Ease
People are always in love with good music. Songs and sounds are usually in different formats and file types. If you happened to have an android gadget or device, MP3 files are indeed easy to be played. However, if you own an Apple device, particularly an iPhone mobile gadget, your music would only be in M4R format (the format supported by iPhone). And yes, you would probably encounter an issue in playing songs in MP3 format.
Have you had this dilemma before? The best solution would be you should know how to convert MP3 to M4R. You are fortunate enough since this article is mainly created to offer you the ways you can use, and you can resort to in case you are in need.
Stay on this page and keep on reading to find out how.
Contents GuidePart 1. What Is M4R Audio Format and Differences between MP3 and M4R?Part 2. Easy Ways on How to Convert MP3 Audio Files to M4RPart 3. A Powerful Tool for You to Convert MP3 to Other File FormatsPart 4. Summing It All
Part 1. What Is M4R Audio Format and Differences between MP3 and M4R?
But before delving into the guides and tools for conversion mentioned above, let us first define what an M4R file extension is. An audio file with M4R extension is considered as an iTunes ringtone file. These are sounds played in Apple devices such as the iPhone mobile device. It is as well a renamed AAC (Advanced Audio Coding) or M4A file.
Similarities and Differences between MP3 and M4R Audio File Format
- Both MP3 and M4R are formats that can be utilized by audio files.
- Files in MP3 format are usually playable and compatible to most devices or gadgets – personal computers, tablets, android phones, and more while M4R audio files are only supported and played in Apple devices such as iPhone, iPad, iPod touch, and Mac computers since this format was created for Apple gadgets’ ringtones. But how to add m4r files to iPhone? Click the right link to find it in this post.
- Both MP3 and M4R have lossy algorithms that allow both to alter the audio’s information making the files a bit smaller.
- MP3 file extension was developed by Moving Picture Experts Group whereas M4R was created by Apple.
- If you are into the sharing of sounds, songs, and music with your friends, using MP3 format is much more advisable since those files in this format can easily be played in lots of devices.
Part 2. Easy Ways on How to Convert MP3 Audio Files to M4R
#1: How to Convert MP3 Audio Files to M4R on Windows Using Movavi Converter
One of the many tools you can use to convert your MP3 audio files to M4R is this Movavi Converter. Having fast conversion speed, you can easily have your converted file in few minutes. You can as well process several files since this allows batch conversion. This also has editing options which will allow you to personalize your file depending on your preference. The tool guarantees that no quality loss will happen during the process.
Here’s how to use it.
Step 1: Make sure that you have the Movavi Converter downloaded and installed on your personal computer.
Step 2: Launch the program and once arrived at the main interface, click the “Add Media” button followed by the “Add Audio” option to be able to browse and choose the MP3 files on your computer.
Step 3: You can now choose the output format by heading to the “Audio for Apple ” preset group and selecting M4R.
Step 4: As mentioned, this program has a built-in editing feature that allows the user for customization. You have the option to trim or cut the file if you wanted to.
Step 5: Finally, tick on the “Convert” button located at the bottom part of the screen to begin the conversion process.
Once the process has been completed, the folder wherein the converted file was saved, will automatically open.
#2: How to Convert MP3 Audio Files to M4R on Mac Using iTunes
Yes! You read the heading correctly. If you do not want to have software applications downloaded and installed on your personal computers, you can use your iTunes application which is definitely already on your Mac computer.
This is the step by step guide to convert mp3 to m4r below:
Step 1 : Open your iTunes application.
Step 2 : If the MP3 file to be converted is not yet on your iTunes library, you can head to the “File” button situated on the upper right corner of the screen. Then tick “Add File to Library” to be able to fully load the MP3 file to your iTunes.
Step 3 : Once loaded, you must select which among will be set as the ringtone, right-click, and choose “Get Info ” among the selections that would be shown.
Step 4 : Click the “Options” tab and set and specify the time. Always note that ringtones should only be set at 40 seconds long. Once done, just click the “OK” button at the bottom part.
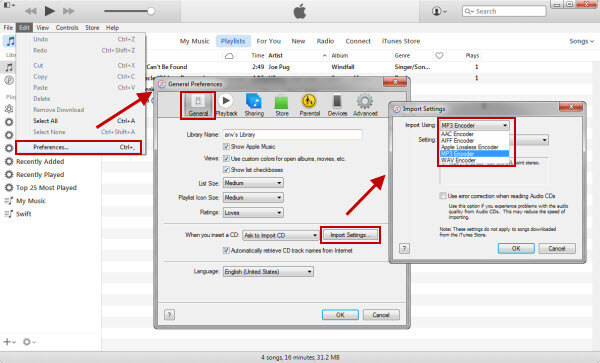
Step 5 : The next step would be heading to the “File” button and ticking the “Convert” option. Once done, click “Create AAC Version ” among the choices. If you are having some difficulty in finding the Create “AAC Version” option, you can head to “Edit” bar and choose “Preferences”, then “General”, “Import Settings” and finally, “AAC Encoder”.
Step 6 : Look for the converted file, right-click, and rename the file by changing the extension from .m4a to .m4r.
Step 7 : You must go back to the iTunes application and remove the MP3 and AAC files.
Step 8 : Next would be transferring the M4R file to your Apple device. This can be done by connecting your iPhone with your Mac and ticking the “Device” button followed by clicking “Manually Manage Videos ”. Look for the “Tones” button under “On My Device” and just perform the dragging and dropping of the M4R files.
This process could be a bit time consuming and tiring compared to using the professional software applications initially presented. But still, by using this method, you can perform the conversion you desire without downloading and installing.
#3: How to Convert MP3 Audio Files to M4R Using Online Converters
If you wanted to avoid the hassle of downloading and installing the previously mentioned converter tools and applications or the tedious way of converting using iTunes, you might want to resort to online conversion. Yes, aside from the two options, you can as well perform conversion online.
One good online converter is Zamzar.
The steps needed to be done are just easy and can be performed in just a few minutes.
Step 1: Go to Zamzar’s website.
Step 2: Tick the “Add Files” button and browse the MP3 file desired to be converted to M4R. Alternatively, you can perform the dragging and dropping of files or even selection of the link.
Step 3: Choose the output format, which in this case is M4R.
Step 4: Finally, click the “Convert” button to begin with the conversion process.
Once the conversion is done, the converted file will be sent to your email address.
Part 3. A Powerful Tool for You to Convert MP3 to Other File Formats
Upon showing you the ways you can utilize to convert your MP3 files to M4R, we are now to highlight a much more powerful tool to convert your MP3 file to other several formats in case you would need to – the DumpMedia Video Converter! Aside from converting MP3 to other files, you can convert other files to MP3 to utilize the Dumpmedia Video Converter, for example, you can convert your FLAC files to MP3 format. Detailed steps you can click the right link to learn more and master more skills!
This tool has been trusted and used by a lot of users in this modern era because its abilities and features have been proven to be amazing and with great results. The conversion has been made effortlessly and efficiently using this tool.
The main feature of this tool is video and audio conversion to different desired formats without quality loss, even maintaining the original look. This supports numerous formats such as the popular MP4, AVI, WMA, WAV, FLAC, and a lot more! In addition, you can easily convert DVD and videos to GIF, video or audio. This as well as editing and enhancing functions wherein you can perform adjusting of brightness, contrast, saturation, and volume control. Even adding subtitles is possible! Aside from its main function, this one is software with a user-friendly interface and offers easy steps to perform the desired processes.
Downloading and even the installation of this program could be done in just a few minutes and would require only a few clicks. You got to have your converted video or audio files by just following a few and simple steps.
To proceed with audio conversion, you must do this simple step by step guide.
Step 1: Of course, you are required to ensure that this DumpMedia Video Converter would be downloaded and installed on your Windows of Mac computers.
Step 2: Launch the program and click the “Add files” button to select the audio media file you desire to convert. You can as well drag and drop the files directly from the location to the main interface of the application.
Step 3: Select the desired output by ticking the “Convert All Tasks to:”. You got a lot of options you can choose from such as MP4, FLAC, WMV, and many more.
Step 4: Once done, choose the destination folder wherein the output or converted file would be saved by clicking the “Browse” button.
Step 5: Click the “Convert” button to begin with the conversion process.

Once you are done with these steps, you can preview and check the converted file by tapping the “Open Folder” option. By performing just these five simple steps, you go to have your converted video in just few minutes.
Part 4. Summing It All
MP3 to M4R conversion has been made easier because of several professional software applications and tools which are now fully available to users. There are specific tools compatible with both Windows and Mac computers. Aside from those, online converters are as well presented in case you prefer using those.
Most importantly, we have highlighted a powerful tool that can be used as well to have your audio files converted to any other formats. This also has the capability of converting video files. Offering amazing features, DumpMedia Video Converter ensures that the user gets to have great output files after conversion.
Do you find this article helpful? Do you get any amazing ideas or wanted to suggest others? Share your thoughts by leaving your comments on the below section!

30% Off >>>