


3 Quick Ways to Convert WMA to iTunes on A Mac
There's no need to despair. If you are a Mac user, you can still make use of a WMA file format. You just need to convert it. The good news is that you can convert WMA to iTunes on your Mac.
Yes, that's right. You can easily convert WMA to iTunes on your Mac and you are good to go. Your WMA files won't end up useless at all. There's no need for you to switch to Windows since you can make use of your Mac to convert WMA to iTunes. Continue reading to see how you can do it.
Contents GuidePart 1. Why You Need to Convert WMA to iTunesPart 2. Three Methods to Convert WMA to iTunesPart 3. Bonus: Save Time with the DumpMedia Video ConverterPart 4. Conclusion
Part 1. Why You Need to Convert WMA to iTunes
There are so many file formats to choose from these days. Whether it’s an audio or video file, there are just too many file extensions to deal with.
There’s nothing wrong with that. It might even benefit you since you have a lot of options. The only downside is that not all file formats are equal. While some file formats take up a lot of space, some can only play on certain computers. The WMA file format can only play on Windows. Hence, it is the reason why you would need to convert WMA to iTunes first before you can play it on your Mac.
Tip: Maybe you want to know how to convert WMA to MP3 format. Luckily, there is a detailed guide for you.
Part 2. Three Methods to Convert WMA to iTunes
As a Mac user, you can still listen to a WMA file format. There are three ways for you to convert WMA to iTunes. First, you can make use of a software called the DumpMedia Video Converter. Second, you can make use of another program called the All2MP3. Third, you can make use of iTunes itself.
Option #1. Use the DumpMedia Video Converter to Convert WMA files in your Max
Here is a step-by-step guide on how to convert WMA to iTunes:
Step 1. Go to the DumpMedia website.
Step 2. Hit on the Video Converter.
Step 3. Add the WMA file to the Video Converter.
Step 4. Convert the WMA file.
Let’s move on the detailed steps below:
Step 1. Go to the DumpMedia Website
The DumpMedia website offers you various converters like the Video Converter, Spotify Converter, Apple Music Converter, and Online Downloader. These converters will come in handy each time you want to convert or download videos.
Step 2. Hit on the Video Converter
The Video Converter is what you need to make use of a WMA file format. Click on the Video Converter and take your cursor to the I need a Mac Version link. You will find the link at the mid, bottom part of the screen. Once you click it, you will be given the option to either download for free or buy. Click on the Free Download button first to give it a try. After you download the Video Converter, run and install it on your Mac.
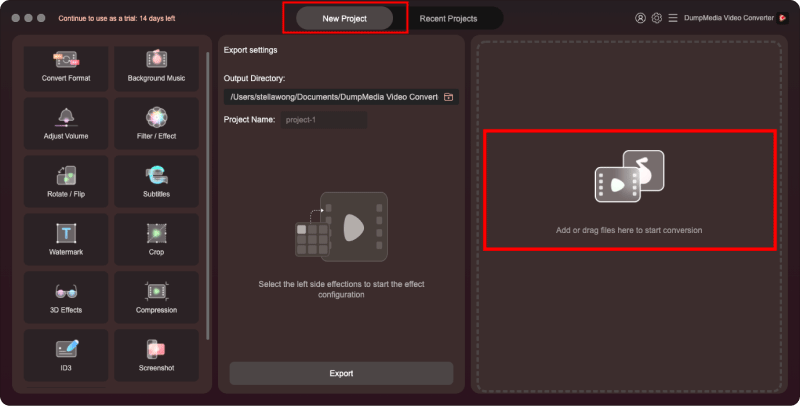
Step 3. Add the WMA File to the Video Converter
Open the Video Converter on your Mac. Add the WMA file to the Video Converter by clicking on the "Add Multiple Videos or Audios". Choose a location as to where you want to save the output file by clicking on the Save button on the bottom part of the screen. Choose an output file format on the "Convert Format".
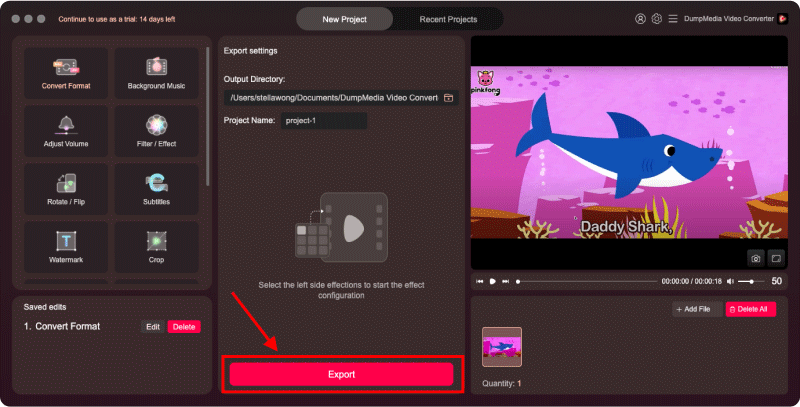
Step 4. Convert the WMA File
Just click on the Convert button to convert the WMA file on your Mac. Then you’re all set.
Option #2. Use the All2MP3 Program
- Access to the website to check it out.
- Click on Download seen on the top, left-hand side of the screen. Read carefully because you might click on another download button that is not meant for the program.
- Choose the appropriate operating system from the Download drop-down list. Since you are trying to convert a WMA file format on your Mac, you would have to choose Mac from the drop-down list.
- Install and launch the program on your Mac.
- Click on the Add button. This button is in the mid-bottom part of the program.
- Find the WMA file you want to convert.
- Click on the Choose button.
- Click on the Continue button when you get a pop-up Warning saying that ALL2MP3 is not fully compatible with Windows Media Format, some files will not be converted.
- Click on the Convert button on the next pop-up window.
- Quick the program once it’s done converting your WMA file.
- Play your newly converted file. It will open and play in your iTunes.
Option #3. Use iTunes to Manually Convert WMA on Your Mac
You can use Apple’s iTunes program to convert your audio files between various formats. iTunes is a music library and player and it’s not designed for converting files. Nonetheless, you can still use it to convert a WMA file format. If you go to the Advanced tab, found on the menu above, you can convert selection to AAC. AAC is Apple’s special MP3 format.
Unfortunately, AAC files can only play either on iTunes or on the iPod itself. So, how can you work around that so that you can convert WMA to iTunes? Read on to know more about it.
- Go to the iTunes menu
- Click on Preferences.
- Click on the Advanced tab on the top menu and take a look at the three tabs General, Importing, and Burning. Keep in mind that it’s the Importing tab that controls what that menu says. For example, if you wanted to convert WMA to iTunes, specifically in an AIFF file format, you would have to select on the Import Using field AIFF Encoder and click OK. If you go back to the Advanced menu on top, you will notice that it says “Convert Selection to AIFF.”
AIFF is an uncompressed interchange format. It’s standard across all platforms and most any computer can play and manipulate it. If you want to convert WMA to iTunes, specifically in the MP3 file format, here’s how you can do it.
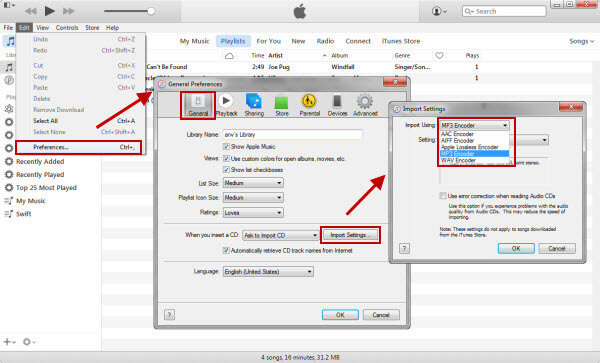
- Go to Preferences under iTunes.
- Click on the Advanced tab
- Click on the Import Using field and choose MP3 Encoder. Keep in mind that with MP3 Encoder, you get another list of settings underneath it. These settings are the following: Good Quality (128 kbps), High Quality (160 kbps), Higher Quality (192 kbps), and Custom. For this article, you can choose Good Quality (128 kbps).
- Click on OK.
- Click on the Advanced tab and you will notice on the drop-down list Convert Selection to MP3 has been selected.
Look at the top of your screen and you will see how long it’s going to take to convert the WMA file on iTunes. Keep in mind that the longer the file is, the longer it’s going to take to convert it.
When the conversion is done, it’s going to be added to the top of your Music Library, that is if you have sorted your library by date added. Hence, all new files go to the very top of the list.
After you have converted your files, you can also reset the options back to where they were. This is recommended especially if you used someone else’s computer to convert your files. You can reset the options back to where they were by following the steps below.
- Go back to Preferences.
- Click on Advanced.
- Click on Importing.
- Select AAC Encoder on the Import Using field.
Part 3. Bonus: Save Time with the DumpMedia Video Converter
Converting a WMA file with the DumpMedia Video Converter is a more efficient way of doing it. You just have to add the file to the program and convert it. The navigation on the DumpMedia Video Converter is a lot easier than manually converting WMA on iTunes.
Aside from saving some valuable time with the DumpMedia Video Converter, you’re also guaranteed some peace of mind. When you download it, you’re not going to end up confused as to which download button to click on. Since the DumpMedia Video Converter has no ads, you’re sure that the download button on its site is safe. Needless to say, it’s very easy to find the download button of the DumpMedia Video Converter. You won’t have to figure out which to click on. That can save you a lot of your valuable time as well.
Keep in mind that most free downloads come with other programs that you won’t need. In a worst-case scenario, some free downloads even come with dangerous programs that can harm your computer. Be careful. You must choose which program to download.
The DumpMedia Video Converter is safe to download. Even with their free download, you’re not going to end up with other useless programs that can harm your computer. It’s a safe program that can help you save a lot of time.
So, go right ahead and convert WMA to iTunes on your Mac with the use of the DumpMedia Video Converter. It’s your best option.

Part 4. Conclusion
There are ways to convert audio and video files on y our Mac. It’s up to you as to which method is more suitable.
Have you ever had to convert WMA to iTunes on your Mac? Share with us some tips and tricks on how you did it.

30% Off >>>