


How to Record Webcam Videos on Windows 10 in 2026
Most people use the front camera of their tablets or laptops for Skype video chats. However, you can use Windows’ camera devices for purposes more than this, especially if you combine it with the appropriate software. So in this article, we offer you methods on webcam recorders on windows 10.
All of the software we will be discussing is fully compatible with Windows 10 and they have unique features to offer. Before we go to the top four third-party webcam recorder tools, let’s take a look at Windows 10’s own webcam recorder app, Camera, along with how to use it. In the last part of this article, we also give you DumpMedia Video Converter - a tool you can use to convert your recorded videos to other formats.
Contents GuidePart 1. Windows 10’s Camera App - Webcam RecorderPart 2. Other Third-Party Tools to Record Webcam Videos on Windows 10Part 3. A Powerful Tool to Convert Your Recorded Videos to Desired FormatsPart 4. In Conclusion
Part 1. Windows 10’s Camera App - Webcam Recorder
A lot of modern devices in Windows OS have a webcam and to make the most out of it, you would need a tool to help you record videos for whatever purpose. Because of this, Microsoft has its own built-in tool called Camera and is available in Windows 10 by default. In this section, we will show you how to start the app and how you can record videos with it.
Before that, you need to ensure that you have installed your webcam’s driver if it is your first time using the Camera tool. The guide below uses the most recent update for Windows 10 Creators.

#1: How to Launch Windows 10’s Camera App
Just like the other apps in Windows, you can launch Windows 10’s Camera app in 2 methods discussed below.
Method 1. Using Cortana’s Search Feature
This is among the fastest ways on how you can launch the Camera app. Just tap or click on the search box of Cortana from your computer’s taskbar then type ‘camera’. From the search results, click on the icon for the Camera tool.
Method 2. Using the Start Menu
Another method is by opening the Camera app using Windows 10’s Start Menu. Just click on the Start icon from the bottom-left part of the screen, look for the Camera app shortcut and click on it.
Note : If you are launching the Camera tool for the first time, a prompt will appear asking you to authorize the app to use your microphone and webcam along with your location. Just agree to it so that it can access all of these features and devices. After that, you should see yourself on the app interface.
#2: How To Record Webcam Videos Using Windows 10’s Camera App
On the Camera app interface’s right side, you will see two icons: one button for capturing pictures and the other one for video recording. You will see that one button will be bigger compared to the other signifying which mode you are currently on. Follow the steps below on how to record your webcam video in Windows 10 using the Camera App.
Step 1. Switch to the Video mode. If the app is in the Camera mode, you need to click on the button for recording video at the right portion of the app’s interface.
Step 2. To start the recording process, tap or click on the Video button one more time. You will notice that the Camera tool will display a stopwatch at the bottom part of your video when the video recording starts. The stopwatch tells you how much time has passed since you started your recording.
Step 3. In case you would need to pause on recording the video, just click/tap on the button for Pause located at the Camera app’s right side. When you pause a recording video, a Paused message will be displayed at the bottom part of the app interface. To continue the recording process, you need to click on this button once again.
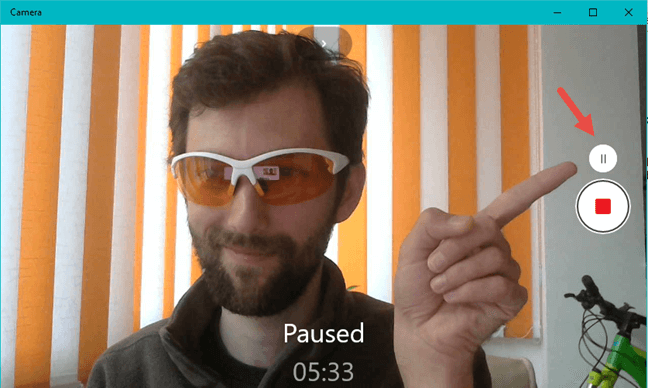
Step 4. Lastly, when you are already done with the video and want to end it, click on the Stop button located at the right portion of the app interface.
Part 2. Other Third-Party Tools to Record Webcam Videos on Windows 10
#1 YouCam 7 Deluxe
YouCam 7 of Cyberlink is one of the webcam apps of Windows 10 that has a lot of features. This software can be basically used for any kind of video recording tasks: capturing videos, images, and even video surveillance.
CyberLink has a free edition for YouCam 7 along with two other choices: Standard and Deluxe versions. But you should not be skeptical of buying the paid version of YouCam 7 as this tool was developed by CyberLink itself which is among the most reliable and biggest companies in its industry.
As for YouCam 7’s features, the main objective of this tool is of course for recording purposes but it also has a lot of effect varieties. The tool allows you to add other edits on your recordings such as the following:
- Emoticons,
- Filters,
- Screens,
- Frames, and
- Funny effects.
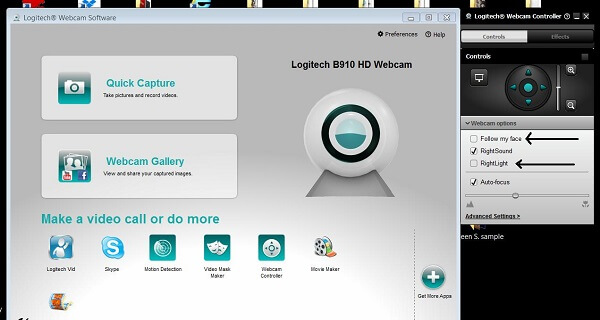
#2 Logitech Webcam Software
Logitech is among the most popular webcam manufacturers around the world. Thus, it is not new that the company has its own software for webcams. So if your webcam is from Logitech’s, it is probably recommended to use their webcam software too.
With Logitech Webcam Software, you are able to record videos and capture images from your computer’s webcam. It also has a few extra options such as its ability in adjusting your camera’s sensitivity and activate motion detection. Moreover, this software offers a mode for surveillance which is a good option for home cameras.
#3 Yawcam
Yawcam is a free software for capturing videos and images using your webcam. It comes with a helpful set of functionalities that can help you enhance your video recordings. With this tool, you can record regular recordings and directly stream your videos online. It is ideal for Twitch streams and YouTube recordings. Moreover, Yawcam also offers an excellent combination of surveillance modes and motion sensors making it a good choice for such purposes.
#4 Debut Video Capture Software
The major intent of this tool is for screen recording and capturing but also has many options for video output customization from a webcam. It is even better compared to other apps that have a purpose solely for that. Debut Video Capture Software allows you to capture video from a webcam or your computer screen in many formats such as MP4, AVI, MPG, WMV, and FLV.
This software is very versatile as it even has the feature of capturing videos from outside sources such as IP webcams. Moreover, Debut Video Capture also offers more handful functionalities such as mouse highlighting. It is probably one of the most helpful tools when you are recording tutorials or gameplay videos for uploading to YouTube and basically allows its users to perform the whole task using only one program through capturing your screen and webcam recording simultaneously.
Part 3. A Powerful Tool to Convert Your Recorded Videos to Desired Formats
DumpMedia Video Converter is a powerful and high-speed all-in-one audio and video converter, downloader, editor, and player. Enjoy the convenience of a friendly interface equipped with a lot of features to meet all of your video needs. The software supports many formats including MPEG, 3GP, FLV, MKV, AVI, WMV, MOV, MP4 along other regular video formats. To convert your recorded videos to other formats you desire, download the software first and follow the steps below.
Step 1. Launch the DumpMedia Video Converter.
For Windows users :
Step 1a. Go to the Search icon (magnifying glass) beside the Windows icon in your computer’s Task Bar.
Step 1b. Type DumpMedia on the text field.
Step 1c. Click on the DumpMedia Video Converter on the search results.
For MacOS users :
Step 1a. Click on the Launchpad icon in your computer’s Dock. The launchpad icon is a gray circle with a darker gray rocket at the center.
Step 1b. Type DumpMedia on the Search bar at the topmost part
Step 1c. Hit the Return button on your keyboard to launch the application.
Step 2. Click the Add Files button located at the top-left section of the interface to import your files or you can drag-and-drop them directly into the main interface.
Step 3. Look for the Convert all tasks to text at the top right corner of the interface. Select your desired output format.
Step 4. At the bottom of the interface, click on the Browse button and browse your computer to the desired destination folder of the converted files.
Step 5. Click the Convert button to start the conversion of your audio file.
Step 6. Wait for the conversion to complete.

Part 4. In Conclusion
That’s it! In this article, we shared with you Windows’ own webcam recording application that you can use to record videos from your webcam for any purpose and how you can use it. Then we gave you the top 4 third-party tools you can use for more advanced webcam recording functionalities:
- YouCam 7 Deluxe,
- Logitech Webcam Software,
- Yawcam, and
- Debut Video Capture Software.
Lastly, in case you want to convert your recorded video to another format, we recommend you to use DumpMedia Video Converter which can help you do this.

30% Off >>>