


High Speed Conversion Using NVIDIA’s CUDA and GeForce GPUs
The ultra-high conversion speed of some video converters is all thanks to the support of NVIDIA GeForce with CUDA. The conversion speed is now six times faster compared to the normal speed and you do not need to worry about the quality loss of recompression. In this article, we are going to discuss what NVIDIA CUDA and NVENC are along with their applications.
As a bonus, we give you a step-by-step guide on how to use DumpMedia Converter Software to convert any audio or video file into your desired format for whatever your purpose is. So without any more delay, let us start with our discussion.
Contents GuidePart 1. Detailed Informations about NVIDIA CUDAPart 2. What Is NVIDIA NVENC and How Does It Work?Part 3. Best High-Speed Video Converter For Your Media FilesPart 4. To Wrap It Up
Part 1. Detailed Informations about NVIDIA CUDA
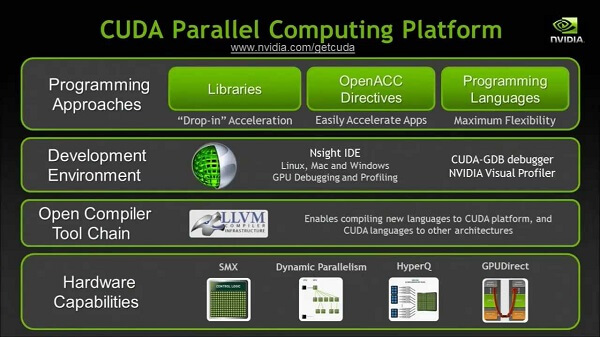
Compute Unified Device Architecture, known as CUDA, is a platform for parallel computing and an interface model for application programming developed by NVIDIA. NVIDIA uses this platform for computing purposes of its own graphics processing units (GPUs) to accelerate their computation processes.
CUDA allows developers to increase the speed of applications that are compute-extensive by utilizing GPU power for the parts of the computation that are parallelizable. With CUDA, software developers and researchers can send Fortran, C, and C++ codes directly to GPUs without making use of assembly codes. This process of streamlining utilizes the benefits of what is called parallel computing where thousands of threads, or tasks, are simultaneously executed.
While there are other GPU APIs that have been proposed like OpenCL and other GPU manufacturer competitors exist, like AMD, the NVIDIA CUDA-NVIDIA GPU combination still dominates the majority of the application areas. This includes deep learning. What’s more, is this combination is the foundation of several of the world’s fastest computers.
NVIDIA’s GPUs (GeForce)
GeForce is NVIDIA’s brands for its GPUs which denotes their product branches at the consumer level. The latest design which was GeForce 20 Superseries is the 17th generation of NVIDIA’s GeForce designs. The first product generations were discrete GPU designs meant for add-on boards. They are intended mostly for the high-margin market of PC gaming.
The product later diversified to cover all fields of the market for PC graphics ranging from affordable GPUs pre-installed in motherboards to the popular add-in boards. Recently, the GeForce technology was introduced to NVIDIA’s wide array of embedded processors for applications designed for mobile handsets and electronic handhelds.
Selecting A Video Card For CUDA
A higher CUDA core number usually means that your video card can provide faster overall performance. However, this number is just one of the many things that you need to consider if you are choosing a video card.
NVIDIA has a variety of video cards featuring CUDA core numbers starting from 8 (GeForce G100) and can reach to 5,760 number of CUDA cores such as the GeForce GTX TITAN Z. Video graphics cards having Pascal, Maxwell, Kepler, Fermi, or Tesca architectures can support CUDA.
What Are the Applications of NVIDIA CUDA and Its GeForce GPUs?
NVIDIA’s CUDA and GPUs were adopted in various areas with a need for high computing performance. Below is a comprehensive list of where they are applied.
- Computational finance
- Weather, ocean, and climate modeling
- Analytics and data science
- Machine learning and deep learning
- Oil and gas industries
- Defense and intelligence
- Security and safety
- Medical imaging
- Management and tools
- Architecture, Engineering, and Construction (AEC)/ Manufacturing: CAE and CAD including automation of electronic design, visualization, computational fluid dynamics, and structural mechanics.
- Research: Supercomputing and higher education including computation biology and chemistry, scientific visualization, physics, and numerical analytics.
- Entertainment and media including the following:
- Rendering, modeling, and animation
- Grain management and color correction
- Compositing
- Effects and finishing
- Editing
- Digital distribution and encoding
- On-air graphics
- Weather graphics
- Stereo, on-set, and review tools
Part 2. What Is NVIDIA NVENC and How Does It Work?
NVIDIA NVENC, as you may know, is a product developed by NVIDIA since CUDA. It is a very powerful technology for video encoding which was introduced along with NVIDIA’s GeForce 600 series GPU in 2012. Compared to the CPU-cased or CUDA-based video encoders, NVENC is CUP-based and can provide a much higher video encoding quality.
What Are the Applications of NVIDIA NVENC?
#1 Acceleration of NVIDIA NVENC for H.264/AVC Encoding
Most people are not familiar with NVIDIA NVENC and are not aware that it is an essential technology for modern people. Most of the TV shows and series that you can download including online streaming sites (YouTube for instance) and Blu-ray movies use the H.264/AVC video encoding technology which is performed by NVIDIA NVENC.
For many years, H.264 has been the most effective method of compression. With this technology’s low requirement for bitrate and widespread availability, it has found its position in all of movie playback devices. The H.264 video encoding method was unmatched for a long time.
H.264 processes frame by utilizing what is called macroblocks. These are pixels that are 16x16 which allow further segmentation. Simply put, it allows the bitrates to be lowered more efficiently compared to the older standards and still retaining equal video quality.
#2 Acceleration of NVIDIA NVENC for H.265/HEVC
While H.264 is still extremely popular with users and is widely used, it is not, however, the most recommended encoding method that is currently used. H.265, also known as HEVC or High-Efficiency Video Coding, produces way higher standard compared to its predecessor under the similar applied settings.
This means that if you want to get that same video quality for watching in H.264, you will only need to have 50% of the bitrates. Let us say that we have recorded a video using H.264 encoding having 60 fps, 15,000 bitrates, and a very high quality which gives us a 500MB file size. While our video will surely look amazing, you can use H.265/HEVC encoding to achieve exactly similar results under only 7,500 bitrate. Another good thing is that the size of the video can be reduced to up to 250MB.
Tip: If you want to know how to resize video files so that you can use them in the corresponding situation you’re facing, just turn to that link to learn more details.
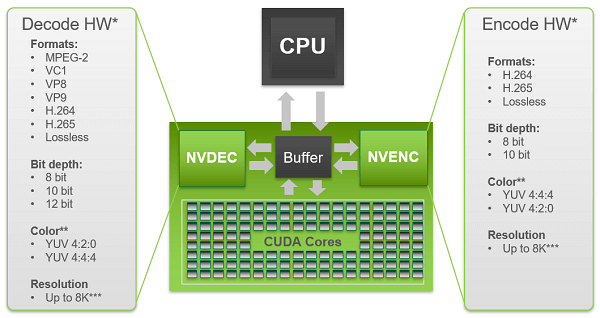
How Does NVIDIA NVENC Work?
Both H.265 and H.264 utilize motion compensation prediction through searching for nonessential areas in one or more consecutive frames. When an inessential area or area is/are determined, the encoding procedure references another area in these frames. To put it simply, when two areas on one frame are the same, (for instance, a yellow wall on about 75% of the frame), then these two similar areas are only considered as one.
It has been mentioned beforehand that in H.264’s case, the areas can have a maximum pixel size of 16x16. The huge difference is found here since HEVC allows the identification of areas having pixel sizes that can reach up to 64x64. HEVC also encodes a lot more efficiently because of its enhanced changeable block size segmentation. Meaning, the area’s shape is not limited to blocks that are square only.
Part 3. Best High-Speed Video Converter For Your Media Files
DumpMedia Video Converter is a powerful and high-speed all-in-one audio and video converter, downloader, editor, and player. Enjoy the convenience of a friendly interface equipped with a lot of features to meet all of your video needs. The software supports many formats including MPEG, 3GP, FLV, MKV, AVI, WMV, MOV, MP4 along other regular video formats. To convert any audio or video to other formats you desire, download the software first and follow the steps below.
Step 1. Launch the DumpMedia application.
For Windows users:
Step 1a. Go to the Search icon (magnifying glass) beside the Windows icon in your computer’s Task Bar.
Step 1b. Type DumpMedia on the text field.
Step 1c. Click on the DumpMedia application on the search results.
For MacOS users:
Step 1a. Click on the Launchpad icon in your computer’s Dock. The launchpad icon is a gray circle with a darker gray rocket at the center.
Step 1b. Type DumpMedia on the Search bar at the topmost part
Step 1c. Hit the Return button on your keyboard to launch the application.
Step 2. Click the Add Files button located at the top-left section of the interface to import your files or you can drag-and-drop them directly into the main interface.
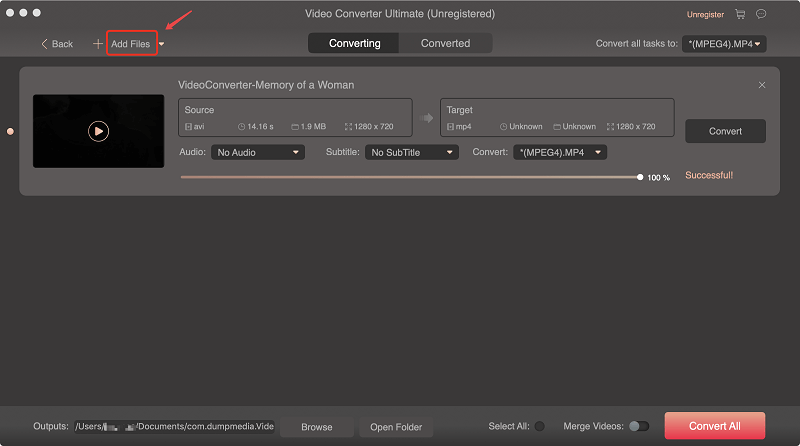
Step 3. Look for the Convert all tasks to text at the top right corner of the interface. Select your desired output format.
Step 4. At the bottom of the interface, click on the Browse button and browse your computer to the desired destination folder of the converted files.
Step 5. Click the Convert button to start the conversion of your audio file.

Step 6. Wait for the conversion to complete.
Part 4. To Wrap It Up
Now you’ve learned the purpose of NVIDIA’s CUDA and NVENC video encoding technology in this article. So to wrap it all up, below are the key topics that we have discussed in this article.
- Definition of NVIDIA CUDA, GeForce, and NVENC;
- How to select a video card for CUDA;
- Applications of NVIDIA CUDA, GeForce, and NVENC;
- How NVIDIA NVENC works; and
- How to convert your audio and video files to your desired format using DumpMedia Converter Software.

30% Off >>>