


How to Record Your Desktop Screen Effortlessly
Have you had a meeting online and you wanted the whole presentation to be recorded? How about getting your own copy of a YouTube live streaming video? Do you want to keep a recorded video tutorial that you just watch online? Well, in this article, we are to offer you two amazing ways to do this. Recording your desktop screen has been made easier. With just a few ticks and clicks, you can get what you want.
If you are interested to find out, we are encouraging you to continue reading. Let us start the discussion with the first option.
Contents GuideWays on How to Record Your Desktop Screen EasilyBonus Tips: Converting Your Recorded Video to Any Format You DesireSumming it All
Ways on How to Record Your Desktop Screen Easily
Option 1: Recording Your Desktop Screen Using Professional Recorder Application
One good choice is the utilization of offline application software. There are actually a lot of selections fully available on the web. Some are free but with limited features and others need to be purchased for you to fully enjoy. Here are some of the popular, trusted, and reliable tools.
#1: VideoSolo Screen Recorder
VideoSolo Screen Recorder supports both Windows and Mac computers. This is, of course, capable of recording your desktop screens – both video and audio. While using this application, you can even make use of its built-in features such as the ability to add effects during recording and taking of screenshots and images for reference.
To be able to use this, below are the steps needed to be accomplished.
Step 1: Ensure that you have this VideoSolo Screen Recorder downloaded and installed on your Windows or Mac computer. Have this launched and run.
Step 2: Once arrived in the main interface, you will be seeing four options to choose from. Make sure that you will tick the “Video Recorder” button.
Step 3: Once done, the next step would be defining the recording region. A captured frame will easily be seen, you can either adjust the range and resize the area depending on your preference. Moreover, you can also utilize the drop-down list in the first button wherein several region modes are visible.
Step 4: If you had decided to record the audio as well, you can just head to the third button wherein you will see a slider for on and off options. Adjusting the video’s audio is as well possible. The last button, “Microphone Sound ” will allow you, on the other hand, to record your own voice. You can tick the slider and turn it on if you want to and tick it off if not. Take note that if you are using a Mac computer, the recording of sound would only be through the microphone. This is because of some sort of privacy reasons.
Step 5: Head to “More Settings ” bar to define your preferences and adjust the settings. Five selections will be shown once clicked – Recording, Mouse, Hotkeys, Output, Others. You can just check any of those under each if prefer to.
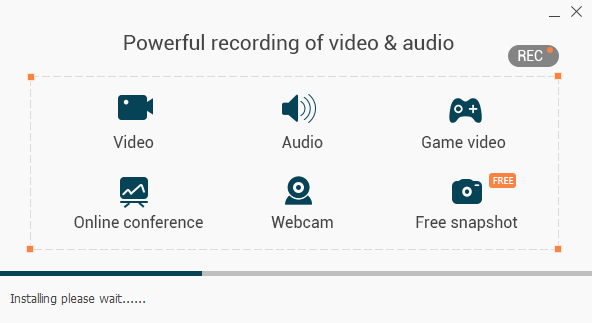
Step 6: Once everything has been finished and set up accordingly, the “REC ” button must be clicked to begin the desktop recording. As initially mentioned, during recording, the application will give you the chance to perform editing and adding of any available video effects that you want. Taking screenshots is possible by just ticking the camera icon in the lower portion of the screen.
Step 7: Finally, if you are done with the recording, you can just click the stop button located on the upper left corner of the tools. You can preview the recorded video and save it once done. After saving, you can either change the file’s name or retain it depending on your choice.
#2: OBS Studio
Another tool you can make use is this OBS Studio. This as well as an application capable of recording your desktop screens without watermarks. What is fascinating in this software is that it has a feature that supports live streaming while recording (in case you desire to use the recorded file for a tutorial or educational purposes). Many users are considering this as one of the best recording software since you can fully enjoy all the features without a need to purchase it.
#3: Snagit
Unlike OBS Studio, Snagit would require you to pay before using it. Of course, this is more versatile and has lots of amazing features. Aside from offering a way to record your desktop screen, this tool would also let you create and edit your own videos and input lots of great graphics, images, and texts.

Option 2: Recording Your Desktop Screen Using Usual Application
Aside from making use of several professional, both free and with charge, in recording your desktop screens, you can also try using some applications which are probably already installed on your own computer.
Do you find this interesting and surprising? Well, we are to highlight one of those applications.
PowerPoint
Yes! PowerPoint could be a way to record your screen effortlessly. In the newest update made, this application already allows users to do mentioned. Plus, this as well has video enhancement functions which you can also make use of.
Here is the step by step guide to do so.
Step 1: Open your PowerPoint application.
Step 2: Go to the “Insert ” tab, and make sure to select “Screen Recording ”.
Step 3: You will be asked to choose the specific area or region you wanted to record. Alternatively, if you prefer recording full screen, just tick the windows key, shift, and F key simultaneously.
Step 4: Once set up, just tick the “Record” button to begin. Clicking the windows key, shift, and R simultaneously is a keyboard shortcut you can use.
Step 5: Of course, you have the option to pause and stop the recording. You can just click the “Pause” button and the “Stop ” button to end the recording.
After this, you can now save your recorded video!
Well, you should know how to record your desktop screen by these ways. Are you interested in how to make a desktop screen larger? Check the link to learn more about the situation.
Bonus Tips: Converting Your Recorded Video to Any Format You Desire
If you have decided to use any of the above and finally got your recorded videos saved on your personal computer, there could still be chances that you might want to change the format of those files. The answer to that would be video conversion!
DumpMedia Video Converter is one tool that is capable of performing a lot of functions most especially the conversion function you desire.
The main feature of this tool is video conversion to different desired formats without quality loss, even maintaining the original look. This supports numerous formats such as the popular MP4, AVI, WMA, WAV, FLAC, and a lot more! In addition, you can easily convert DVD and videos to GIF, video or audio. This as well as editing and enhancing functions wherein you can perform adjusting of brightness, contrast, saturation, and volume control. Even adding subtitles is possible! Aside from its main function, this one is software with a user-friendly interface and offers easy steps to perform the desired processes.
Downloading and even the installation of this program could be done in just a few minutes and would require only a few clicks. You got to have your converted video by just following a few and simple steps.
To proceed with video conversion, you must do this simple step by step guide.
Step 1: Of course, you are required to ensure that this DumpMedia Video Converter would be downloaded and installed on your Windows of Mac computers.
Step 2: Launch the program and click the “Add files” button to select the desired media file to convert. You can as well drag and drop the files directly from the location to the main interface of the application.
Step 3: Select the desired output format by ticking the “Convert All Tasks to: ”. You got a lot of options you can choose from such as MP4, MOV, WMV, AVI and many more.

Step 4: Once done, choose the destination folder wherein the output or converted file would be saved by clicking the “Browse ” button.
Step 5: Click the “Convert” button to begin with the conversion process.
Once you are done with these steps, you can preview the video and check the converted file by tapping the “Open Folder” option. By performing just these five simple steps, you go to have your converted video in just a few minutes.
Summing it All
Recording of your desktop screens is now made easier, more efficient, and of course accessible. You have a lot of options you can select from. The two ideas presented above are just some of the most popular and well-known methods. Ultimately, there could still be more choices available on the web.
If you are a person who looks for professional software applications with added and built-in features, either Video Screen Recorder, OBS Studio, or Snagit would help you out.
If you just wanted to have the screen recording option and some sort of editing effects, you can just rely on PowerPoint application. Using this will lessen the hassle of downloading and installing the software.
An amazing video converter, DumpMedia Video Converter, is as well discussed above. If you decided to change the format of the recorded video file, you can utilize this tool!
Do you have any suggestions or comments? Let us know by leaving your thoughts on the below section.

30% Off >>>