


[2025 Guide]How Can Spotify Sync Local Files Easily
If you also got some original files and songs you wanted to incorporate and save on your Spotify application. How are you doing this? Here, we are to discuss the easiest way that how can Spotify sync local files.
Spotify can also be considered as an all-in-one player. As initially mentioned, it has a feature that allows every user to integrate their local files and music into it making it more flexible and reliable.
Before finally heading to the guide, keep in mind that the Spotify sync local files would only be possible if you are a Spotify premium account user. This means that free users do not have the capability to do such.
Contents Guide Part 1: What Is the Difference Between A Premium and Free User?Part 2: How Do You Sync Local Songs on Spotify ApplicationPart 3: Tip on How Spotify Sync Local Files for Free Spotify UserPart 4: To Sum It All
Part 1: What Is the Difference Between A Premium and Free User?
If you have been using the Spotify application for some time now, you are absolutely aware that there are two types of users – you can be a premium or a free user.
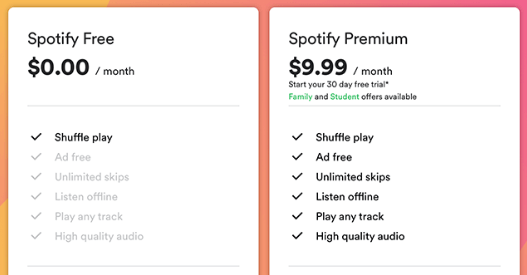
A Spotify premium account user has subscribed to the monthly subscription wherein they are required to pay a certain amount on a monthly basis. Getting a premium makes a user enjoy the several and amazing features the Spotify application has.
You can get to experience unlimited skipping of songs and uninterrupted music experience (because advertisements are blocked if you have a premium).
Having a premium account lets the user the chance to save and download songs and playlists for offline playing and streaming though you do not have an internet or data connection. And, as mentioned, you can have your local files and songs integrated on your Spotify application if you are paying the monthly premium or subscription free.
A free Spotify user, on the other hand, is the total opposite of the premium user. If you do not mind hearing repetitive and numerous advertisements all throughout your listening time, then being a free user would be fine with you.
A free user also gets the chance to listen to all songs the Spotify offers. However, you cannot perform the choosing and skipping of songs and cannot even download the songs you love for offline playing. You must also have a stable internet connection in order to use the application and listen to songs.
Upon learning some basic ideas about Spotify, we will now get to the guide on how can Spotify sync local files.
Part 2: How Do You Sync Local Files on Spotify Application
In this part of the post, we will be explaining two ways on how any user can efficiently and easily sync their most loved local files to their Spotify application. You can have it done either on a desktop (or personal computer) or on your mobile phone or tablet. We will now begin the discussion with the procedure you must do in case you wanted the process to be performed on a personal computer.
Spotify Sync Local Files On Desktop
The syncing of local files to Spotify using your desktop can easily be done by doing only three (3) simple steps.
- Attach the music playlist local folder on your Spotify application.
- Add the local files to a separate playlist.
- Enjoy your local files!
The explanation for the mentioned three (3) steps will be read below.
Step 1: Attach the Music Playlist Local Folder On Your Spotify Application
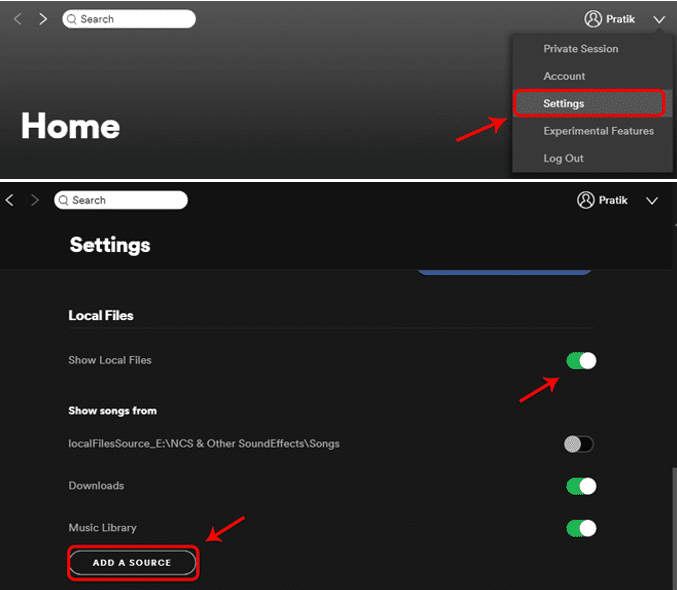
In order to successfully sync and save all your local files or music to the Spotify application, the initial thing needed to be done is to attach the music playlist local folder on your Spotify application. You can have this done by heading to the “Settings” button first which you can find on the top right corner of the interface.
Once you have ticked the mentioned button, you will be seeing some texts and options. In here, you should enable the “Show Local Files” button using the slider you will be seeing (green color signifies that enabling has been successfully done). Once this has been completed, two new options will be displayed – “Downloads” and “Music Library”.
If these two will be enabled, all your songs and files in these folders will be accessed. Now, if you wanted to sync songs not saved on this folder, you can easily attach a new folder in this section as well. The initial thing you need to do to proceed is to click the “Add A Source” button.
Upon performing the above, a new window will suddenly pop up. This is where you are given the chance to choose the local folder to be attached. Just make sure to tick the folder and hit the “OK” button on the bottom portion. Once you have completed this step, the local folder you added and attached will appear below the local files section. You should also ensure that slider alongside the added folder will be turned on and enabled to allow access.
Step 2: Add the Local Files to A Separate Playlist
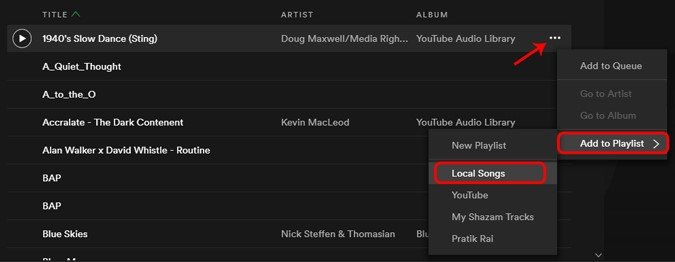
Upon completion of the first step, in Spotify’s main interface (on the left side of the screen), you can tick the “Local Files” button and view all those songs and files saved onto it. Once you have seen those, the next step would be adding those to a separate playlist.
Besides each song, you will be seeing three (3) dots. Hit that and head to the “Add to Playlist” option. From here, the names of the playlist will be displayed. You can now choose where playlist to save the files.
Step 3: Enjoy Your Local Files
Now, the only thing left for you is to enjoy all those local files you have synced on your Spotify application. Have those played and streamed anywhere and anytime!
Spotify Sync Local Files to Phone And Tablets
On your mobile devices or tablets, you actually need to perform the importing of your local files to your Spotify application using the desktop application. Here, we are to explain how you can have those accessed to phone and tablets in three (3) easy steps as well.
- Make sure to log in on your phone Spotify application.
- Head to the local songs’ playlist.
- Hit the “Download” button.
Let us discuss these three (3) in detail.
Step 1: Make Sure to login On Your Phone Spotify Application
On your phone devices or tablets, you must ensure that you should log in to your phone Spotify application by providing all the needed information (username and password).
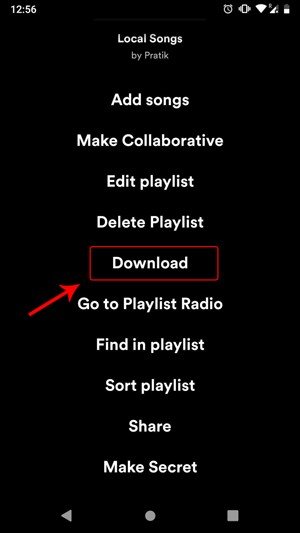
Step 2: Head to The Local Songs’ Playlist
Once logged in, you can now head to your local songs’ playlist. Once you have seen it, you can just tap on it to open and proceed. All the local songs imported will be viewed in grey color. What does this mean? This signifies that you cannot still have those played and enjoyed. To stream, you would need to download those songs.
Step 3: Hit The “Download” Button
Now, you can just hit the three dots alongside each song and options will be displayed on your screen. From those, look for the “Download” button and click it to proceed. Now, you can have the songs played!
You now learned how to finally sync local files to your Spotify application. In the next part, we are to give you some additional information most especially if you are a free Spotify user.
Part 3: Tip on How Spotify Sync Local Files for Free Spotify User
If you are a free user, Spotify offers no way for you to download songs and saved those to your gadgets for offline playing. But you should not be worried about this because, in this part, we are actually to give one additional and great tip you can surely make use of.
Finding a way on how you can stream songs offline from Spotify application is no longer an issue now. You can easily do it by using a tool named “DumpMedia Spotify Music Converter”.
What Is This DumpMedia Spotify Music Converter?
DumpMedia Spotify Music Converter is a tool developed and created by DumpMedia. This software application has the ability to transform or convert your favorite Spotify songs to any format you want. Besides, it can import your Spotify playlist to other applications like tidal and Apple Music.
It supports a lot including the most used and most popular. In addition to this, during conversion, the removal of DRM protection will also be done. This means that you can have those songs streamed and played on other devices.
How Can You Use This DumpMedia Spotify Music Converter?
The steps are actually quite easy. Here are those.
- Download and install DumpMedia Spotify Music Converter.
- Choose any you desire as the resulting one.
- Proceed with conversion by ticking the Convert button.
Let us look into these steps further.
Step 1: Download and Install DumpMedia Spotify Music Converter
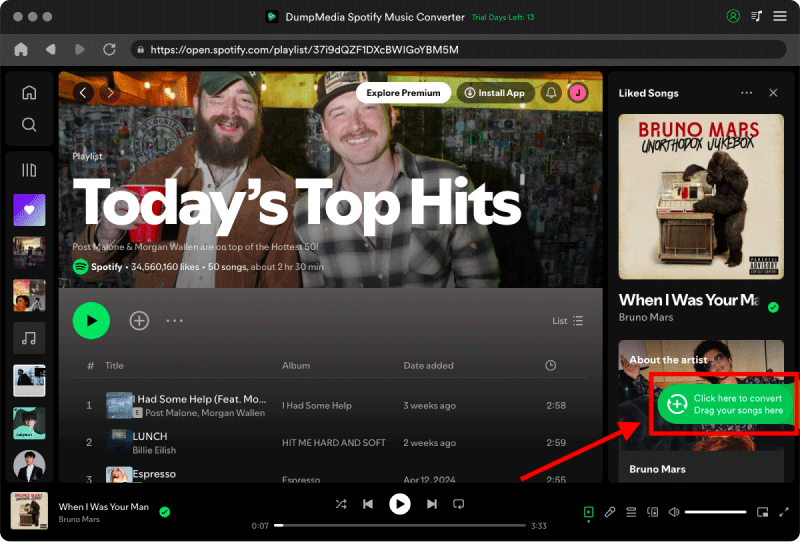
Of course, the first thing you need to do is to have this DumpMedia Spotify Music Converter downloaded and installed on your personal computer. Once done, just open and launch the program to start as well as your Spotify application.
You can begin adding the files by performing dragging and dropping or even adding just the file’s URL (link). This program supports batch conversion which makes it possible to convert not only a file but a number. Converting a lot at a time is not an issue.
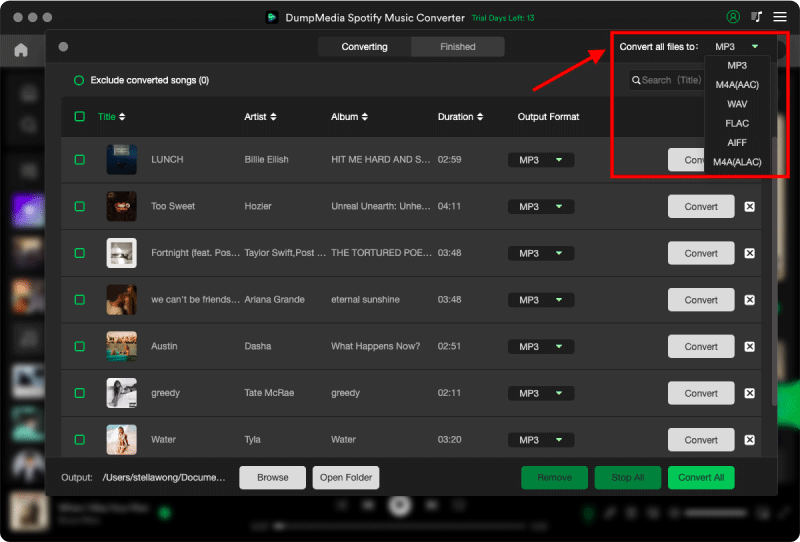
Step 2: Choose Any Format You Desire as The Resulting One
Upon importing and uploading the songs to be converted, the next step would be the selection of the output format. Make sure that you will choose any format you desire among those that you will be seeing on the screen. In this case, we ought to convert the songs to a format that has been generally supported by numerous media players.
You can have the songs converted to MP3 format. You can do this by heading to the “Convert All Tasks To” button located at the top right corner of the screen.
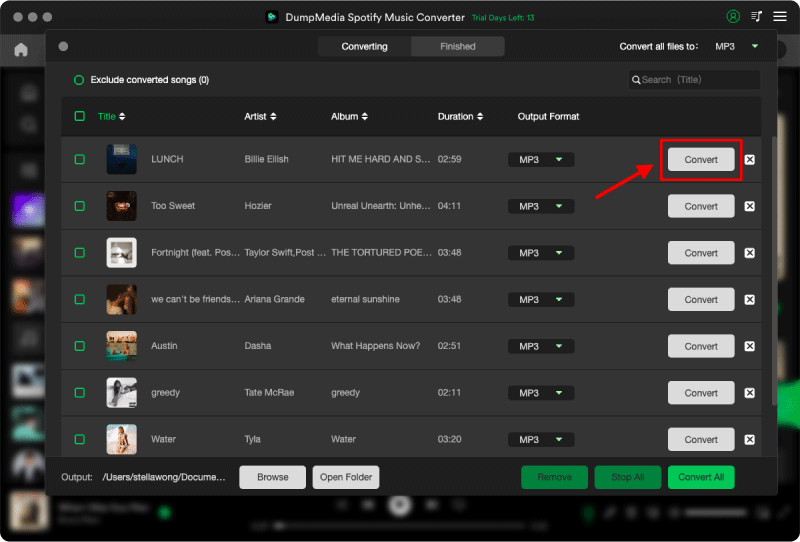
Step 3: Proceed with Conversion By Ticking The Convert Button
The last step would be hitting the “Convert” button to begin the conversion process. This will only take some time since the program is designed to function five times faster than any other converters. While conversion is being done, status bars will be shown on the screen wherein you can monitor the progress of the process for each song.
Once the steps mentioned were performed, you can now enjoy all your favorite Spotify songs to any media players or music players you have. You also are assured that the DRM protection was removed.
In the future and it happens that you are in need to transform the songs to any other format, you can definitely make use of this DumpMedia Spotify Music Converter. The songs are already saved on your local device. Now that, it is time to sync local files from Spotify.
Part 4: To Sum It All
Spotify sync local files was actually difficult before – during the time the guides are not yet available and ready on the web. Through the help of different guides like this post, you can easily learn the procedure of importing the local songs you have on your personal computer.
This article had highlighted the process in case you wanted it to be done on your desktop Spotify application or on your mobile devices and tablets. Apart from this, an additional tip for free users has been explained and shown in this article as well (using software named DumpMedia Spotify Music Converter).
Do you have any additional information and knowledge you wanted to share with others as well? Why not leave your comments in the below section?

30% Off >>>