


2025 Efficient Ways to Play Apple Music on Sony LF-S50G
Listening to music whenever you are on the go or even at home would always be an amazing pastime. During travel, you can have your earphones with you so that you could hear any songs you wanted to alone. At home, at the office, or in any place, you can do the same.
But, what if you wanted to share your favorite songs with a bunch of people? Well, using a smart speaker such as Sony LF-S50G will be a good option, right? This is why in this post, we are going to discuss the ways you can do to be able to play Apple Music on Sony LF-S50G. If you own one, this post will surely help you utilize the device more.
But before delving into that, let us first check out some basic information and ideas about this smart speaker which would be the main focus of this article – the Sony LF-S50G.
Contents Guide Part 1: Things You Need To Know About Sony LF-S50GPart 2: How to Use Google Assistant on Your Sony LF-S50G?Part 3: How to Play Apple Music On Sony LF-S50GPart 4: In Summary
Part 1: Things You Need To Know About Sony LF-S50G
Sony LF-S50G, as the name suggests, is a smart speaker which was created, designed, and introduced by the Sony company to the public. This has been known to function as a great Google home alternative or option which was proven to contain several different features.
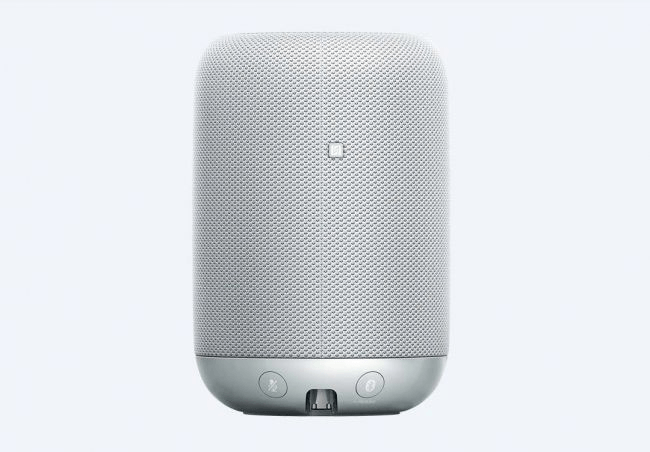
In terms of design, Sony LF-S50G as well stands out among the others. You can have this device either in black or in white color. It is too small with a measurement of 6.4 x 4.3 inches. It can fit any space in your house, in your office, or even in your backpack (if you wanted to bring the device to a certain place wherein you will be using it).
In addition to this, the device can as well show the time as it has an LED display of the current time in front of it. Lights will be shown on the device every time Google Assistant is listening. If you are to look for specific buttons, you will only be seeing one at the bottom which functions as the navigator in case you wanted to mute the device’s microphone. It also features a touch-free gesture control. What is more fascinating about this is that it is truly water resistant.
As initially mentioned, it supports Google Assistant. Since the speaker has two built-in microphones on top of it, Google Assistant is very responsive to commands. Well, one drawback is, same with others, the Sony LF-S50G is not yet capable of making calls.
In terms of audio performance, the mentioned speaker has balance in treble and mass which make the audio sound so good.
Lastly, this speaker is wireless and can easily be set up just by using the Google Home application. The speaker is making use of the WiFi connection. It can also be easily paired with your smartphone for other purposes such as music playing and streaming.
Now that we got an idea of how amazing the features of the Sony LF-S50G are, we will now be heading on the steps you need to accomplish to successfully set up your Sony LF-S50G.
Part 2: How to Use Google Assistant on Your Sony LF-S50G?
To set up the Google Assistant on your Sony LF-S50G, you would need to ensure that you have the Google Home application installed on your smartphone and that the initial settings and steps which will be discussed below would be followed. In addition, an account in Google should also be made to successfully proceed.
- Make sure to turn on your Sony LF-S50G.
- Perform the connection.
- Add music and movie services you wanted to be added.
Now, let us look into these three steps in detail since there are numerous steps to be completed.
Step 1: Make Sure To Turn On Your Sony LF-S50G
Of course, the first thing that you need to do is to make sure that your Sony LF-S50G device has been turned on. Once done, you should as well make sure that the Bluetooth of your smartphone will be turned on as well.
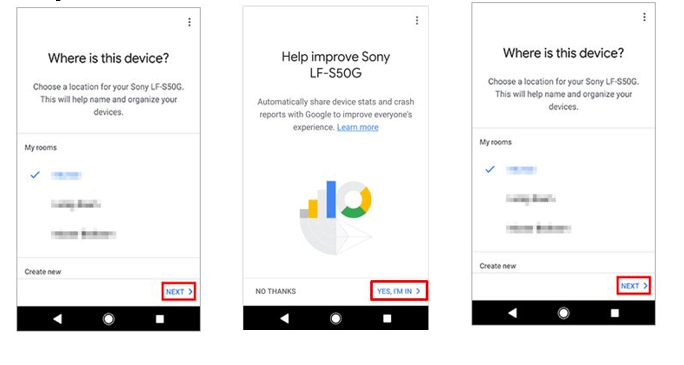
Since you already installed the Google Home application, make sure to touch the camera-like icon on the top right corner of the screen. You will be arriving at a new screen wherein you would need to tap the “Set up ” button under your speaker’s name. When the speaker has been found, the next thing to be done is to tap the “YES ” button.
When you already heard the sound, just make sure to tap the “YES” button to proceed. If it is fine with you to share information about your smartphone status, you can hit the “YES, I’M IN ” button which you will see on the next screen. Now, you would need to select the location of your Sony LF-S50G before clicking the “NEXT ” button.
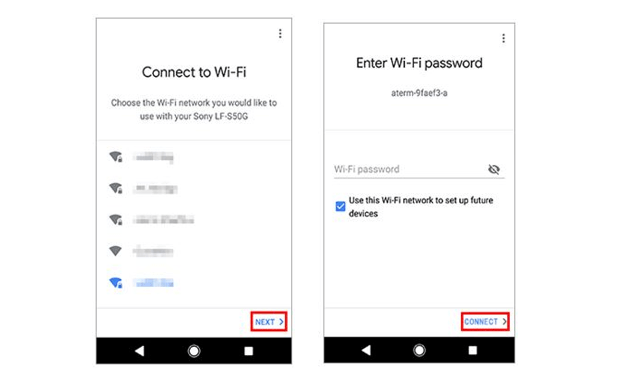
Step 2: Perform The Connection
The next thing would be performing the connection. You can do this by selecting which network to be used. Once chosen, you can just click the “NEXT” button to proceed. You must of course input the correct password and tap the “CONNECT ” button.
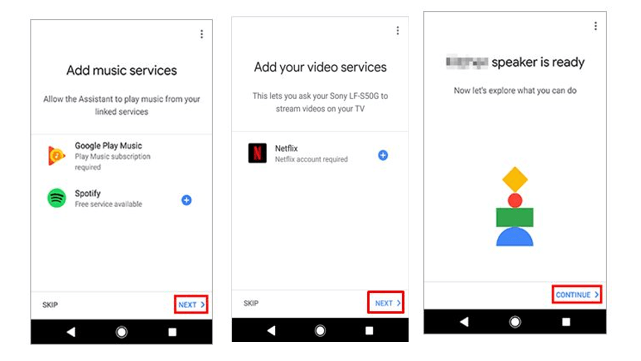
Step 3: Add Music And Movie Services You Wanted To Be Added
The third and last step would be adding music and movie services that you wanted to be added to your device. Once you have selected items, just hit the “NEXT” buttons to continue. The next thing would be choosing the device to operate by voice. Once selected one, just hit “Continue ”. Once done, you will be seeing the third image on your screen.
Upon knowing the steps needed to set up Google Assistant, we will now head to the ways you can use to play Apple Music on your Sony LF-S50G.
Part 3: How to Play Apple Music On Sony LF-S50G
We are to present two ways in this portion of the article. Make sure to keep on reading to know more.
Play Apple Music On Sony LF-S50G Using Bluetooth
To use Bluetooth to play Apple Music songs on your Sony LF-S50G, these are the steps you need to do. Take note that in this case, you are using the Sony LF-S50G as an external speaker. This means that the device will solely function as a speaker making it impossible to use the Google Assistant feature.
- Establish a WiFi connection.
- Perform pairing on the Bluetooth device.
Let us check out the details below.
Step 1: Establish WiFi Connection
The first thing needed to be done is to establish a WiFi connection.
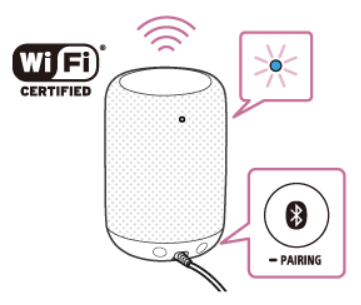
Step 2: Perform Pairing On The Bluetooth Device
Now, what you need to do is to perform the pairing. You must press and hold the “Bluetooth ” button which is located at the bottom portion of your Sony LF-SG50 device. This will place your speaker in Bluetooth pairing mode. Once you have seen numerous names, make sure to choose the name of the speaker.
If there would be a need to enter a passkey, you can just enter “0000 ” to continue. Upon finishing this step, you can now enjoy playing your favorite Apple Music songs using the Bluetooth of your speaker.
Upon finishing the first option, we will now be heading to the second one.
Play Apple Music On Sony LF-S50G Using Google Assistant
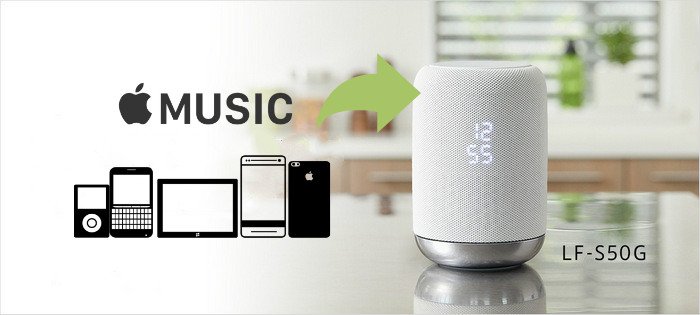
If you have thoroughly read the second part of this post, you will be seeing on one of the images that Apple Music is not included on the list of the music streaming services supported by Sony LF-S50G.
But, you should not worry that much because you can still play your most loved Apple Music songs using the speaker with the help of course of Google Assistant. You can just simply upload any songs you love from Apple Music to your Google Play Music or Spotify application and choose one streaming service to be able to listen to good music.
If you have been using Apple Music for quite some time now, you are surely aware that songs in it are DRM (Digital Rights Management) protection. This only means that it could be impossible to download songs directly from Apple Music and even play those on unauthorized devices. You can easily have this done by using one great third-party software application named DumpMedia Apple Music Converter.
This mentioned tool lets you transform your most loved Apple music songs to MP3 format or any other format you would want. This application was created by DumpMedia. This mentioned has been a creator of great software applications such as video, audio converters, and even video downloaders which you can surely make use of.
It has made its way to be known in the technology industry by innovating and developing awesome applications which will be considered as an option for the answers to the problems of many users nowadays.
Having created not only the mentioned but also developed a Spotify Music Converter and of course, an Apple Music converter which lets one convert his favorite Apple Music songs to many other formats. In addition to that, you do not need to worry about the DRM (Digital Rights Management) protection each file has since these amazing converters can remove those in an instant.
Now, let us take a look at how you can use this DumpMedia Apple Music Converter in downloading and converting Apple Music songs to MP3 format.
Download And Install DumpMedia Apple Music Converter
Of course, we need to ensure that DumpMedia Apple Music Converter has been downloaded and installed on your personal computer. Once installed, open and launch the program. Once the program has been launched, iTunes will also be activated. No need to worry about this just proceed with the process.
Under the “Library ” menu, tick “Music” if you wanted to copy the songs you have. Once done, you will now be seeing all the songs and playlists stored in your iTunes library. To be able to choose the songs to be downloaded and converted, you can either tick the checkboxes right next to each or make use of the search bar to easily find the specific songs you wanted to be downloaded.
Perform Adjustments On The Settings Of The Resulting Output
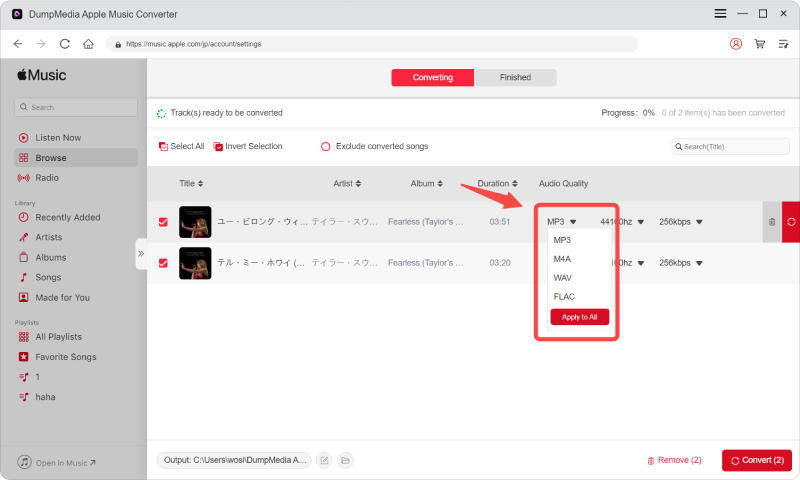
The next step that should be done is to perform the adjustments on the settings of the resulting output. You can choose any format from those that would be listed. The application supports many DRM-free formats including MP3. This as well supports those in AC3, M4A, M4R, AIFF, FLAC, AU, and even MKA format. Selecting MP3 as the format would be the best option for you.
The tool will also allow you to change other options such as the bit rate and sample rate. You can as well perform the renaming of the resulting file. In this step, you would also need to specify the output path or the target location wherein the files will be saved.
Tick The Convert Button To Begin The Process
Upon completing all the adjustments wanted for personalization or customization, the final step would now be the conversion process. You can just hit the “Convert” button which is located at the bottom right corner of the screen.
After a few minutes, your songs will now be converted and finally downloaded. You can now enjoy those files anytime you want to! In addition to this, alongside conversion, DRM protection will also be removed at the same time the file was transformed.
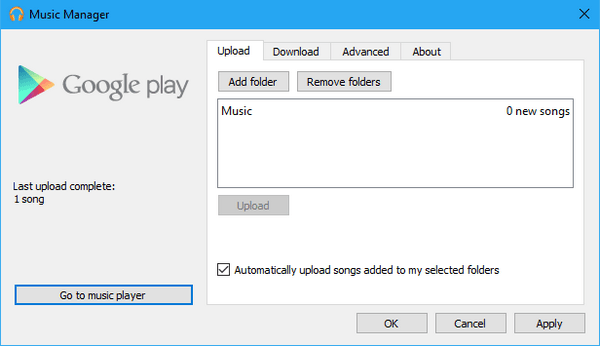
To have the songs easily played on your Sony LF-S50G speaker, you can just upload those to either Google Play Music or Spotify.
Part 4: In Summary
This post discussed the ways you can make use of it to play your most loved Apple music songs using your Sony LF-S50G. You can either utilize its Bluetooth feature. However, the drawback here is that you can only use it as an external speaker which means that you cannot enjoy the capability of using Google Assistant.
Another option shown in this post is the use of a tool such as DumpMedia Apple Music Converter to convert and transform the DRM-protected Apple Music songs to other formats making it possible to be uploaded on Google Play music.
Have you tried any of the options highlighted? Or, did you try using other ways apart from those discussed here? Let us know what your experiences are by sharing them in the below section.

30% Off >>>