


How To Restore Apple Music: 2026 Easy Guide
“I accidentally deleted some of my favorite playlists and I wish to have them recovered, do you know how to restore Apple Music playlists and tracks?”
“I recently bought a new iPhone and when I tried opening my Apple Music account, I noticed that my Apple Music playlists were gone, can you let me know how to restore Apple Music songs that were lost?”
Are the above concerns or questions similar to the ones you are encountering right now? Are you also looking for ways how to restore Apple Music tracks that you are thinking were gone or were lost? Or have you accidentally deleted some playlists before or even if you intended to do so but are now feeling a change of heart?
We got your back. We are here to help you out. We will be discussing the procedure in detail regarding the process of how to restore Apple Music as you jump to the second part of this post.
Contents Guide Part 1. Can I Restore My Apple Music? Part 2. How to Restore Apple Music Library? Part 3. Bonus: How to Keep Apple Music Songs Forever?Part 4. Conclusion
Part 1. Can I Restore My Apple Music?
You must be aware that the Apple Music app is capable of allowing you to save the tracks you wish to download and even videos. But all those downloaded media files will be lost once you sign out of your iTunes or Apple account (then try signing in again) or set up your account on a new device. This happens because the iCloud music library is not enabled by default.
Also, another instance that might cause the disappearance of the Apple Music tracks is when the trial period (for three months) ended or when you, of course, canceled your Apple Music subscription (without renewing within the allotted timeline of 30 days).
So once the Apple Music songs are gone, can you still have them restored? Well, you are lucky because the answer to this question is a “YES”. You just have to know how to restore Apple Music tracks and playlists correctly to proceed. And, that is what we will be tackling in the second section of this article.
We are just getting started so don’t leave yet and find out how to restore Apple Music tracks with ease.
Part 2. How to Restore Apple Music Library?
As promised, in this section, you will know how to restore Apple Music tracks easily. We have here the procedure in case you are using an iPhone, an iPad, a Mac computer, or a Windows personal computer. We’ll discuss the steps in this part of the post.
How To Restore Apple Music Using Your iPhone Or iPad
If you are using a handy device such as an iPhone or an iPad, you can follow the below procedure to finally restore the Apple Music tracks that were gone or went missing without you noticing it.
Step #1. On your handy device, go ahead and look for the “Settings” icon. Tick on it and then scroll down until you see the “Music” menu.
Step #2. Once the “Music” icon has been ticked, you have to enable the “iCloud Music Library”. There is a slider next to it. Toggle this slider to switch it on. The green color indicates that the process has been successful.
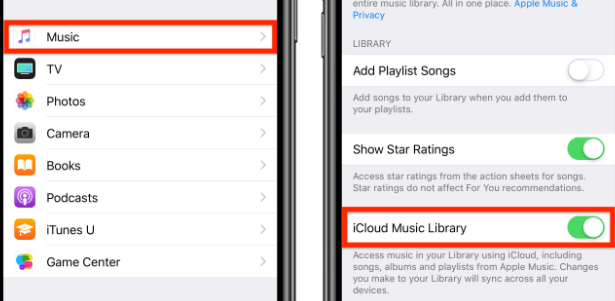
Take note that it might take a few minutes before the Apple Music songs are restored and shown again in the “Music” app.
How To Restore Apple Music Using Your Mac Computer
If in case you experience this issue on your Mac PC. Here is how to restore Apple Music tracks easily.
Step #1. On your Mac PC, open the iTunes app.
Step #2. Tick on the “iTunes” button that you will see right away at the top area of the screen. Afterward, click “Preferences”.
Step #3. In the “General” tab, you’ll immediately see that there is a checkbox next to the “iCloud Music Library” ensuring that the iCloud Music Library has been turned on.

Again, wait for some time until the media files or tracks re-appear on your iTunes app.
How To Restore Apple Music Using Your Windows Computer
If you are using a Windows PC, here is the procedure of how to restore Apple Music.
Step #1. On your Windows PC, launch and open the iTunes app.
Step #2. From the menu bar that is at the top portion of the screen, choose “Edit” and then select the “Preferences” button.
Step #3. The same as the previous process (on Mac), just simply tick the “General” tab and then select “iCloud Music Library” to have it turned on. You have to take note that this option won’t occur if you haven’t subscribed to either Apple Music or iTunes Match.
Step #4. Finally, click the “OK” button.
Now, after reading this section, you surely already know how to restore Apple Music. As you go and read the third part of this article, you’ll learn how you can keep any Apple songs that you love forever. By using the tool to be presented in the next part, you’ll avoid worrying about any other issues with your Apple Music application.
Part 3. Bonus: How to Keep Apple Music Songs Forever?
Keeping your favorite Apple Music tracks might be difficult for some since Apple Music songs are protected by Apple FairPlay’s DRM protection. You can’t have the tracks downloaded, saved, transferred, or played on any unauthorized device.
With the help of this DumpMedia Apple Music Converter, you can have the DRM encryption removed. It can support the transformation of the Apple Music tracks to any output format you desire (as it has a lot of output formats supported) and finally, have them downloaded to your personal computer.
It has a fast speed, 10x faster than the usual apps, for both processed – conversion and downloading. The quality of the files won’t be at risk as well as it will be maintained at a 100% level. More than this, the ID tags will also be kept.
In case you love listening to audiobook converters, you can also use this professional application to convert the audiobook files that you have. This app is also easy to use and has an interface that can easily be understood by everyone. Regarding the installation requirements, there are only a few things that you must check and accomplish.
To give you a preview, we have also listed the steps that you must follow for you to keep your favorite Apple songs with you forever.
Here is how it’s done.
Step #1. Follow the installation procedure (have the installation needs completed) and launch the app afterward. Select the Apple Music songs that you wish to convert and download.

Step #2. In this step, you can now choose the output format you want to use. Also, when it comes to the output settings, you can customize it the way you want it to be. Added to this, you can also input an output path to easily locate where the converted files are after the conversion process.
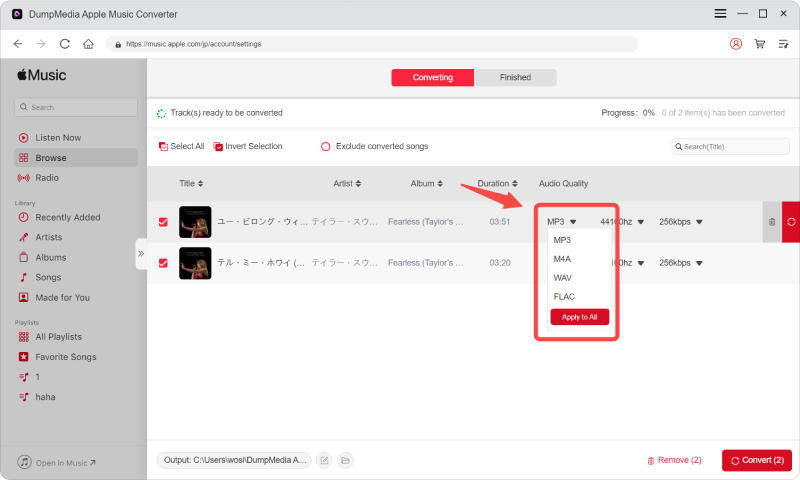
Step #3. This conversion of files will only take minutes and the transformed ones will be readily available right away. Alongside conversion, the removal of the DRM encryption will also be done by the app.

As simple as that, you can have the non-DRM and converted Apple Music songs saved on your PC. You can transfer the songs to any device and have them played even on any media player that you want.
Part 4. Conclusion
Finally, you now know how to restore Apple Music with ease. Just by following all the procedures stated in the second part of this article, you can have it done right away. Additionally, to avoid encountering any issues while streaming via your Apple Music app, you can just have all the tracks and playlists you love downloaded to your PC and play them offline. Do this through the help of apps like DumpMedia Apple Music Converter.

30% Off >>>