


Apple Music Songs Greyed Out? 2026 Fixes Here
Many Apple Music users suddenly find that their songs are greyed out and cannot be played, even though they were downloaded before. This issue can be frustrating, especially when you are sure your subscription is active and your internet connection is stable.
In fact, Apple Music songs greyed out is a very common problem and usually indicates that Apple can no longer verify the usage rights of those tracks. In this article, we will explain what it means when Apple Music songs are greyed out, why it happens, how to fix it temporarily, and how to prevent it from happening again.
Contents Guide Part 1: Why Are Some of My Songs on Apple Music Greyed Out?Part 2: How to Fix Apple Music Songs Greyed Out [On Computer]Part 3: How to Fix Apple Music Songs Greyed Out [On Mobile Devices]Part 4: Best Way to Prevent Apple Music Songs Greyed Out PermanentlyPart 5: Summary
Part 1: Why Are Some of My Songs on Apple Music Greyed Out?
When Apple Music songs are greyed out, it means the tracks are currently unavailable for playback on your device. Although they may still appear in your library, Apple Music has restricted access to them.
In most cases, this does not mean the files are missing. Instead, it means Apple Music cannot authorize those songs due to licensing, account, or DRM-related issues. This is why Apple Music songs greyed out often occur after updates, subscription changes, or device switches.

There are several reasons why Apple Music songs greyed out may occur:
First, Apple Music uses DRM protection, which ties downloaded songs to your Apple ID, subscription status, and region. If any of these conditions change, Apple Music may temporarily or permanently disable access to the tracks.
Second, syncing problems between devices can also trigger this issue. If iCloud Music Library fails to sync properly, Apple Music may mark some songs as unavailable.
Third, subscription-related changes, such as expiration, renewal errors, or switching Apple IDs, can cause Apple Music songs to grey out even if the songs were downloaded previously.
These reasons explain why the issue often reappears even after users successfully fix it once.
Part 2: How to Fix Apple Music Songs Greyed Out [On Computer]
In this portion, as previously mentioned, we will share with you the basic fixes that you can try to apply to fix the “Apple Music songs greyed out” concern on your computer. Again, these are common solutions that could possibly work on some users but aren’t effective on others. In any case, it would still be your decision if you wish to check and try them out.
Solution #1. Check your Network Connection or Settings
As mentioned, there could possibly be an issue with your internet connection not being stable enough. Try to restart your Wi-Fi network or reconnect your devices. You can also check if you can stream the tracks via your mobile data connection to see if the issue lies on your Wi-Fi network.
Solution #2. Try Syncing your Apple Music Library to Other Devices
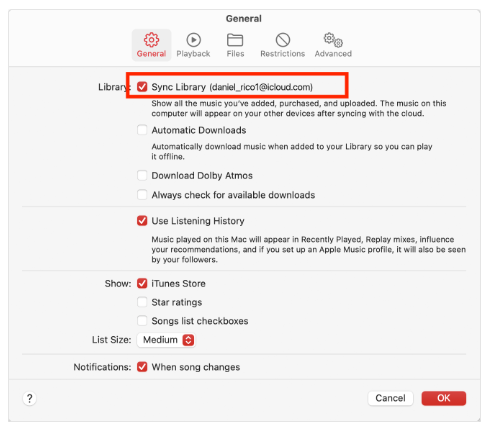
Using your Mac
Step #1. Launch Apple Music on your Mac.
Step #2. In the menu bar, tap the “Music” button before choosing “Preferences”.
Step #3. Under the “General” tab, ensure that the “Sync Library” checkbox has been ticked off.
Step #4. Lastly, tap the “OK” button to save the settings.
Using your Windows PC
Step #1. Launch the iTunes app.
Step #2. Tap the “Edit” button under the menu bar before hitting the button for “Preferences”.
Step #3. Under the “General” tab, you shall see the “Sync Library” option. Put a checkmark in its box.
Step #4. Confirm the changes made by clicking the “OK” button.
Solution #3. Try Re-Authorizing your Computer
Another solution to fix this “Apple Music songs greyed out” issue is to try re-authorizing one’s computer. This can be done by following the below guide.
Step #1. On your iTunes app, hit the “Store” that is at the menu bar.
Step #2. Once the drop-down list has been displayed, choose the “Deauthorize This Computer” option and just log out of your iTunes account.
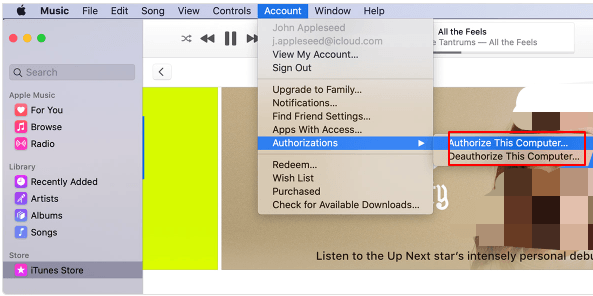
Step #3. Restart your PC. Once opened again, head to iTunes, choose “Store”, and then just tap the “Authorize This Computer” option.
Solution #4. Contact the Apple Music Customer Support Team
If after trying all the basic solutions you could think of when it comes to this “Apple Music songs greyed out” issue, and yet, the problem is still there, you can also seek assistance from the Apple Music customer support team. They should be able to help you address the concern. It is just that sometimes, the turnaround time isn’t as quick as you expect as there could probably be other concerns that are being addressed by the team. Nevertheless, they should be able to get back to you with an answer.
Part 3: How to Fix Apple Music Songs Greyed Out [On Mobile Devices]
If your Apple Music songs are greyed out on your mobile device, it could mean that the songs are protected by digital rights management (DRM). DRM is a way to copy-protect digital media files so that they can only be played on authorized devices.
In order to fix this issue, you will need to download the songs to your computer and transfer them to your mobile device using a third-party application, such as iTunes or music conversion software. Alternatively, if the songs are not DRM-protected, you may need to contact Apple Support for further assistance. However, there are still methods that you could try.
Solution #1. Try Syncing your Apple Music Library to Other Devices
Using your iPhone or iPad
Step #1. Head to “Settings” and scroll down until you see “Music”.
Step #2. Ensure that the “Sync Library” option has been enabled.
Solution #2. Sign out and sign in to Apple Music
Go to Settings > tap [your account] > tap iTunes & App Store > tap your ID > tap Sign Out. Then sign in after 10-20 seconds. This may help refresh your music sync.
Solution #3. Check sync settings
If you subscribe to Apple Music or iTunes Match, make sure you have the Sync Library option enabled on your iPhone.
On your iPhone: Go to Settings > tap Music > Turn on Sync Library.
In iTunes, click Edit > choose Settings > choose General > select iCloud Music Library.
Solution #4. Check song format
If iTunes songs are grayed out, you should check if they are DRM-protected. In iTunes, select the grayed-out song > right-click it, and select Get Info > Check Out Kind under the File tab. If "Protected" appears next to the type, it means the song is DRM-protected or unsupported. In this case, you can subscribe to iTunes Match or Apple Music to enjoy the music.
Part 4: Best Way to Prevent Apple Music Songs Greyed Out Permanently
If you want to avoid seeing Apple Music songs greyed out again in the future, the most reliable solution is to remove Apple Music’s DRM restrictions and store your music locally. DumpMedia Apple Music Converter allows you to convert Apple Music songs, albums, and playlists into standard MP3, M4A, or other common audio formats for personal use. Once converted, the songs are no longer dependent on Apple Music authorization, subscriptions, or region checks.
Converted files remain playable permanently on any device and will never become greyed out again. This makes DumpMedia an ideal solution for users who want long-term access to their Apple Music library without worrying about DRM-related playback issues.
How to Use DumpMedia Apple Music Converter
Step #1. Once all the installation requirements are met, install the app on your PC and launch it. Once this has been up and running, you may start by previewing and selecting the Apple Music songs to be converted and processed. Choosing a bunch will work since this app does the batch conversion.

Step #2. Choose an output format you like to use. There are several formats supported by the app. Select the one that suits your needs and preference. Using MP3 will always be the recommendation as this is supported by almost all devices. Other output parameter settings can also be changed as you wish.
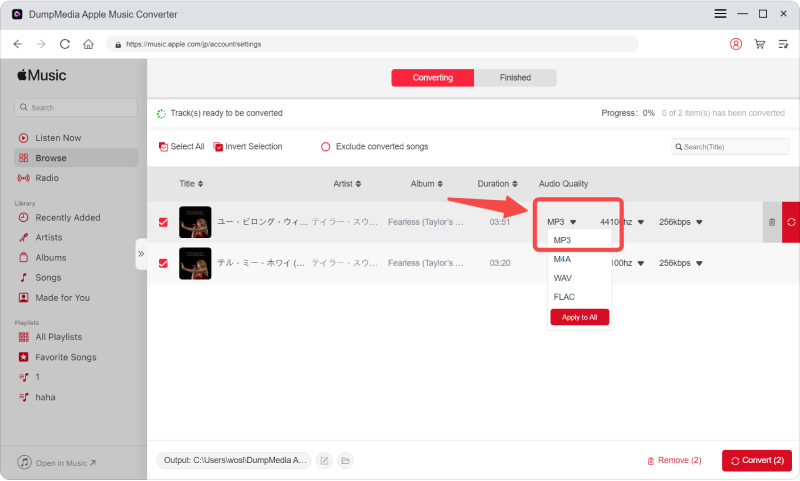
Step #3. Navigate to the bottom of the page and click on the "Convert" button, and the program will do the rest. Once completed, the converted files are saved locally and can be transferred freely to other devices. These files are not affected by Apple Music updates, account changes, or subscription expiration.
Part 5: Summary
Hopefully, you are no longer worried about this “Apple Music songs greyed out” issue. Though there are various common solutions that you can apply, it will still be best if you are to rely on professional tools like the DumpMedia Apple Music Converter. Downloading the songs will always be the best resort to avoid issues from happening over again.

30% Off >>>